Examples of Automation X-SEL Serial Communication 2 - IGAS
Examples of Automation X-SEL Serial Communication 2 - IGAS
Examples of Automation X-SEL Serial Communication 2 - IGAS

You also want an ePaper? Increase the reach of your titles
YUMPU automatically turns print PDFs into web optimized ePapers that Google loves.
)<br />
c)<br />
d)<br />
e)<br />
f)<br />
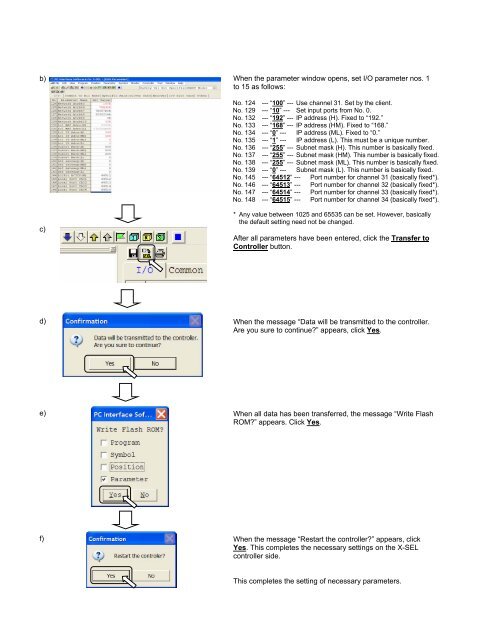
When the parameter window opens, set I/O parameter nos. 1<br />
to 15 as follows:<br />
No. 124 --- “100” --- Use channel 31. Set by the client.<br />
No. 129 --- “10” --- Set input ports from No. 0.<br />
No. 132 --- “192” --- IP address (H). Fixed to “192.”<br />
No. 133 --- “168” --- IP address (HM). Fixed to “168.”<br />
No. 134 --- “0” --- IP address (ML). Fixed to “0.”<br />
No. 135 --- “1” --- IP address (L). This must be a unique number.<br />
No. 136 --- “255” --- Subnet mask (H). This number is basically fixed.<br />
No. 137 --- “255” --- Subnet mask (HM). This number is basically fixed.<br />
No. 138 --- “255” --- Subnet mask (ML). This number is basically fixed.<br />
No. 139 --- “0” --- Subnet mask (L). This number is basically fixed.<br />
No. 145 --- “64512” --- Port number for channel 31 (basically fixed*).<br />
No. 146 --- “64513” --- Port number for channel 32 (basically fixed*).<br />
No. 147 --- “64514” --- Port number for channel 33 (basically fixed*).<br />
No. 148 --- “64515” --- Port number for channel 34 (basically fixed*).<br />
* Any value between 1025 and 65535 can be set. However, basically<br />
the default setting need not be changed.<br />
After all parameters have been entered, click the Transfer to<br />
Controller button.<br />
When the message “Data will be transmitted to the controller.<br />
Are you sure to continue?” appears, click Yes.<br />
When all data has been transferred, the message “Write Flash<br />
ROM?” appears. Click Yes.<br />
When the message “Restart the controller?” appears, click<br />
Yes. This completes the necessary settings on the X-<strong>SEL</strong><br />
controller side.<br />
This completes the setting <strong>of</strong> necessary parameters.