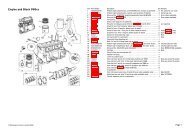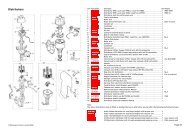
Distributors - Carburetter Models
Distributors - Carburetter Models
Distributors - Carburetter Models

You also want an ePaper? Increase the reach of your titles
YUMPU automatically turns print PDFs into web optimized ePapers that Google loves.
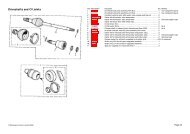
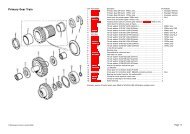
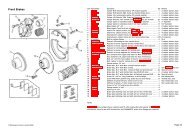
Dynamo and Alternator Mountings<br />
No. Part No. Description Qty. Remarks No. Part No. Description Qty. Remarks<br />
Dynamo Mountings<br />
1 12A526 BRACKET, dynamo mounting, rear 1<br />
2 SH605061 SCREW, bracket to engine 2<br />
3 LWZ305 WASHER, locking 2<br />
4 SH605101 SCREW, dynamo to bracket 1<br />
5 PWZ305 WASHER, plain 2<br />
6 GHF222 NUT, nyloc 1<br />
7 BH605141 BOLT, dynamo to water pump 1 Not Cooper S 1963-69.<br />
SH605151 SCREW, dynamo to water pump 1 Cooper S 1963-69.<br />
8 PWZ305 WASHER, plain 2<br />
9 LNZ205 NUT, nyloc 1<br />
10 2A128 PILLAR, adjusting link 1 850cc and 1000cc to 1969; Cooper<br />
models except S, 1961-63.<br />
12G289 PILLAR, adjusting link 1 Cooper models except S, 1963-69;<br />
all models except Cooper S , 1969 on.<br />
AEG182 PILLAR, adjusting link 1 Cooper S models .<br />
11 FNZ106 NUT, pillar to engine bearer plate 1<br />
12 LWZ306 WASHER, locking 1<br />
13 12H67 LINK, adjustment 1 All 850cc models; 1000cc models up<br />
to 1969.<br />
2A497 LINK, adjustment 1 Cooper S models up to 1969; 1000cc<br />
models 1969 on.<br />
12G2193 LINK, adjustment 1 Cooper S models 1969 on; 1275GT<br />
models.<br />
14 GHF223 NUT, nyloc, link to pillar 1<br />
15 PWZ106 WASHER, plain 1 Not Cooper S models.<br />
1B8806 WASHER, plain 1 Cooper S models.<br />
16 SH505091 SCREW, link to dynamo 1 Not Cooper S models.<br />
SH505121 SCREW, link to dynamo 1 Cooper S models.<br />
17 LWZ305 WASHER, locking 1<br />
Alternator Mountings<br />
1959-80 (A Series Engine)<br />
18 12G1053 BRACKET, rear 1<br />
19 SH605071 SCREW, bracket to engine 2<br />
20 LWZ305 WASHER, locking 2<br />
21 SH605121 SCREW, alternator to rear bracket 1<br />
22 PWZ305 WASHER, plain 2<br />
23 GHF222 NUT, nyloc 1<br />
24 BH605141 BOLT, alternator to water pump 1<br />
25 PWZ305 WASHER, plain 2<br />
26 GHF222 NUT, nyloc 1<br />
27 2A128 PILLAR, adjusting link 1 850 and 1000cc models , 1959-69.<br />
12G289 PILLAR, adjusting link 1 850 and 1000cc models, 1969-80;<br />
1275 GT.<br />
12G1582 PILLAR, adjusting link 1 Cooper S, 1963-69.<br />
AEG182 PILLAR, adjusting link 1 Cooper S 1969 on.<br />
28 FNZ106 NUT, pillar to engine bearer plate 1<br />
29 LWZ306 WASHER, locking 1<br />
30 12G2193 LINK, adjustment 1 1959-69.<br />
12G2627 LINK, adjustment 1 1969-80.<br />
31 GHF223 NUT, nyloc, link to pillar 1<br />
32 PWZ106 WASHER, plain 1<br />
33 SH505051 SCREW, link to alternator 1<br />
34 LWZ305 WASHER, locking 1<br />
52 PWZ106 WASHER, plain 1 1980-85.<br />
53 SH606111 SCREW, link to engine bearer plate 1 1985-96.<br />
54 PWZ106 WASHER, plain 1 1985-96.<br />
55 TAM1645 DISTANCE PIECE, link 2 1985-96.<br />
56 FNZ106 NUT, securing screw to 1 1985-96.<br />
engine bearer plate<br />
57 FNZ106 NUT, securing link to screw 1 1985-96.<br />
58 LWZ506 WASHER, shakeproof 1 1985-96.<br />
59 SH505051 SCREW, link to alternator 1 UNC thread; 1980.<br />
SH108181 SCREW, link to alternator 1 Metric thread; 1980-96.<br />
If your alternator has a stepped black plastic cover on the back,it is a 16ACR or 17ACR alternator and<br />
takes a UNC threaded screw. If the alternator has a flat plastic cover on the back with a small canshaped<br />
capacitor screwed to it, it will be an A115/45 alternator and will take a metric screw.<br />
60 LWZ305 WASHER, locking 1 1980<br />
GHF382 WASHER, locking 1 1980-96.<br />
YLU101920 BRACKET, alternator 1 Air conditioned models.<br />
YLU101930 BRACKET, adjustment 1 Air conditioned models.<br />
YLR100120 COVER, alternator fan 1 Air conditioned models.<br />
YKQ100030 FINGER GUARD,alternator fan 1 Air conditioned models.<br />
1997 On (A Series K70, K71 and K72 Type Engine)<br />
61 YLU102500 BRACKET, upper 1 Not air conditioned models .<br />
62 YLL100100 DOWEL RING , upper bracket 1 Not air conditioned models .<br />
63 FS108207 SCREW, upper bracket to engine 3 Not air conditioned models .<br />
64 FB108241 BOLT, securing alternator 2 Not air conditioned models .<br />
65 YLU102340 BRACKET, alternator and air conditioning 1 Air conditioned models.<br />
66 FS108207 SCREW, alternator and air conditioning 4 Air conditioned models.<br />
bracket to engine<br />
67 FS108207 SCREW, securing alternator 1 Air conditioned models.<br />
68 PQM100120 STUD, hexagonal, securing alternator 1 Air conditioned models.<br />
69 FN108047 NUT,alternator to stud 1 Air conditioned models.<br />
70 PRF100000 FINGER GUARD, drive belt 1<br />
71 FN108047 NUT, securing finger guard 1<br />
Adjusting the Fan Belt<br />
However tempting it may be, do not use a jack handle to lever out the dynamo/alternator on its<br />
mountings to tension a loose, squealing fan belt! Over-tensioning the fan belt will lead to damaging the<br />
bearings on the dynamo/alternator, damaging the water pump bearing (sometimes both together),or<br />
breaking one of the mounting brackets - resulting in a frustrating hunt for a new bracket if yours is one<br />
of the earlier or rarer types.<br />
A fan belt should be capable of being tensioned by hand, only maybe using a pr y such as a long<br />
handled screwdriver to hold the dynamo or alternator with the fan belt in tension while the mounting<br />
nuts and bolts are tightened. If you can’t tension the fan belt by hand, it is either worn or stretched, or<br />
you don’t have the correct one for your car.<br />
If you are in any doubt about fan belt condition, replace it with a new one - given the expensive<br />
damage that may be caused by a worn or broken fan belt, it would be cheaper in the long run.<br />
Checking a Dynamo Circuit for Faults<br />
If you know you have a charging problem but you’re not sure what’s causing it, first check the fan belt<br />
tension and battery condition - man y dynamos have been needlessly replaced over the years because the<br />
former isn’t driving the dynamo correctly or the latter is in such poor condition that it is no longer fully<br />
capable of completing the charging circuit.<br />
1980-96 (A+ Series Engine)<br />
35 CAM4853 BRACKET, rear 1<br />
36 SH605071 SCREW, bracket to engine 2<br />
37 LWZ305 WASHER, locking 2<br />
38 SH605121 SCREW, alternator to rear bracket 1<br />
39 PWZ305 WASHER, plain 2<br />
40 LWZ305 WASHER, locking 1<br />
41 FNZ105 NUT 1<br />
42 BH605141 BOLT, alternator to water pump 1<br />
43 PWZ305 WASHER, plain 2<br />
44 LWZ305 WASHER, locking 1<br />
45 FNZ105 NUT 1<br />
46 12G2627 LINK, adjustment 1<br />
47 SH606161 SCREW, link to engine bearer plate 1 1980-85.<br />
48 LWZ506 WASHER, shakeproof 1 1980-85.<br />
49 CAM6508 SLEEVE, screw to engine bearer plate 1 1980-85.<br />
50 FNZ106 NUT, securing link to screw 1 1980-85.<br />
51 LWZ206 WASHER, locking 1 1980-85.<br />
Next, using a multimeter check the wiring and the condition of the wiring connectors - you should check<br />
the brown and yellow wire running between the large spade connector on the dynamo and the D<br />
terminal on the control box, and the brown and green wire running between the small spade connector<br />
on the dynamo and the F terminal on the control box. Again, faults actually caused by poor wiring or<br />
terminal connections have caused the unnecessary replacement of dynamos in the past.<br />
Having made sure all electrical equipment in the car is turned off, disconnect the wires from the back of<br />
the dynamo and tape up their connectors to prevent a short circuit. Then connect a length of wire<br />
between the two terminals on the dynamo. Start the engine and allow to idle. Connect a 0-20V moving<br />
coil voltmeter to a good earth on the engine and to one of the dynamo terminals (be sure to connect<br />
the voltmeter the right way round with reference to the car’s polarity).<br />
Gently increasing the engine speed, check the voltmeter reading rises smoothly. If the highest reading is<br />
still low (from 0-5V approx.), the dynamo is at fault. Don’t race the engine in the hope of getting a few<br />
more volts on the meter! If the reading is stuck at zero, it may be the dynamo just needs new brushes .<br />
If all the checks and tests so far have had good results, then the control box is the faulty component in<br />
your charging circuit.<br />
Tel. 01249 721421 Fax. 01249 721316 www.somerford-mini.co.uk<br />
9