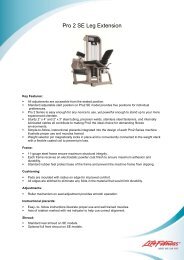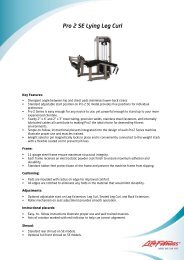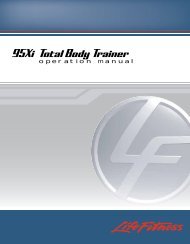
View User Manual - Life Fitness
View User Manual - Life Fitness
View User Manual - Life Fitness

Create successful ePaper yourself
Turn your PDF publications into a flip-book with our unique Google optimized e-Paper software.
Frequency Tuning: Opens the Frequency Tuning window. Allows channel scanning through all available frequencies<br />
beginning at 45 MHZ. Begin a scan by selecting Start. Scroll through found channels using the Channel Up and<br />
Down arrow keys on the screen.<br />
Channels can be fine tuned using the arrow keys located below the Frequency Tuning Start button. Use the Channel<br />
Up and Down arrow keys to select a channel to fine tune. Press the Fine Tuning arrow keys to adjust the frequency<br />
for the best possible picture.<br />
Select OK to accept channels.<br />
TV CHANNEL FAVORITES<br />
Opens the Favorite Channel configuration screen. Up to 9 favorite channels can be stored for quick access during a<br />
workout. This feature may be enabled or disabled.<br />
NOTE: Setting channels using the auto channel setup procedure, as instructed in TV SETUP, is recommended before<br />
attempting to setup favorite channels.<br />
To Set Up a Favorite Channel: Select (touch) the ENABLE radial button, select the radial button next to the input slot<br />
desired, select Enter Name, input the channel name using the keyboard display, select OK to accept the channel<br />
name, select the desired channel using the Up or Down ARROW Keys. Continue as desired to set up to 9 favorite<br />
channels. Select OK to set the channels to memory.<br />
TV CHANNEL NAME/SORT<br />
Opens the Channel Name / Sort configuration screen. Allows the facility manager to customize the TV channel list order. This<br />
feature may be enabled or disabled.<br />
NOTE: Setting channels using the auto channel setup procedure, as instructed in TV SETUP, is recommended before attempting<br />
to setup favorite channels.<br />
Validation: The validation checkbox enables or disables viewing of the channel in the list. Select the checkbox to<br />
enable the channel. If Channel Name / Sort and Channel Favorites are both enabled, channels not marked as valid<br />
(enabled) in Channel Name / Sort will be removed from Channel Favorites.<br />
Channel Swap: To swap channels within the channel listing, select Channel Swap. Select the radio button next to<br />
the desired channel. The Channel Swap window will appear showing the channel selected for swapping. Use the Up<br />
or Down arrow keys to select the second channel to swap with the previous channel. Select the swap button to preview<br />
the channel swap information. Press OK to confirm the channel swap or CANCEL to exit without swapping<br />
channels.<br />
PROMO CHANNEL SETUP<br />
Opens the Promo Channel Setup screen. If enabled, one existing input channel can be selected to be a dedicated channel<br />
for internal promotional broadcast use. Select the Channel Change button to scroll up or down to the desired channel.<br />
ADVANCED PROMO CHANNEL SETTINGS<br />
When Promo Channel is enabled, the option becomes available to choose how Promo Channel may be configured when<br />
viewed in the attract screen.<br />
If “Promo Channel Only” is selected, only the channel selected as the Promo Channel is available for display in the<br />
attract screen.<br />
If “Allow <strong>User</strong> to Change Channel” is selected, users may change the channel displayed in the attract screen using<br />
the CHANNEL UP or DOWN arrow keys.<br />
Within this option, the number of minutes before the TV display returns to the Promo Channel is set. Whether or not<br />
the unit starts up with the Promo Channel displayed can also be configured.<br />
If “Start with Promo Channel” is not selected, the unit will startup and display the last channel selected by the user.<br />
FM RADIO SETUP<br />
Opens the FM Radio Setup screen allowing FM channel setup. This feature may be enabled or disabled.<br />
To Set Up Channels: Select Channel Setup; Auto, Start.<br />
To Delete an Unwanted Channel: Choose Channel Setup; <strong>Manual</strong>, use the Channel Controls to choose the channel<br />
to be deleted, select delete, return the Channel Setup to Auto.<br />
To Restore a Channel: Choose Channel Setup; <strong>Manual</strong>, use the Channel Controls to choose the channel to be<br />
restored, select Add, return the Channel Setup to Auto.<br />
37