1.0 - SATA-IO
1.0 - SATA-IO
1.0 - SATA-IO

Create successful ePaper yourself
Turn your PDF publications into a flip-book with our unique Google optimized e-Paper software.
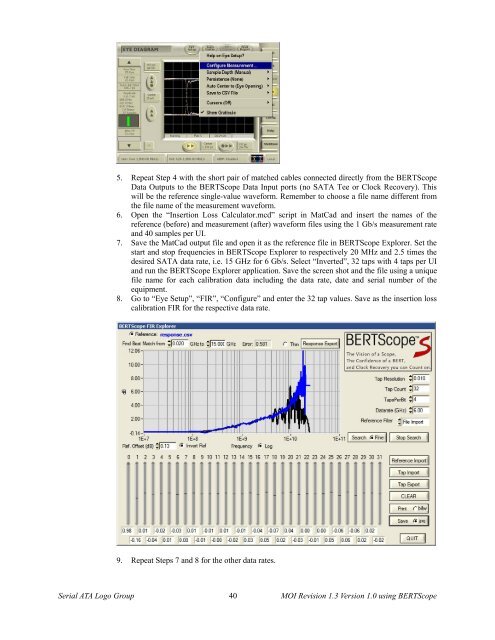
5. Repeat Step 4 with the short pair of matched cables connected directly from the BERTScope<br />
Data Outputs to the BERTScope Data Input ports (no <strong>SATA</strong> Tee or Clock Recovery). This<br />
will be the reference single-value waveform. Remember to choose a file name different from<br />
the file name of the measurement waveform.<br />
6. Open the “Insertion Loss Calculator.mcd” script in MatCad and insert the names of the<br />
reference (before) and measurement (after) waveform files using the 1 Gb/s measurement rate<br />
and 40 samples per UI.<br />
7. Save the MatCad output file and open it as the reference file in BERTScope Explorer. Set the<br />
start and stop frequencies in BERTScope Explorer to respectively 20 MHz and 2.5 times the<br />
desired <strong>SATA</strong> data rate, i.e. 15 GHz for 6 Gb/s. Select “Inverted”, 32 taps with 4 taps per UI<br />
and run the BERTScope Explorer application. Save the screen shot and the file using a unique<br />
file name for each calibration data including the data rate, date and serial number of the<br />
equipment.<br />
8. Go to “Eye Setup”, “FIR”, “Configure” and enter the 32 tap values. Save as the insertion loss<br />
calibration FIR for the respective data rate.<br />
9. Repeat Steps 7 and 8 for the other data rates.<br />
Serial ATA Logo Group 40 MOI Revision 1.3 Version <strong>1.0</strong> using BERTScope