hp scanjet 7400c series scanner setup and ... - Hewlett Packard
hp scanjet 7400c series scanner setup and ... - Hewlett Packard
hp scanjet 7400c series scanner setup and ... - Hewlett Packard

You also want an ePaper? Increase the reach of your titles
YUMPU automatically turns print PDFs into web optimized ePapers that Google loves.
<strong>hp</strong> <strong>scanjet</strong> <strong>7400c</strong> <strong>series</strong> <strong>scanner</strong><br />
<strong>setup</strong> <strong>and</strong> support guide
2<br />
Copyright information<br />
© Copyright <strong>Hewlett</strong>-<strong>Packard</strong> Company<br />
2000<br />
All rights reserved. Reproduction,<br />
adaptation, or translation without prior<br />
written permission is prohibited, except as<br />
allowed under copyright laws.<br />
Trademark credits<br />
Adobe, Adobe Photoshop, <strong>and</strong> Acrobat are<br />
trademarks of Adobe Systems Incorporated.<br />
Energy Star ® is a U.S. registered service<br />
mark of the United States Environmental<br />
Protection Agency. Microsoft <strong>and</strong> Hotmail<br />
are U.S. registered trademarks of Microsoft<br />
Corporation.<br />
All other products mentioned herein may be<br />
trademarks of their respective companies.<br />
Warranty<br />
The information contained in this document<br />
is subject to change without notice.<br />
<strong>Hewlett</strong>-<strong>Packard</strong> makes no warranty of any<br />
kind with respect to this information.<br />
HEWLETT-PACKARD SPECIFICALLY<br />
DISCLAIMS THE IMPLIED WARRANTY OF<br />
MERCHANTABILITY AND FITNESS FOR A<br />
PARTICULAR PURPOSE.<br />
<strong>Hewlett</strong>-<strong>Packard</strong> shall not be liable for any<br />
direct, indirect, incidental, consequential, or<br />
other damage alleged in connection with the<br />
furnishing or use of this information.<br />
NOTICE TO U.S. GOVERNMENT<br />
USERS: RESTRICTED RIGHTS<br />
COMMERCIAL COMPUTER SOFTWARE:<br />
“Use, duplication, or disclosure by the<br />
Government is subject to restrictions as set<br />
forth in subparagraph (c) (1) (ii) of the Rights<br />
in Technical Data Clause at DFARS 52.227-<br />
7013.”<br />
Material scanned by this product may be<br />
protected by governmental laws <strong>and</strong> other<br />
regulations, such as copyright laws. The<br />
customer is solely responsible for complying<br />
with all such laws <strong>and</strong> regulations.
1 Installing<br />
<strong>and</strong><br />
troubleshooting<br />
This section provides information for installing the <strong>scanner</strong> <strong>and</strong> resolving issues that<br />
might occur during installation. For usage problems after installation, see the user’s<br />
manual.<br />
Installing the <strong>scanner</strong> <strong>and</strong> accessories<br />
Before you begin<br />
● Ensure you have a USB connection or SCSI card properly installed in your<br />
computer. If you choose to use SCSI, you will need a SCSI cable.<br />
● Locate the Macintosh CD package.<br />
3
4 Installing <strong>and</strong> troubleshooting<br />
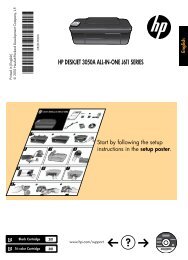
1. Check the box contents<br />
ADF<br />
XPA<br />
HP PrecisionScan Pro<br />
CD-ROM<br />
● HP ScanJet 7400C <strong>series</strong><br />
<strong>scanner</strong><br />
● HP PrecisionScan Pro CD-ROM<br />
● automatic document feeder (ADF)<br />
(some models only)<br />
System requirements<br />
See the box in which the <strong>scanner</strong> shipped.<br />
● USB cable<br />
● power cable<br />
<strong>scanner</strong><br />
power cable USB cable<br />
● transparency/slide adapter<br />
(XPA)
Installing <strong>and</strong> troubleshooting 5<br />
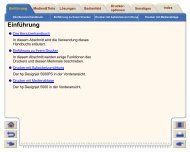
2. Connect the ADF<br />
If your <strong>scanner</strong> came with an ADF or you purchased one separately, attach the<br />
ADF to the <strong>scanner</strong>. Use the ADF to scan multiple pages.<br />
a Remove the protective film from the bottom of the ADF.<br />
b Attach the ADF to the <strong>scanner</strong>.<br />
c Connect the ADF cable to its port on the <strong>scanner</strong>.<br />
ADF port<br />
See “Using accessories” in the HP PrecisionScan Pro Help for usage<br />
instructions.
6 Installing <strong>and</strong> troubleshooting<br />
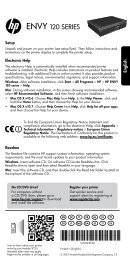
3. Unlock the <strong>scanner</strong><br />
Use your finger to flip the lock down to the unlocked position. If the lock is not<br />
completely in the unlocked position, you will hear a grinding noise when you try<br />
to scan.
Installing <strong>and</strong> troubleshooting 7<br />
4. Install software<br />
Install the HP scanning software before you install additional software.<br />
a Quit all open programs.<br />
b Insert the CD-ROM.<br />
The HP Scanning Software window appears. (If the HP Scanning Software<br />
window does not appear, double-click the icon for the HP Scanning<br />
Software CD.)<br />
c Double-click the HP Scanning Software Installer, <strong>and</strong> then follow the<br />
instructions on the screen.<br />
d When the main installation dialog box appears, select an installation<br />
package from the pull-down menu (located in the upper-left part of the<br />
dialog box).<br />
e Click Install.<br />
The Installer copies component files onto your computer.<br />
f If the installation is successful, click Restart to leave the Installer <strong>and</strong><br />
restart the computer.<br />
-Or-<br />
Click Continue to add more installation packages from the main dialog box<br />
of the Installer.<br />
-Or-<br />
Click Quit to leave the Installer without restarting the computer.<br />
After you install the HP scanning software, install the additional software.<br />
Note: For more information about installing software, see the Installation Read<br />
Me file on the HP Scanning Software CD.
8 Installing <strong>and</strong> troubleshooting<br />
5. Connect interface cable<br />
a Turn off the computer.<br />
b Choose ONE:<br />
● Connect the USB cable between the USB ports on the <strong>scanner</strong> <strong>and</strong> the<br />
computer.<br />
● Connect the SCSI cable between the SCSI ports on the <strong>scanner</strong> <strong>and</strong> the<br />
computer.<br />
SCSI USB<br />
6. Connect the power cable<br />
a Connect the power cable between the <strong>scanner</strong> <strong>and</strong> a surge protector or<br />
grounded wall outlet that is easily accessible. This turns on the <strong>scanner</strong>.<br />
(There is no power switch.)<br />
b Turn on the computer.
Installing <strong>and</strong> troubleshooting 9<br />
7. Change the front panel overlay (if necessary)<br />
The <strong>scanner</strong> has a front panel overlay installed. If necessary, change the<br />
overlay to match your language.<br />
a From the bottom, front center of the overlay, gently lift the overlay off of the<br />
<strong>scanner</strong>.<br />
b Align the pegs on the back of the new overlay with the holes on the <strong>scanner</strong><br />
<strong>and</strong> snap the overlay into place.
10 Installing <strong>and</strong> troubleshooting<br />
Start scanning<br />
Use one of these methods:<br />
● Scanner buttons. Scan directly to a destination by pressing one of these<br />
buttons:<br />
E-mail<br />
Fax Copy File<br />
Edit Text<br />
HP Scanning<br />
Software<br />
● HP PrecisionScan Pro software. Use the software to view or change the<br />
scanned image before you send it.
Installing <strong>and</strong> troubleshooting 11<br />
Connect the XPA (optional)<br />
Use the XPA to scan negatives, slides, <strong>and</strong> other transparent items.<br />
a Connect the XPA cable to its port on the <strong>scanner</strong>.<br />
b Restart the scanning software.<br />
See “Using accessories” in the HP PrecisionScan Pro Help for usage<br />
instructions.<br />
Find help <strong>and</strong> support<br />
See these sources:<br />
XPA port<br />
● View the three-minute product tour when you start the software.<br />
● For installation help, support, <strong>and</strong> specifications: See more information later<br />
in this guide.<br />
● For tips <strong>and</strong> information on scanning <strong>and</strong> optional accessories: Visit the<br />
HP ScanJet website at www.<strong>scanjet</strong>.<strong>hp</strong>.com.<br />
● For customer support on the Web, visit www.<strong>hp</strong>.com/go/support.
12 Installing <strong>and</strong> troubleshooting<br />
Performing basic troubleshooting<br />
If the <strong>scanner</strong> or software is not working, perform these steps first.<br />
● Check that the power cable is securely connected between the <strong>scanner</strong> <strong>and</strong> a<br />
live electrical outlet or surge protector that is turned on.<br />
● Make sure you have properly <strong>and</strong> securely connected the <strong>scanner</strong> to the<br />
computer using either the Universal Serial Bus (USB) or the SCSI Input/Output<br />
(I/O) interface. See "Checking connections" on page 13.<br />
● Use the Apple System Profiler to make sure the <strong>scanner</strong> is connected to the<br />
computer correctly. See "Checking connections" on page 13.<br />
● If the <strong>scanner</strong> is making a loud grinding noise, make sure the <strong>scanner</strong> is<br />
unlocked. Move the lock down to the unlocked position.<br />
● Disconnect the power cable from the <strong>scanner</strong> <strong>and</strong> turn off the computer. After<br />
30 seconds, reconnect the power cable <strong>and</strong> then turn on the computer, in that<br />
order.<br />
● If you receive installation file errors or the scanning software will not run, make<br />
sure all programs are closed, <strong>and</strong> then uninstall <strong>and</strong> reinstall the scanning<br />
software.<br />
● Make sure your computer meets the minimum system requirements. See the<br />
box in which the <strong>scanner</strong> shipped. If you do not have enough hard disk space,<br />
remove unnecessary files or install the software on a different disk drive.
Checking connections<br />
Installing <strong>and</strong> troubleshooting 13<br />
The <strong>scanner</strong> can be connected to the computer using a USB or a SCSI connection.<br />
USB is recommended because its installation is simpler.<br />
If you are having trouble with a USB or a SCSI connection, use the Apple System<br />
Profiler to verify that <strong>scanner</strong> is connected to the computer correctly.<br />
Using the Apple System Profiler<br />
The Apple System Profiler is a tool included in the Mac OS that provides information<br />
about your computer, such as:<br />
● the version of the Mac OS your computer is using<br />
● the number <strong>and</strong> type of peripheral devices that are connected to your computer<br />
● what programs are installed on your computer<br />
If you are still having trouble with USB after using the Apple System Profiler, see<br />
“Checking the USB connection” below. If you are still having trouble with SCSI, see<br />
"Checking the SCSI connection" on page 16.<br />
To open the Apple System Profiler<br />
1 Choose Apple System Profiler from the Apple ( ) menu.<br />
2 Click the Devices <strong>and</strong> Volumes tab.<br />
3 Make sure the <strong>scanner</strong> is listed in the USB section or the SCSI section of the<br />
window with the other USB <strong>and</strong> SCSI devices connected to the computer.
14 Installing <strong>and</strong> troubleshooting<br />
Checking the USB connection<br />
This <strong>scanner</strong> can be connected to the computer using USB if these requirements<br />
can be met:<br />
● The computer has a USB connector on the back (see below).<br />
● The computer is running Mac OS 8.5.1 or later.<br />
USB port on the <strong>scanner</strong><br />
USB port on the<br />
computer
Installing <strong>and</strong> troubleshooting 15<br />
To test the USB connection<br />
1 Close all applications <strong>and</strong> shut down the computer.<br />
2 Make sure that the <strong>scanner</strong> is unlocked.<br />
3 Connect the power cord to the <strong>scanner</strong> <strong>and</strong> to an electrical outlet.<br />
4 Turn on all external USB devices, including the <strong>scanner</strong>.<br />
5 Turn on the computer.<br />
6 Choose Control Panels from the Apple menu, <strong>and</strong> then choose HP ScanJet<br />
Controls from the submenu.<br />
7 Click the General tab in the HP ScanJet Controls dialog box.<br />
8 Click USB, <strong>and</strong> then select the model number of your <strong>scanner</strong> from list, if it is<br />
not already selected. (The <strong>scanner</strong> you select becomes the default <strong>scanner</strong>.)<br />
9 Click Refresh.<br />
10 Press the HP SCANNING SOFTWARE button on the front of the <strong>scanner</strong>. If the<br />
<strong>scanner</strong> is connected correctly, the HP scanning software appears.<br />
If USB still is not detected, use the SCSI connection. See "Checking the SCSI<br />
connection" on page 16.
16 Installing <strong>and</strong> troubleshooting<br />
Checking the SCSI connection<br />
You can connect this <strong>scanner</strong> to a computer using a SCSI card <strong>and</strong> cable that meet<br />
the requirements shown below. These requirements are the same as those on any<br />
SCSI flyer that might be included in the <strong>scanner</strong> box.<br />
For all SCSI cards <strong>and</strong> cables:<br />
● The SCSI card must be compliant with the operating system that your computer<br />
is running.<br />
● The SCSI card must be installed with appropriate software drivers. See the<br />
documentation for the card.<br />
● The SCSI card must have a connector visible on the back of the computer that<br />
allows you to connect a SCSI cable.<br />
● The SCSI cable must have a connector on one end that matches the SCSI<br />
connector on the computer (see example below).<br />
● The other end of the SCSI cable must have a connector that matches the highdensity,<br />
mini 50-pin connector on the <strong>scanner</strong> (see example below).<br />
Possible shapes of the SCSI connector<br />
on the computer<br />
SCSI connector on the <strong>scanner</strong>
Connecting the <strong>scanner</strong><br />
Installing <strong>and</strong> troubleshooting 17<br />
If you have other SCSI devices to connect to the SCSI card, connect the <strong>scanner</strong> to<br />
the last device in the chain. For more information, see the documentation that came<br />
with the SCSI card.<br />
Testing the SCSI installation<br />
Test the SCSI installation to see if it is working.<br />
To test the SCSI installation<br />
Note: If you get an error message while testing the SCSI installation, follow the<br />
directions in the message.<br />
1 Close all applications <strong>and</strong> shut down the computer.<br />
2 Make sure that the <strong>scanner</strong> is unlocked.<br />
3 Connect the power cord to the <strong>scanner</strong> <strong>and</strong> to an electrical outlet.<br />
4 Turn on all external SCSI devices, including the <strong>scanner</strong>.<br />
5 Turn on the computer.<br />
6 Choose Control Panels from the Apple menu, <strong>and</strong> then choose HP ScanJet<br />
Controls from the submenu.<br />
7 Click the General tab in the HP ScanJet Controls dialog box.<br />
8 Click SCSI, <strong>and</strong> then select the model number of your <strong>scanner</strong> from the list, if it<br />
is not already selected. (The <strong>scanner</strong> you select becomes the default <strong>scanner</strong>.)<br />
9 Press the HP SCANNING SOFTWARE button on the front of the <strong>scanner</strong>. If the<br />
SCSI card has been installed correctly, the HP scanning software appears.
18 Installing <strong>and</strong> troubleshooting<br />
SCSI troubleshooting<br />
If the <strong>scanner</strong> test fails, follow these steps.<br />
● Repeat basic troubleshooting. See "Performing basic troubleshooting" on<br />
page 12.<br />
● Make sure the SCSI chain is less than 20 feet (6 meters) long, including any<br />
cabling to SCSI devices inside the computer.<br />
● If other SCSI devices are connected to the computer, make sure the <strong>scanner</strong> is<br />
the last physical device in the SCSI chain.<br />
● Disconnect all other SCSI devices <strong>and</strong> connect the <strong>scanner</strong> directly to the<br />
computer to see if the problem is with the <strong>scanner</strong> or with another SCSI device<br />
or cable.<br />
● Make sure that any SCSI devices connected between the computer <strong>and</strong> the<br />
<strong>scanner</strong> have their termination turned off.<br />
● Check for an address conflict. See “Changing the SCSI address” below.
Changing the SCSI address<br />
Installing <strong>and</strong> troubleshooting 19<br />
The SCSI address (also called the SCSI ID) for the HP <strong>scanner</strong> is preset to 2. If you<br />
have other SCSI devices attached to this SCSI card, you may need to change the<br />
<strong>scanner</strong> address to prevent address conflicts. If this is the case, use the following<br />
procedure only AFTER installing the scanning software.<br />
To change the SCSI address<br />
1 Find an available address using the documentation that came with the<br />
computer. Do not choose the addresses for the SCSI card, typically 7, <strong>and</strong> the<br />
hard disk drives, typically 0 or 1.<br />
2 Press FAX <strong>and</strong> FILE on the <strong>scanner</strong> at the same time. “SCSI Address: 2” should<br />
appear on the front panel display.<br />
3 Use the NUMBER OF COPIES button on the <strong>scanner</strong> to select a number for the<br />
SCSI address. The number changes on the front panel display as you press the<br />
button.<br />
4 To exit the SCSI address settings, press any button on the <strong>scanner</strong> except the<br />
NUMBER OF COPIES button.
20 Installing <strong>and</strong> troubleshooting<br />
Uninstalling the software<br />
The Uninstall option of the <strong>setup</strong> program allows you to remove the scanning<br />
software from your computer.<br />
To uninstall software<br />
1 Unplug the <strong>scanner</strong>, <strong>and</strong> then restart the computer.<br />
Note: If you do not unplug the <strong>scanner</strong> <strong>and</strong> restart the computer before you<br />
uninstall the software, some files are not removed from your computer<br />
during the uninstallation.<br />
2 Insert the HP Scanning Software CD into your computer's CD-ROM drive.<br />
The HP Scanning Software window appears. (If the HP Scanning Software<br />
window does not appear, double-click the icon for the HP Scanning Software<br />
CD.)<br />
3 Double-click the HP Scanning Software Installer, <strong>and</strong> then follow the<br />
instructions on the screen.<br />
4 When the main installation dialog box appears, select Uninstall from the pulldown<br />
menu (located in the upper-left part of the dialog box).<br />
5 Click Uninstall.<br />
6 Follow the instructions on screen.<br />
7 After the uninstall finishes, quit the HP Scanning Software Installer.
2 Support,<br />
Support, warranty, <strong>and</strong> specifications 21<br />
warranty,<br />
<strong>and</strong> specifications<br />
This section provides information for finding support for your <strong>scanner</strong>, the warranty,<br />
<strong>and</strong> specifications.<br />
Finding HP help on the Web<br />
HP provides several resources on the Web to provide help with your <strong>scanner</strong><br />
whenever you want.<br />
Visiting HP websites<br />
HP product support<br />
Visit www.<strong>hp</strong>.com/go/support to find information for your <strong>scanner</strong> model. Once you<br />
enter the section that covers your <strong>scanner</strong> model, you will be able to choose<br />
information about setting up <strong>and</strong> using your <strong>scanner</strong>, downloading drivers, solving a<br />
problem, ordering, <strong>and</strong> information about the warranty.<br />
HP ScanJet website<br />
Visit www.<strong>scanjet</strong>.<strong>hp</strong>.com for:<br />
● tips for using your <strong>scanner</strong> more effectively <strong>and</strong> creatively.<br />
● HP ScanJet driver updates <strong>and</strong> software.<br />
HP assistance<br />
If you cannot find an answer to your question using the sites listed above, visit<br />
www.<strong>hp</strong>.com/cposupport/mail_support.html. From there, you can discover how to<br />
contact HP via e-mail, phone, <strong>and</strong> other methods.
22 Support, warranty, <strong>and</strong> specifications<br />
Visiting related websites<br />
Links to third-party websites are provided solely as a convenience to you. HP has<br />
not reviewed all of these third-party sites <strong>and</strong> does not control <strong>and</strong> is not responsible<br />
for any of these sites or their content. Thus, HP does not endorse or make any<br />
representations about them, or any information, software or other products or<br />
materials found there, or any results that may be obtained from using them. If you<br />
decide to access any of the third-party sites, you do this entirely at your own risk.<br />
ConnectCom Solutions website<br />
If you need to install a SCSI card on your computer to connect the computer to the<br />
<strong>scanner</strong>, HP recommends buying <strong>and</strong> installing a ConnectCom Solutions SCSI card.<br />
Visit the ConnectCom Solutions website for information about the recommended<br />
SCSI card, or to check for <strong>and</strong> download updated drivers for the card.<br />
www.connectcom.net/products/<strong>hp</strong><strong>scanner</strong>sol.html
Support, warranty, <strong>and</strong> specifications 23<br />
Contacting HP Customer Support<br />
In addition to the Web, you can contact HP by telephone or mail for support <strong>and</strong><br />
service for your <strong>scanner</strong>. Prices, availability, <strong>and</strong> hours of support are subject to<br />
change without notice.<br />
How HP can help<br />
HP's support hotline can help resolve problems with:<br />
● <strong>setup</strong><br />
● installation<br />
● configuration<br />
● operation<br />
For questions relating to operating systems or network configurations, contact your<br />
point of purchase or internal support department. For help with non-HP hardware or<br />
software, please contact the manufacturer of the other product.<br />
Before you call<br />
Please have the following information ready before you call.<br />
● serial number (found on the back or bottom of your <strong>scanner</strong>)<br />
● product name<br />
● date of purchase
24 Support, warranty, <strong>and</strong> specifications<br />
Obtaining support within the United States<br />
Free telephone support for one year<br />
Within one year of your purchase, telephone support is provided to you free of<br />
charge. If this is a long distance call for you, long distance charges will apply.<br />
Call (208) 323-2551.<br />
Our support staff is available from 6 am to 10 pm Mountain Time, Monday through<br />
Friday, or 9 am to 4 pm Saturday.<br />
After the first year<br />
Call (900) 555-1500.<br />
Charges are $2.50 per minute with a $25.00 maximum, charged to your phone bill.<br />
Charges begin only when you connect with a support technician.<br />
If you think your HP product may need service, call the Customer Support Center,<br />
which can help determine if service is required <strong>and</strong> direct you to a service site.<br />
Otherwise, contact the store where you purchased the product. Or, visit<br />
www.<strong>hp</strong>.com/cpso-support/guide/psd/repairhelp.html for the nearest sales <strong>and</strong><br />
service office.<br />
Obtaining support worldwide<br />
If you need help with your HP product, please call the phone number listed below for<br />
the Customer Support Center in your country. Telephone support is free for 90 days<br />
in Asia <strong>and</strong> the South Pacific <strong>and</strong> 30 days in Europe, the Middle East, <strong>and</strong> Africa.<br />
If you think your HP product may need service, call the Customer Support Center,<br />
which can help determine if service is required <strong>and</strong> direct you to a service site.<br />
Otherwise, contact the store where you purchased the product. Or, visit<br />
www.<strong>hp</strong>.com/cpso-support/guide/psd/repairhelp.html for the nearest sales <strong>and</strong><br />
service office.
Support, warranty, <strong>and</strong> specifications 25<br />
If the number below has changed, visit www.<strong>hp</strong>.com/cposupport/mail_support.html<br />
to check for a new one.<br />
Argentina<br />
(5411) 4778 8380<br />
0810 555 5520 (clientes del interior)<br />
Australia<br />
+61 (3) 8877 8000<br />
Austria<br />
+0810 00 6080<br />
Belgium<br />
Dutch: +32 (0)2 626 8806<br />
French: +32 (0)2 626 8807<br />
Brazil<br />
(11) 3747 7799 (Gr<strong>and</strong>e São Paulo)<br />
0800 157 751 (Demais regioes)<br />
Canada<br />
905 206 4663 (for support during the<br />
warranty period)<br />
877 621 4722 (for support after the<br />
warranty period)<br />
Chile<br />
800 22 5547 (Post-sales Business<br />
Computing)<br />
800 360 999 (Post-sales Home<br />
Computing)<br />
China<br />
+86 (10) 6564 5959<br />
Colombia<br />
+9 800 919 477<br />
Czech Republic<br />
+42 (0)2 6130 7310<br />
Denmark<br />
+45 39 29 4099<br />
Finl<strong>and</strong><br />
+358 (0)203 47 288<br />
France<br />
+33 (0)1 43 62 34 34<br />
Germany<br />
+49 (0)180 52 58 143 (24 PF/min)<br />
Greece<br />
+30 (0)1 619 64 11<br />
Guatemala<br />
1 800 999 5305<br />
Hong Kong<br />
+852 800 967729<br />
Hungary<br />
+36 (0)1 382 1111<br />
India<br />
+91 11 682 6035<br />
Indonesia<br />
+62 (21) 350 3408<br />
Irel<strong>and</strong><br />
+353 (0)1 662 5525<br />
Israel<br />
+972 (0)9 952 48 48<br />
Italy<br />
+39 02 264 10350<br />
Japan<br />
+81 3 3335 8333<br />
Korea, Republic of<br />
+82 (2) 3270 0700 (Seoul)<br />
080 999 0700 (outside Seoul)
26 Support, warranty, <strong>and</strong> specifications<br />
Malaysia<br />
+60 (3) 295 2566 (Kuala Lumpur)<br />
1 300 88 00 28 (Penang)<br />
Mexico<br />
52 58 9922 (Mexico City)<br />
01-800-472-6684 (outside<br />
Mexico City)<br />
Middle East/Africa<br />
+44 (0) 207 512 52 02<br />
Netherl<strong>and</strong>s<br />
+31 (0)20 606 8751<br />
New Zeal<strong>and</strong><br />
+64 (9) 356 6640<br />
Norway<br />
+47 22 11 6299<br />
Peru<br />
0 800 10111<br />
Philippines<br />
+63 (2) 867-3551<br />
Pol<strong>and</strong><br />
+48 022 865 98 00<br />
Portugal<br />
+351 21 3176333<br />
Puerto Rico<br />
1 877 232 0589<br />
Russian Federation<br />
+7 095 797 3520 (Moscow)<br />
+7 812 346 7997 (St. Petersburg)<br />
Singapore<br />
+65 272 5300<br />
South Africa<br />
086 000 1030 (RSA)<br />
+27-11 258 9301 (outside RSA)<br />
Spain<br />
+34 902 321 123<br />
Sweden<br />
+46 (0)8 619 2170<br />
Switzerl<strong>and</strong><br />
+41 (0)848 80 11 11<br />
Taiwan<br />
+886 (2) 2717 0055<br />
Thail<strong>and</strong><br />
+66 (2) 661 4000 (Bankok)<br />
+66 (53) 357990 (Chiang-Mai)<br />
Turkey<br />
+90 212 221 69 69<br />
Ukraine<br />
+7 (380-44) 490-3520<br />
United Arab Emirates<br />
971 4 883 8454<br />
United Kingdom<br />
+44 (0)207 512 52 02<br />
United States<br />
(208) 323-2551<br />
Venezuela<br />
800 47 777<br />
Viet Nam<br />
+84 (0)8 823 4530
Warranty Statement<br />
Support, warranty, <strong>and</strong> specifications 27<br />
HEWLETT-PACKARD LIMITED WARRANTY STATEMENT<br />
HP PRODUCT<br />
HP ScanJet 7400C, 7450C, 7490C<br />
Scanners <strong>and</strong>/or HP ScanJet<br />
Automatic Document Feeder <strong>and</strong>/or<br />
HP ScanJet Transparency Adapter<br />
DURATION OF LIMITED WARRANTY:<br />
1 year<br />
1 HP warrants to you, the end-user customer, that HP hardware, accessories <strong>and</strong><br />
supplies will be free from defects in materials <strong>and</strong> workmanship after the date of<br />
purchase, for the period specified above. If HP receives notice of such defects<br />
during the warranty period, HP will, at its option, either repair or replace<br />
products which prove to be defective. Replacement products may be either new<br />
or equivalent in performance to new.<br />
2 HP warrants to you that HP software will not fail to execute its programming<br />
instructions after the date of purchase, for the period specified above, due to<br />
defects in material <strong>and</strong> workmanship when properly installed <strong>and</strong> used. If HP<br />
receives notice of such defects during the warranty period, HP will replace<br />
software which does not execute its programming instructions due to such<br />
defects.<br />
3 HP does not warrant that the operation of HP products will be uninterrupted or<br />
error free. If HP is unable, within a reasonable time, to repair or replace any<br />
product to a condition as warranted, you will be entitled to a refund of the<br />
purchase price upon prompt return of the product.<br />
4 HP products may contain remanufactured parts equivalent to new in<br />
performance or may have been subject to incidental use.<br />
5 Warranty does not apply to defects resulting from (a) improper or inadequate<br />
maintenance or calibration, (b) software, interfacing, parts or supplies not<br />
supplied by HP, (c) unauthorized modification or misuse, (d) operation outside<br />
of the published environmental specifications for the product, or (e) improper<br />
site preparation or maintenance.<br />
6 TO THE EXTENT ALLOWED BY LOCAL LAW, THE ABOVE WARRANTIES<br />
ARE EXCLUSIVE AND NO OTHER WARRANTY OR CONDITION, WHETHER<br />
WRITTEN OR ORAL, IS EXPRESSED OR IMPLIED AND HP SPECIFICALLY<br />
DISCLAIMS ANY IMPLIED WARRANTIES OR CONDITIONS OF<br />
MERCHANTABILITY, SATISFACTORY QUALITY, AND FITNESS FOR A<br />
PARTICULAR PURPOSE. Some countries, states or provinces do not allow<br />
limitations on the duration of an implied warranty, so the above limitation or<br />
exclusion might not apply to you. This warranty gives you specific legal rights<br />
<strong>and</strong> you might also have other rights that vary from country to country, state to<br />
state, or province to province.
28 Support, warranty, <strong>and</strong> specifications<br />
7 HP’s limited warranty is valid in any country or locality where HP has a support<br />
presence for this product <strong>and</strong> where HP has marketed this product. The level of<br />
warranty service you receive may vary according to local st<strong>and</strong>ards. HP will not<br />
alter form, fit or function of the product to make it operate in a country for which<br />
it was never intended to function for legal or regulatory reasons.<br />
8 TO THE EXTENT ALLOWED BY LOCAL LAW, THE REMEDIES IN THIS<br />
WARRANTY STATEMENT ARE YOUR SOLE AND EXCLUSIVE REMEDIES.<br />
EXCEPT AS INDICATED ABOVE, IN NO EVENT WILL HP OR ITS<br />
SUPPLIERS BE LIABLE FOR LOSS OF DATA OR FOR DIRECT, SPECIAL,<br />
INCIDENTAL, CONSEQUENTIAL (INCLUDING LOST PROFIT OR DATA), OR<br />
OTHER DAMAGE, WHETHER BASED IN CONTRACT, TORT, OR<br />
OTHERWISE. Some countries, states or provinces do not allow the exclusion<br />
or limitation of incidental or consequential damages, so the above limitation or<br />
exclusion may not apply to you.<br />
9 THE WARRANTY TERMS CONTAINED IN THIS STATEMENT, EXCEPT TO<br />
THE EXTENT LAWFULLY PERMITTED, DO NOT EXCLUDE, RESTRICT OR<br />
MODIFY AND ARE IN ADDITION TO THE MANDATORY STATUTORY<br />
RIGHTS APPLICABLE TO THE SALE OF THIS PRODUCT TO YOU.<br />
Hardware repair services<br />
If you think your <strong>scanner</strong>, ADF, or XPA needs repair, first call the Customer Support<br />
Center, which can help determine if service is required <strong>and</strong> direct you to a service<br />
site. Please see "Contacting HP Customer Support" on page 23. Otherwise, contact<br />
the store where you purchased the product. Or, visit www.<strong>hp</strong>.com/cpso-support/<br />
guide/psd/repairhelp.html for nearest sales <strong>and</strong> service office.<br />
Service is free of charge during the warranty period. Beyond the warranty period,<br />
service will be charged.
Specifications<br />
Environmental specifications<br />
Scanner<br />
Temperature<br />
Operating: 10° to 35° C<br />
(50° to 95° F)<br />
Storage: -40° to 60° C<br />
(-40° to 140° F)<br />
Humidity<br />
Operating: 15% to 80%<br />
noncondensing 10° to 35° C<br />
(50° to 95° F)<br />
Storage: up to 90%<br />
(0° to 70° C or 32° to 158° F)<br />
XPA<br />
Temperature<br />
Operating: 10° to 35° C<br />
(50° to 95° F)<br />
Storage: -40° to 60° C<br />
(-40° to 140° F)<br />
Humidity<br />
Operating: 15% to 80%<br />
noncondensing<br />
(10° to 35° C or 50° to 95° F)<br />
Storage: 10% to 90%<br />
(0° to 70° C or 32° to 158° F)<br />
Support, warranty, <strong>and</strong> specifications 29<br />
ADF<br />
Temperature<br />
Operating: 10° to 35° C<br />
(50° to 95° F)<br />
Storage: -40° to 60° C<br />
(-40° to 140° F)<br />
Humidity<br />
Operating: 10% to 80%<br />
noncondensing<br />
(10° to 35° C or 50° to 95° F)<br />
Storage: 10% to 90%<br />
(0° to 40° C or 32° to 104° F)
30 Support, warranty, <strong>and</strong> specifications<br />
Product specifications<br />
Scanner<br />
Scanner Feature Specification<br />
Scanner type Flatbed<br />
Maximum item size 216 mm by 356 mm (8.5 in by 14 in),<br />
or letter width by legal length<br />
Scanning element Charged-coupled device<br />
Interface USB or SCSI<br />
Optical resolution 2400 dpi<br />
Selectable resolution 12 dpi to 999,999 dpi at 100% scaling<br />
Image processing<br />
(options)<br />
AC line voltage 100-240 VAC, 50-60 Hz<br />
Dithering, thresholding, scaling, interpolation, gamma<br />
adjustment, matrix adjustment<br />
Power consumption 22 W maximum, 10 W idle mode, ENERGY STAR ® compliant.<br />
(ENERGY STAR ® is a U.S. registered service mark of the United<br />
States Environmental Protection Agency.)<br />
As an ENERGY STAR ® Partner, <strong>Hewlett</strong>-<br />
<strong>Packard</strong> Company has determined that this<br />
product meets the ENERGY STAR ®<br />
guidelines for energy efficiency.<br />
Weight 5.6 kg (12.4 lb)
ADF<br />
ADF Feature Specification<br />
XPA<br />
Support, warranty, <strong>and</strong> specifications 31<br />
Size 535 by 290 by 90 mm (21.06 by 11.42 by 3.54 inches)<br />
Weight 2.20 kg (4.85 lb)<br />
Paper tray capacity 50 sheets of 75 g/m 2 (20 lb bond)<br />
Maximum paper size 216 by 356 mm (8.5 by 14 inches)<br />
Minimum paper size 210 by 149 mm (8.27 by 5.85 inches)<br />
Maximum paper weight 105 g/m 2 (28 lb bond)<br />
Minimum paper weight 60 g/m 2 (16 lb bond)<br />
Power requirements 420 mA (24 V dc) average<br />
Speed C7716B: 15 ppm for 216 by 279 mm (8.5 by 11 inches) sheets<br />
XPA Feature Specification<br />
Size 330 by 235 by 88 mm by 88.9 mm<br />
(13.0 by 9.25 by 3.54 in by 3.50 in)<br />
Weight 0.95 kg (2.1 lb)<br />
Power requirements 120 Vac (60.0 Hz)
32 Support, warranty, <strong>and</strong> specifications<br />
Regulatory information<br />
German Noise Declaration<br />
The German noise declaration is required in Germany. It gives noise output figures.<br />
Scanner<br />
Geräuschemission<br />
LpS < 70 dB<br />
am Arbeitsplatz<br />
normaler Betrieb<br />
nach DIN 45635 T. 19<br />
Die Daten sind die Ergebnisse von<br />
Typenprüfungen<br />
ADF<br />
Geräuschemission<br />
LpS < 70 dB<br />
am Arbeitsplatz<br />
normaler Betrieb<br />
nach DIN 45635 T. 19<br />
Die Daten sind die Ergebnisse von<br />
Typenprüfungen
Support, warranty, <strong>and</strong> specifications 33<br />
FCC Declaration of Conformity (<strong>scanner</strong>)<br />
Supplier’s Name: <strong>Hewlett</strong>-<strong>Packard</strong> Company<br />
Supplier’s Address: Colorado Digital Imaging<br />
700 71st Avenue<br />
Greeley, CO 80634<br />
USA<br />
Contact Person: CDI Regulatory Manager<br />
Telephone: 970-350-4000<br />
Product Name: HP ScanJet 7400C, HP ScanJet 7450C, HP ScanJet 7490C<br />
Model Number: C7710A (Base Scanner), C7717A or C7718A (Worldwide), C7713A<br />
or C7715A (US Commercial), C7712A or C7714A (US Retail)<br />
Product Options: C7671B (transparency adapter); C7716B (automatic document<br />
feeder; may contain different suffix)<br />
The supplier listed above declares that this product has been tested <strong>and</strong> found to comply with<br />
the limits for a Class B digital device, pursuant to Part 15 of FCC rules. Operation is subject to<br />
the following two conditions: (1) This device may not cause harmful interference, <strong>and</strong> (2) This<br />
device must accept any interference received, including interference that may cause undesired<br />
operation.<br />
These limits are designed to provide reasonable protection against harmful interference in a<br />
residential installation. This equipment generates, uses, <strong>and</strong> can radiate radio frequency<br />
energy <strong>and</strong>, if not installed <strong>and</strong> used in accordance with the instruction manual, may cause<br />
harmful interference to radio communications. However, there is no guarantee that interference<br />
will not occur in a particular installation. If this equipment does cause harmful interference to<br />
radio or television reception, which can be determined by turning the equipment off <strong>and</strong> on, the<br />
user is encouraged to try to correct the interference by one or more of the following measures:<br />
● Reorient or relocate the receiving antenna.<br />
● Increase the separation between the equipment <strong>and</strong> receiver.<br />
● Connect the equipment into an outlet on a circuit different from that to which the<br />
receiver is connected.<br />
● Consult the dealer or an experienced radio/TV technician.<br />
Changes or modification of this equipment not expressly approved by <strong>Hewlett</strong>-<strong>Packard</strong> could<br />
void the user’s authority to operate this equipment. Only use the cables, connectors, power<br />
cords <strong>and</strong> accessories supplied with this equipment or expressly approved by <strong>Hewlett</strong>-<br />
<strong>Packard</strong>.<br />
Test report on file: C7710-1<br />
Date: February 2001
34 Support, warranty, <strong>and</strong> specifications<br />
EU Declaration of Conformity (<strong>scanner</strong>)<br />
According to ISO/IEC Guide 22 <strong>and</strong> EN 45014:<br />
Supplier's Name <strong>Hewlett</strong>-<strong>Packard</strong> Company<br />
Supplier's Address Colorado Digital Imaging<br />
700 71st Avenue<br />
Greeley, Colorado 80634<br />
USA<br />
declares that the product:<br />
Product Name HP ScanJet 7400C, HP ScanJet 7450C, HP ScanJet 7490C<br />
Model Number(s) C7710A (Base Scanner), C7717A or C7718A (Worldwide), C7713A<br />
or C7715A (US Commercial), C7712A or C7714A (US Retail)<br />
Product Options C7671B (transparency adapter); C7716B (automatic document<br />
feeder; may contain different suffix)<br />
conforms to the following Product Specifications:<br />
Safety EN 60950:1992+A1:1992+A2:1993+A3:1995+A4:1996 +A11:1997<br />
EN 60825-1: 1994 Class 1<br />
EMC CISPR 22: 1993+A1+A2, Class B/ EN55022:1994+A1+A2, Class B<br />
IEC 1000-3-2: 1995/EN61000-3-2: 1995 Class A<br />
IEC 1000-3-3: 1994/EN61000-3-3: 1995<br />
EN 50082-1: 1997/EN 55024: 1998<br />
EN/IEC 61000-4-2, 4kV CD, 8 kV AD<br />
EN/IEC 61000-4-3, 3 V/m<br />
EN/IEC 61000-4-4, 1kV Power Lines<br />
EN/IEC 61000-4-5, High Energy Transients<br />
EN/IEC 61000-4-6<br />
EN/IEC 61000-4-8<br />
EN/IEC 61000-4-11<br />
Supplementary Information:<br />
The product herewith complies with the requirements of the Low Voltage Directive 73/23/EEC<br />
<strong>and</strong> the EMC Directive 89/336/EEC <strong>and</strong> carries the CE-marking accordingly. LEDs in this<br />
product are Class 1 in accordance to EN60825-1.<br />
Greeley, Colorado, USA, February 2001
Support, warranty, <strong>and</strong> specifications 35<br />
HP Environmental Product Stewardship<br />
Program<br />
Protecting the environment<br />
<strong>Hewlett</strong>-<strong>Packard</strong> Company is committed to providing quality products in an<br />
environmentally sound manner. This product has been designed with attributes to<br />
minimize impacts on our environment.<br />
Energy consumption<br />
Energy usage drops significantly while in low-power mode, which saves natural<br />
resources <strong>and</strong> saves money without affecting the high performance of this product.<br />
This product qualifies for ENERGY STAR ® , which is a voluntary program to encourage<br />
the development of energy-efficient office products.<br />
As an ENERGY STAR ® Partner, <strong>Hewlett</strong>-<strong>Packard</strong> Company has determined that this<br />
product meets ENERGY STAR ® guidelines for energy efficiency. For more<br />
information, see http://www.epa.gov/energystar/.<br />
Plastics<br />
Plastic parts over 25 g (0.88 oz) are marked according to international st<strong>and</strong>ards<br />
that enhance the ability to identify plastics for recycling purposes at the end of the<br />
product's life.
36 Support, warranty, <strong>and</strong> specifications<br />
Disassembly/End of life<br />
This HP product (HP ScanJet 7400C <strong>series</strong> <strong>scanner</strong>) is designed for ease of<br />
disassembly <strong>and</strong> to provide end-of-life disposal options by use of common fasteners<br />
<strong>and</strong> snap-fitting parts.<br />
Acoustical noise specification<br />
This HP product (HP ScanJet 7400C <strong>series</strong> <strong>scanner</strong>) has the following sound power<br />
levels:<br />
Note: These specifications reflect sound power levels of the <strong>scanner</strong> without<br />
any attached accessories.<br />
Category Specification<br />
Acoustical noise
Recycling materials<br />
Support, warranty, <strong>and</strong> specifications 37<br />
HP offers a variety of product end-of-life return programs in a number of geographic<br />
areas. To determine if one is available in your area, please contact your nearest HP<br />
sales office.<br />
Products returned to HP are reused, recycled, or disposed of in a responsible<br />
manner. Each month, HP reuses or recycles more than 3.5 million lb (1.6 million kg)<br />
of material at our product recovery centers in Grenoble, France; Boeblingen,<br />
Germany; <strong>and</strong> Roseville, California, USA. This represents 99 percent by weight of all<br />
the material we receive from customers <strong>and</strong> HP operations.
38 Support, warranty, <strong>and</strong> specifications