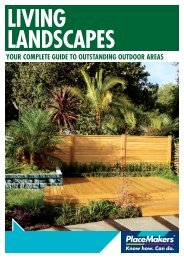
your complete guide to outstanding outdoor areas - PlaceMakers
your complete guide to outstanding outdoor areas - PlaceMakers
your complete guide to outstanding outdoor areas - PlaceMakers

Create successful ePaper yourself
Turn your PDF publications into a flip-book with our unique Google optimized e-Paper software.
Left unpainted or unstained, <strong>your</strong> new picket fence will change colour <strong>to</strong> a silvergrey,<br />
and may appear darker with time due <strong>to</strong> natural mould growth. Periodic light<br />
water blasting will res<strong>to</strong>re some natural colouring. Painted or stained fences will<br />
require recoating with time. When painting apply at least one coat <strong>to</strong> posts and<br />
pales before fi xing. That way no unpainted <strong>areas</strong> will show up when the timber<br />
naturally shrinks in summer.<br />
Please Note: As with all fences, check with <strong>your</strong> local council if it borders<br />
council property, find out about any height restrictions, and speak with any<br />
neighbours the fence will affect.<br />
“The most renewable natural resource” for more information visit our<br />
website www.nzwood.co.nz<br />
Please Note:<br />
Whilst the advice and recommendations contained in this brochure<br />
have been produced with proper care, they are offered only with the<br />
objective of assisting those interested in home improvement projects<br />
and <strong>PlaceMakers</strong> does not accept responsibility for the advice,<br />
recommendations, etc. contained herein.<br />
Updated: July 2008 (BSPG110116)<br />
www.placemakers.co.nz<br />
0800 KNOW HOW (0800 566 946)<br />
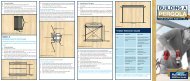
8. Use a spare picket as a spacer (see Illustration 4) and fi x the next picket<br />
using steps 2 through 7.<br />
Illustration 4: Use the thickness of one<br />
picket <strong>to</strong> space the pickets<br />
9. At a corner, set out the pickets as shown in Illustration 5.<br />
Illustration 5: Corner post<br />
While this brochure provides construction details<br />
for a simple picket fence, there are many variations<br />
<strong>to</strong> this design that can be used. Here are a couple of<br />
suggestions.<br />
Trimming the length of the intermediate pickets can give a graceful curving<br />
profile <strong>to</strong> the fence.<br />
Illustration 6: Pickets trimmed <strong>to</strong> give a curving profile<br />
Fix the rails between the posts and set them higher than the surrounding<br />
pickets. A simple groove cut in<strong>to</strong> the <strong>to</strong>p of the posts as a shadow line can<br />
provide decoration. Post caps that fi x <strong>to</strong> the <strong>to</strong>p of the fence.<br />
Posts are also available in a range of styles.<br />
Illustration 7: Pickets set between featured posts<br />
Illustration 8: Post caps in a variety of styles are available<br />
Fence Posts<br />
• H4 treated radiata<br />
• Available in 100 x 75mm<br />
or 100 x 100mm<br />
• Lengths 1.8, 2.4,<br />
2.7 or 3M<br />
Larger dimension posts<br />
and dressed are available<br />
on request.<br />
Fence Rails<br />
• H3.2 treated radiata<br />
• Available in 75 x 50mm<br />
or 100 x 50mm<br />
MAINTENANCE<br />
VARIATIONS<br />
CHANGE THE PROFILE<br />
VARIATIONS / MAINTENANCE<br />
BUILDING YOUR FENCE / VARIATIONS<br />
EMPHASISE THE POSTS<br />
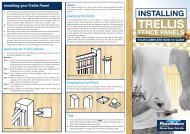
PUTTING UP A<br />
PICKET<br />
FENCE<br />
YOUR COMPLETE HOW TO GUIDE<br />
HOW TO GUIDES<br />
For instructions on how <strong>to</strong> build <strong>your</strong><br />
fence, see our How To Guides<br />
available in-s<strong>to</strong>re or online at<br />
www.placemakers.co.nz<br />
KNOW<br />
HOW<br />
CARD<br />
SPEND *<br />
$<br />
250<br />
GET A<br />
$<br />
25<br />
*Terms and conditions apply.<br />
BONUS<br />
VOUCHER<br />
Don’t forget <strong>to</strong> use <strong>your</strong> Know How<br />
Card with every purchase.<br />
PROJECT CHECK LIST<br />
Materials<br />
• Fence post • Fence rails<br />
• Nails • Concrete<br />
• Timber pegs • Timber preservative<br />
• Timber fencing (paling, panels or pickets)<br />
• Post caps<br />
Tools<br />
• Stringline • Tape measure<br />
• Set square • Hammer<br />
• Spirit level • Adjustable wrench<br />
• Hand saw/circular saw<br />
• Spade/post hole borer<br />
Picket Fence Panel<br />
These picket panels are easy<br />
<strong>to</strong> install and are the fastest<br />
way <strong>to</strong> put up a picket fence.<br />
It has been preservative<br />
treated <strong>to</strong> withstand the<br />
weather and is fastened<br />
<strong>to</strong>gether with rust-proof<br />
galvanized nails.<br />
• Available in 1.2M x 900mm<br />
& 1.8M x 900mm<br />
Danube Fence Panel<br />
Lakeview Fence Panel<br />
Verda Pre-Finished<br />
Fence Panels<br />
Verda’s superior quality preconstructed<br />
fence panels can be<br />
used as fences, screens, dividers,<br />
and <strong>to</strong> create sheltered <strong>areas</strong>.<br />
• H3.2 TanE treatment – 25 year<br />
guarantee against rot and<br />
insect attack*<br />
• Available in 1.2M x 900mm,<br />
1.2M x 1.8M, 1.8M x 900mm<br />
or 1.8M x 1.8M<br />
• Chromium & arsenic free<br />
* Subject <strong>to</strong> conditions – see guarantee<br />
on www.verda.co.nz for more details<br />
Trellis Top Fence Panels<br />
These panels are popular<br />
in creating privacy screens,<br />
weather screens, fence panels<br />
and gate panels.<br />
• H3.2 treated radiata<br />
• Available in various sizes in<br />
diagonal, square, vertical or<br />
horizontal trellis <strong>to</strong>p<br />
15