your complete guide to outstanding outdoor areas - PlaceMakers
your complete guide to outstanding outdoor areas - PlaceMakers
your complete guide to outstanding outdoor areas - PlaceMakers

Create successful ePaper yourself
Turn your PDF publications into a flip-book with our unique Google optimized e-Paper software.
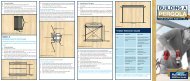
suB GraDe testiNG<br />
Sub-grade Weak moderate Strong<br />
Strength<br />
Walking & Walking Heel Neither walking<br />
heel test leaves distinct leaves an nor heel leaves<br />
footprints footprints impression an impression<br />
Driveways 175mm base 125mm base 75mm base<br />
(light vehicle material material material<br />
traffic only)<br />
Pedestrian 75mm base 50mm base No base<br />
use only material material material required,<br />
just sand<br />
exCavatioN exaMple<br />
Paver thickness (driveway)<br />
60 mm<br />
Bedding sand (compacted)<br />
30 mm<br />
Base Course (moderate sub-grade firmness) 125 mm<br />
= <strong>to</strong>tal exCavatioN Depth<br />
(below finished paving level)<br />
215mm<br />
Base Course Material<br />
• Should be crushed rock including particles of all sizes.<br />
• No particles should have a diameter more than one third of the<br />
thickness of the required base course layer.<br />
• It should contain no soil or plant material.<br />
• Lay geotextile fabric first where soft clay which might push in<strong>to</strong><br />
and through the base course material.<br />
• For layers of 100mm thick or more, use 40mm all in aggregate.<br />
This should also be laid in layers no thicker than 100mm and compacted <strong>to</strong> a<br />
uniform dense condition, especially around manholes and kerbs. The finished<br />
texture of the base course should not allow bedding sand <strong>to</strong> filter through. The<br />
final surface of the base course should match the con<strong>to</strong>ur of <strong>your</strong> finished<br />
paving with no bumps, and no holes deeper than 10mm.<br />
Edging is important <strong>to</strong> prevent sideways movement of pavers, and <strong>to</strong> s<strong>to</strong>p<br />
bedding sand leaking out.<br />
edging options<br />
• Soldier course of either standing or flat pavers (See Illustration 3)<br />
• Paving kerb – segmented raised kerbing<br />
• Paving edge – concealed, underground PVC strip<br />
• Haunching – concealed concrete strip. (See Illustration 4)<br />
Concrete<br />
Soldier Course<br />
Subgrade<br />
Illustration 3: Soldier course of standing pavers<br />
Concrete Haunching<br />
Soldier Course<br />
100mm<br />
Min<br />
Illustration 4: Concealed haunching<br />
Bedding sand supports <strong>your</strong> pavers, but will not hide irregularities in the base<br />
course. It should be coarse river sand (not beach sand), and damp but not wet.<br />
1. Don’t compact bedding sand directly. It compacts under the pavers. To test<br />
how much the thickness will reduce, spread some sand over a small area.<br />
Lay a paver on <strong>to</strong>p, and thump that with a rubber hammer. The resulting<br />
reduction in sand thickness will tell you how much <strong>your</strong> sand compacts.<br />
2. Pave in manageable sized <strong>areas</strong>. Spread sand only over an area you know<br />
you can finish in one session, and get <strong>to</strong> without walking on. Spread the<br />
sand <strong>to</strong> slightly more than the depth <strong>your</strong> rubber hammer test indicated<br />
would produce a compacted sand depth of between 20mm and 30mm. You<br />
will usually need <strong>to</strong> start with the uncompacted sand bed between 5mm<br />
and 10mm thicker than its compacted depth. (See Illustration 5A)<br />
3. Screed the sand <strong>to</strong> a uniform level. As with any screeding, you need<br />
temporary <strong>guide</strong>s or runners at each side <strong>to</strong> run <strong>your</strong> screed board on.<br />
If you have already laid a soldier or kerb course, you may be able <strong>to</strong> use<br />
that <strong>to</strong> support <strong>your</strong> runners. If the area <strong>to</strong> be paved is <strong>to</strong>o wide you’ll<br />
need <strong>to</strong> drive pegs, and fix <strong>your</strong> runners <strong>to</strong> them, just like concrete boxing.<br />
(See Illustration 5B)<br />
1. Start from the straightest convenient edge, and lay <strong>your</strong> pavers with a<br />
space of 2mm <strong>to</strong> 4mm between them. Some pavers have spacer nibs<br />
which achieve that au<strong>to</strong>matically. The space allows joint sand <strong>to</strong> penetrate<br />
around the pavers. Always start at the bot<strong>to</strong>m of sloped <strong>areas</strong>.<br />
2. Lay all full pavers first: then cut and lay any pieces. Cut pavers with a<br />
diamond concrete saw, paver splitter (both available from hire centres) or,<br />
for small <strong>areas</strong>, a bolster.<br />
3. Don’t run vehicles over the paving until it’s <strong>complete</strong>ly finished. To get a<br />
loaded wheelbarrow across, lay heavy planks down as running boards.<br />
Soldier Course<br />
on Concrete<br />
Illustration 5A: Screed on Runners<br />
Screed<br />
Sand<br />
Basecourse<br />
Subgrade<br />
Illustration 5B: (Detail) Not <strong>to</strong> scale<br />
Timber Screed<br />
Subgrade<br />
Guide Cleats<br />
Fixed <strong>to</strong> Screed<br />
Timber Runner<br />
Fixed <strong>to</strong> Peg<br />
Guide cleats<br />
fixed <strong>to</strong> screed<br />
Timber runner at<br />
correct height fixed<br />
<strong>to</strong> pegs<br />
Peg<br />
Your pavers now need <strong>to</strong> be consistently compacted over the whole area. Include<br />
a minimum of three passes with compac<strong>to</strong>r each at 90 degrees <strong>to</strong> each other.<br />
1. For a small area, use a rubber hammer on a short length of heavy timber:<br />
say a piece of 150 x 50mm. For most other jobs, use a plate compac<strong>to</strong>r.<br />
2. When the pavers are all compacted, sweep joint sand over the whole area<br />
and compact again. The compac<strong>to</strong>r will drive the sand in<strong>to</strong> the joints. Keep<br />
sweeping and compacting until all joints are filled.<br />
3. Joint sand should be fine dry plaster sand with angular particles that lock<br />
well <strong>to</strong>gether. It is also sold as paving sand and some types incorporate a<br />
weed preventative.<br />
In most cases maintenance will be minimal. If some pavers settle unevenly, or<br />
if underground services need <strong>to</strong> be exposed, <strong>your</strong> paving may require re-laying.<br />
To do this simply follow the procedures given above. It would pay <strong>to</strong> add a<br />
layer of weed matting below the sand layer <strong>to</strong> s<strong>to</strong>p any weeds that could grow<br />
up and between <strong>your</strong> pavers. Where paving is cleaned or has water running<br />
across it the joint sand may require <strong>to</strong>pping up periodically. To enhance the<br />
appearance of <strong>your</strong> paving special sealers are available, and these may require<br />
reapplication over time. Ask about these at <strong>your</strong> <strong>PlaceMakers</strong> Firth Centre.<br />
note: Building or landscaping work has <strong>to</strong> comply with the new Zealand<br />
Building code and <strong>your</strong> local council requirements. talk <strong>to</strong> the building<br />
inspec<strong>to</strong>rs at <strong>your</strong> council. they can provide helpful details of such<br />
matters and say whether or not a permit is required for the work you wish<br />
<strong>to</strong> do.<br />
Choose <strong>your</strong> site carefully, watch and compensate for potential problems such<br />
as drains, trees and electrical wiring.<br />
Check the height of the surface <strong>to</strong> be paved, take measurements and draw design<br />
plans <strong>to</strong> allow for the paving’s <strong>to</strong> be below the floor level and slightly sloped away<br />
from the house or <strong>areas</strong> that you would want <strong>to</strong> keep water away from.<br />
Choose <strong>your</strong> pavers and design…measure up and order.<br />
If the ground is firm and well compacted excavate <strong>to</strong> a depth of 75 mm, then<br />
move <strong>to</strong> next step. If soft or a filled site, excavate 75-100mm deeper and add<br />
75-100mm of <strong>to</strong>p course, compact well with a plate compacter.<br />
Now set up string lines <strong>to</strong> give you lines <strong>to</strong> follow for both height and gapping.<br />
now you can choose 1 of 2 laying methods:<br />
1. Spread and level a fine loose bedding sand, dampen and lightly compact.<br />
Then screed level and choose <strong>your</strong> laying pattern. (This method is quick<br />
easy and if the leveling is done well gives a great finish).<br />
2. Mix up a mix of sand and cement with water <strong>to</strong> make a wet mix that you<br />
put on the base, roughly level and then tamp <strong>your</strong> pavers down in<strong>to</strong> it,<br />
remember where they sit is where they stay. (This method requires more<br />
work, precision laying as it is far less forgiving, once the sand and cement<br />
mix hardens <strong>your</strong> pavers are not able <strong>to</strong> be easily lifted or moved).<br />
nB: It is critical you allow a gap between pavers of a minimum of 8mm,<br />
although 10-15mm is gap is recommended.<br />
This gap allows you <strong>to</strong> have some flexibility if there are any minor height<br />
discrepancies and also remove the effect of any slight size variation that occurs<br />
in hand made pavers.<br />
Some pavers may need cutting, you can hire a suitable saw from hire centres<br />
or use an angle grinder with a masonry blade installed. Remember <strong>your</strong> safety<br />
equipment.<br />
do not uSe comPActIon eQuIPment over PAverS<br />
Hose off pavers, let them dry, then use either pave joint sand, mortar pointing, or<br />
pavelock grouting sand…remember follow the product directions, if compaction<br />
is required, go over pavers tapping with a rubber mallet.<br />
Use dry sand and cement mix, <strong>to</strong> trowel an edge from the <strong>to</strong>p of the paver<br />
away at a 45 degree angle <strong>to</strong> give the pavers a border or haunch <strong>to</strong> hold them<br />
in place.<br />
Remember, if at any stage you are unsure of what you are doing or need further<br />
advice, seek professional help.<br />
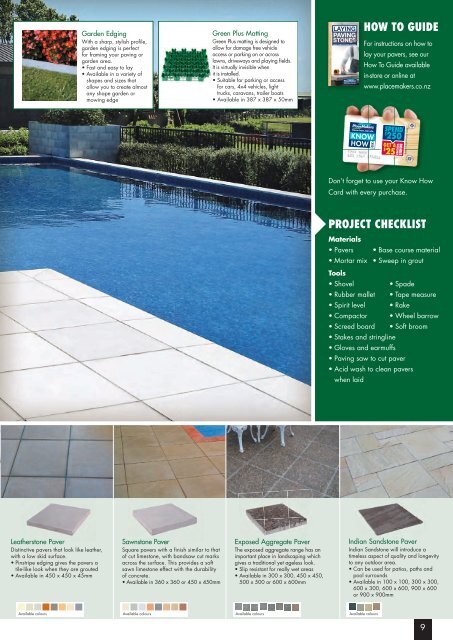
Garden Edging<br />
With a sharp, stylish profile,<br />
garden edging is perfect<br />
for framing <strong>your</strong> paving or<br />
garden area.<br />
• Fast and easy <strong>to</strong> lay<br />
• Available in a variety of<br />
shapes and sizes that<br />
allow you <strong>to</strong> create almost<br />
any shape garden or<br />
mowing edge<br />
Green Plus Matting<br />
Green Plus matting is designed <strong>to</strong><br />
5. PrePArIng the BeddIng<br />
allow for damage SAnd BASe free vehicle<br />
7. comPActIng the PAverS<br />
access or parking on or across<br />
lawns, driveways and playing fields.<br />
mAIntenAnce<br />
It is virtually invisible when<br />
6. lAyIng the PAverS<br />
it is installed.<br />
• Suitable for parking or access<br />
for cars, 4x4 vehicles, light<br />
trucks, caravans, trailer boats<br />
• Available in 387 x 387 x 50mm<br />
3. PrePArIng the BASe<br />
courSe<br />
4. PlAcIng the edgIng<br />
installation instructions<br />
installation instructions<br />
installation instructions / maintenance<br />
Wet cASt PAvIng<br />
wet cast paving<br />
LAYING<br />
PAVING<br />
STONES<br />
<strong>your</strong> <strong>complete</strong> how <strong>to</strong> <strong>guide</strong><br />
HOW TO GUIDE<br />
For instructions on how <strong>to</strong><br />
lay <strong>your</strong> pavers, see our<br />
How To Guide available<br />
in-s<strong>to</strong>re or online at<br />
www.placemakers.co.nz<br />
KNOW<br />
HOW<br />
CARD<br />
SPEND *<br />
$<br />
250<br />
GET A<br />
$<br />
25<br />
*Terms and conditions apply.<br />
BONUS<br />
VOUCHER<br />
Don’t forget <strong>to</strong> use <strong>your</strong> Know How<br />
Card with every purchase.<br />
PROJECT CHECKLIST<br />
Materials<br />
• Pavers • Base course material<br />
• Mortar mix • Sweep in grout<br />
Tools<br />
• Shovel<br />
• Spade<br />
• Rubber mallet • Tape measure<br />
• Spirit level • Rake<br />
• Compac<strong>to</strong>r • Wheel barrow<br />
• Screed board • Soft broom<br />
• Stakes and stringline<br />
• Gloves and earmuffs<br />
• Paving saw <strong>to</strong> cut paver<br />
• Acid wash <strong>to</strong> clean pavers<br />
when laid<br />
Leathers<strong>to</strong>ne Paver<br />
Distinctive pavers that look like leather,<br />
with a low skid surface.<br />
• Pinstripe edging gives the pavers a<br />
tile-like look when they are grouted<br />
• Available in 450 x 450 x 45mm<br />
Sawns<strong>to</strong>ne Paver<br />
Square pavers with a finish similar <strong>to</strong> that<br />
of cut limes<strong>to</strong>ne, with bandsaw cut marks<br />
across the surface. This provides a soft<br />
sawn limes<strong>to</strong>ne effect with the durability<br />
of concrete.<br />
• Available in 360 x 360 or 450 x 450mm<br />
Exposed Aggregate Paver<br />
The exposed aggregate range has an<br />
important place in landscaping which<br />
gives a traditional yet ageless look.<br />
• Slip resistant for really wet <strong>areas</strong><br />
• Available in 300 x 300, 450 x 450,<br />
500 x 500 or 600 x 600mm<br />
Indian Sands<strong>to</strong>ne Paver<br />
Indian Sands<strong>to</strong>ne will introduce a<br />
timeless aspect of quality and longevity<br />
<strong>to</strong> any <strong>outdoor</strong> area.<br />
• Can be used for patios, paths and<br />
pool surrounds<br />
• Available in 100 x 100, 300 x 300,<br />
600 x 300, 600 x 600, 900 x 600<br />
or 900 x 900mm<br />
Available colours Available colours Available colours Available colours<br />
9