your complete guide to outstanding outdoor areas - PlaceMakers
your complete guide to outstanding outdoor areas - PlaceMakers
your complete guide to outstanding outdoor areas - PlaceMakers

Create successful ePaper yourself
Turn your PDF publications into a flip-book with our unique Google optimized e-Paper software.
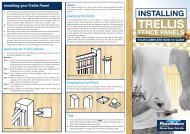
• Is it spaced correctly Measure from reference point multiplying the<br />
spacing by the number of gaps.<br />
• Does it follow the fenceline Use packers against both stringlines.<br />
• Is it tall enough Measure from the stringline <strong>to</strong> the <strong>to</strong>p of the post.<br />
• Is it vertical Check the side of each post with a spirit level.<br />
5. With posts braced in position, fill the holes with concrete as with end posts.<br />
Recheck as in Step 4 above and if necessary adjust and rebrace.<br />
6. Leave 7 days for the concrete <strong>to</strong> harden. If you also intend <strong>to</strong> pour a mowing<br />
strip along the fenceline, do it now.<br />
Once the concrete has set hard you can start fitting the rails.<br />
Check each of the posts and make sure they are firm in the ground. If there is<br />
any movement, brace the post with temporary bracing. This will hold it steady<br />
until the rails are fixed. The posts can now be trimmed <strong>to</strong> the post height.<br />
1. Fix the stringline <strong>to</strong> both of the end posts at the post height, and mark<br />
this height on all posts. On a level site use a square. On a sloping site the<br />
rails won’t be at right angles <strong>to</strong> the posts. In that case follow the stringline.<br />
Before taking the stringline down, check the height again.<br />
2. Once you have checked that the heights are marked correctly on all posts<br />
trim the posts at height marks.<br />
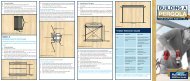
There are different ways of fixing the rails <strong>to</strong> the fence posts and the<br />
method you use will depend on the type of fence you are building. The<br />
major difference between rail fixing methods is:<br />
• the rails are fixed <strong>to</strong> the outside of the posts,<br />
• the rails are fixed between the posts,<br />
• or, the rails are checked in <strong>to</strong> the posts.<br />
In this method the rails run from the centre of one post <strong>to</strong> the centre of the next.<br />
If the timber you are using is long enough, you can run the rails across three<br />
posts. The procedure is similar whether you are fixing <strong>to</strong> the face of the post or<br />
the <strong>to</strong>p of the post (see Illustrations 5 & 6).<br />
1. On a level site, trim one end of the first rail square. On a sloping site support<br />
the rail in the correct position against the posts and mark the cutting angle.<br />
Transfer that angle <strong>to</strong> a piece of scrap timber and use it <strong>to</strong> ensure all cuts<br />
are the same.<br />
Illustration 6<br />
Rails fixed<br />
<strong>to</strong> face of post<br />
Rails fixed<br />
<strong>to</strong> face of post<br />
Illustration 5: Rails fixed outside post<br />
Centre <strong>to</strong> Centre<br />
Centre <strong>to</strong> Centre<br />
Rails fixed on<br />
<strong>to</strong>p of post<br />
Rails fixed on<br />
<strong>to</strong>p of post<br />
2. Fix a block <strong>to</strong> the first post <strong>to</strong> support the rail at the correct fixing height<br />
(see Illustrations 7 & 8). The rail should be held flush with the leading edge<br />
of the first post and the rail then marked at the centre of the joining post.<br />
3. Cut the rail <strong>to</strong> that mark and then nail in<strong>to</strong> the correct position.<br />
4. Remove the supporting block from the first post, and repeat the whole<br />
process for the rest of the rails.<br />
Illustration 7: Packer <strong>to</strong> support fence rail<br />
Illustration 8<br />
Measure distance<br />
between posts<br />
Position of fence rail<br />
In this method the rails run between the posts. The procedure is similar whether<br />
you are fixing the rails <strong>to</strong> be flush with the face, or setback from the face<br />
(see Illustration 9).<br />
Rails fixed flush<br />
with face<br />
Illustration 9: Rails fixed between post<br />
Rails fixed back<br />
from face<br />
1. On a level site, trim one end of the first rail square. On a sloping site<br />
support the rail in the correct position against the posts and mark the<br />
cutting angle.<br />
Transfer that angle <strong>to</strong> a piece of scrap timber and use it <strong>to</strong> ensure all cuts<br />
are the same.<br />
2. Lay the rail on the ground against the base of the first post and mark it<br />
against the edge of the next post in the line (see Illustration 10).<br />
Illustration 10: Marking length of rail between posts<br />
3. Cut the rail <strong>to</strong> that mark.<br />
4. Nail a supporting block <strong>to</strong> each post and place the rail in its correct position.<br />
5. Skew nail the rail <strong>to</strong> the post using at least 4 nails.<br />
6. Remove the supporting block from the first post and repeat the process for<br />
the rest of the rails.<br />
Edgelock Polycarbonate Roofing<br />
Edgelock is a simple flat roof system, offering a solution for<br />
domestic and residential applications.<br />
• Easy <strong>to</strong> install<br />
• Low maintenance<br />
• Very durable giving <strong>your</strong> next DIY project a unique look<br />
without the cost attached<br />
• Suitable for pergolas, sunrooms, porches, carports and<br />
can also be used as fencing<br />
• Available in 2.4, 3 & 3.6M lengths<br />
• Available in 300 or 600mm widths<br />
TRANSLUCENT<br />
ROOFING<br />
PERGOLAS<br />
Pergolas are a useful and attractive<br />
addition <strong>to</strong> any garden setting. They<br />
offer a focus and architectural form in<br />
a flat garden. They can also provide<br />
shelter over a doorway or can be<br />
used as gazebo when a roof in clear<br />
corrugated material is added.<br />
FIXING THE RAILS<br />
INSTRUCTIONS<br />
INSTRUCTIONS<br />
Twice the rail<br />
thickness<br />
INSTRUCTIONS<br />
BETWEEN POST FIXING<br />
INSTRUCTIONS / TIMBER SELECTION GUIDE<br />
INSTALLING<br />
POSTS<br />
& RAILS<br />
YOUR COMPLETE HOW TO GUIDE<br />
OUTSIDE POST FIXING &<br />
CHECKED IN FIXING<br />
a<br />
Sunlite PVC Roofing<br />
Sunlite is a light blue, easy<br />
<strong>to</strong> install, low cost corrugated<br />
sheet.<br />
• 690mm wide<br />
• Available in 1.8, 2.4,<br />
3 & 3.6M lengths<br />
• Ideal for pergolas<br />
and carports<br />
Suntuf Polycarbonate<br />
Roofing<br />
As the name suggests, Suntuf<br />
is a <strong>to</strong>ugh polycarbonate<br />
product designed <strong>to</strong> offer<br />
year-round protection from<br />
the harsh New Zealand<br />
environment.<br />
• 860mm wide<br />
• Available in various lengths<br />
from 1.8 – 6M<br />
• Ideal for roofing, external<br />
cladding, veranda covers<br />
and carports<br />
Tufclad Ultra<br />
Polycarbonate Roofing<br />
Tufclad Ultra is a cost<br />
effective polycarbonate sheet<br />
that offers all-weather<br />
protection.<br />
• Excellent UV ray resistance<br />
(up <strong>to</strong> 99.9%)<br />
• Super strong and durable<br />
• Suitable for pergolas,<br />
sunrooms, porches<br />
and carports<br />
Clearvue Polycarbonate<br />
Roofing<br />
Clearvue is a high quality<br />
product with the fantastic<br />
seamless, flat look of glass.<br />
• Very high impact<br />
resistance<br />
• Sleek modern look<br />
• Easy installation<br />
• Very adaptable<br />
• High UV protection<br />
• Solid, flat sheeting<br />
HOW TO GUIDES<br />
For instructions on how <strong>to</strong> build<br />
<strong>your</strong> pergola or install <strong>your</strong> posts<br />
and rails, see our How To Guides<br />
available in-s<strong>to</strong>re or online at<br />
www.placemakers.co.nz<br />
PROJECT CHECKLIST<br />
Materials<br />
• Nails • Pegs<br />
• H3.2 bearers • H3.2 rafters<br />
• Concrete <strong>to</strong> set the posts<br />
• H5 treated post<br />
• Timber preservative<br />
Tools<br />
• Electric drill • Shovel • Hammer<br />
• Sand paper • G or F clamps<br />
• Stringline • Old paintbrush<br />
• Spirit level • Adjustable spanner<br />
• Spade or post hole borer<br />
• Hand saw or circular saw<br />
• Tape, square and pencil<br />
• Jigsaw if cutting curves on<br />
ends or rafters (optional)<br />
21