

High Definition 3D Multimedia Player - Mede8er.org
High Definition 3D Multimedia Player - Mede8er.org
High Definition 3D Multimedia Player - Mede8er.org

Create successful ePaper yourself
Turn your PDF publications into a flip-book with our unique Google optimized e-Paper software.
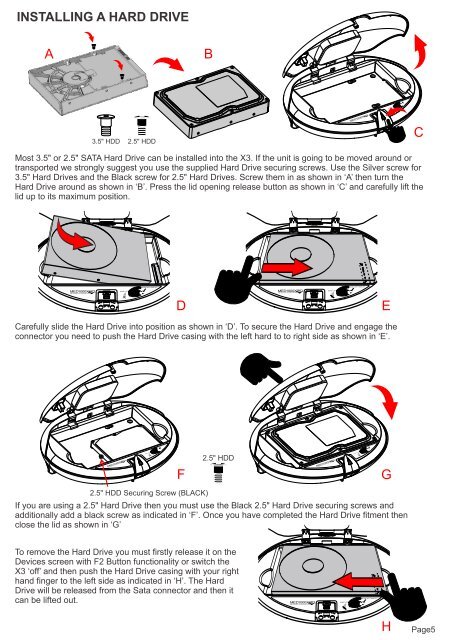
INSTALLING A HARD DRIVE<br />
A<br />
B<br />
3.5" HDD<br />
2.5" HDD<br />
C<br />
Most 3.5" or 2.5" SATA Hard Drive can be installed into the X3. If the unit is going to be moved around or<br />
transported we strongly suggest you use the supplied Hard Drive securing screws. Use the Silver screw for<br />
3.5" Hard Drives and the Black screw for 2.5" Hard Drives. Screw them in as shown in ‘A’ then turn the<br />
Hard Drive around as shown in ‘B’. Press the lid opening release button as shown in ‘C’ and carefully lift the<br />
lid up to its maximum position.<br />
D<br />
E<br />
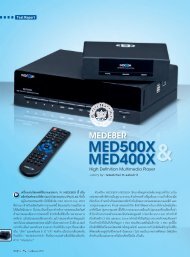
Carefully slide the Hard Drive into position as shown in ‘D’. To secure the Hard Drive and engage the<br />
connector you need to push the Hard Drive casing with the left hard to to right side as shown in ‘E’.<br />
F<br />
2.5" HDD<br />
G<br />
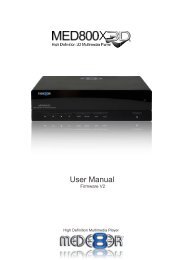
2.5" HDD Securing Screw (BLACK)<br />
If you are using a 2.5" Hard Drive then you must use the Black 2.5" Hard Drive securing screws and<br />
additionally add a black screw as indicated in ‘F’. Once you have completed the Hard Drive fitment then<br />
close the lid as shown in ‘G’<br />
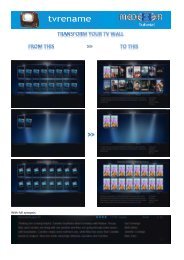
To remove the Hard Drive you must firstly release it on the<br />
Devices screen with F2 Button functionality or switch the<br />
X3 ‘off’ and then push the Hard Drive casing with your right<br />
hand finger to the left side as indicated in ‘H’. The Hard<br />
Drive will be released from the Sata connector and then it<br />
can be lifted out.<br />
H<br />
Page5


![Review [Media Center]: Mede8er MED500X (+ video)](https://img.yumpu.com/3934389/1/184x260/review-media-center-mede8er-med500x-video.jpg?quality=85)