TM-U220 Technical Reference guide EPSON - Perimatic.fr
TM-U220 Technical Reference guide EPSON - Perimatic.fr
TM-U220 Technical Reference guide EPSON - Perimatic.fr

You also want an ePaper? Increase the reach of your titles
YUMPU automatically turns print PDFs into web optimized ePapers that Google loves.
<strong>TM</strong>-<strong>U220</strong> <strong>Technical</strong> <strong>Reference</strong> Guide<br />
5. Tighten the spacer with two screws included with the <strong>guide</strong>. (See figure above.)<br />
6. Set the memory switch (customize value) for the paper width. (See “Memory Switches”<br />
(page 3-17))<br />
3.4.6 Adjusting Position of Roll Paper Near End Detector<br />
Below are two reasons for the roll paper to require an NE detector adjustment.<br />
❏<br />
❏<br />
To adjust the location of detection for the diameter of the roll paper core.<br />
To adjust the amount of remaining paper.<br />
The procedure is as following.<br />
1. Make sure the power supply is disconnected.<br />
2. Open the roll paper cover, and remove the paper roll.<br />
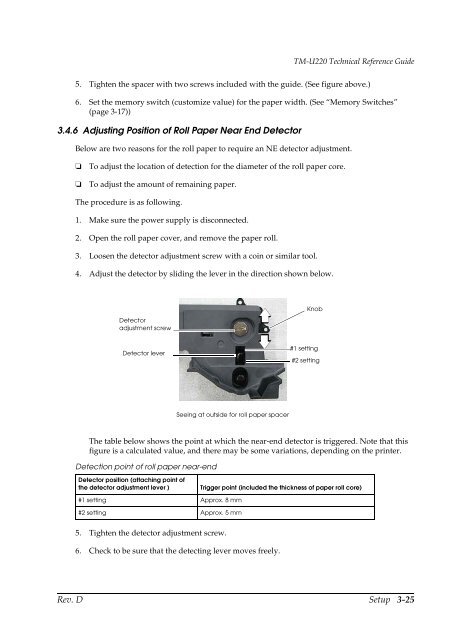
3. Loosen the detector adjustment screw with a coin or similar tool.<br />
4. Adjust the detector by sliding the lever in the direction shown below.<br />
Detector<br />
adjustment screw<br />
Knob<br />
Detector lever<br />
#1 setting<br />
#2 setting<br />
Seeing at outside for roll paper spacer<br />
The table below shows the point at which the near-end detector is triggered. Note that this<br />
figure is a calculated value, and there may be some variations, depending on the printer.<br />
Detection point of roll paper near-end<br />
Detector position (attaching point of<br />
the detector adjustment lever )<br />
Trigger point (included the thickness of paper roll core)<br />
#1 setting Approx. 8 mm<br />
#2 setting Approx. 5 mm<br />
5. Tighten the detector adjustment screw.<br />
6. Check to be sure that the detecting lever moves <strong>fr</strong>eely.<br />
Rev. D Setup 3-25