Instructions for Use GB - Lucas CPR
Instructions for Use GB - Lucas CPR
Instructions for Use GB - Lucas CPR

You also want an ePaper? Increase the reach of your titles
YUMPU automatically turns print PDFs into web optimized ePapers that Google loves.
17<br />
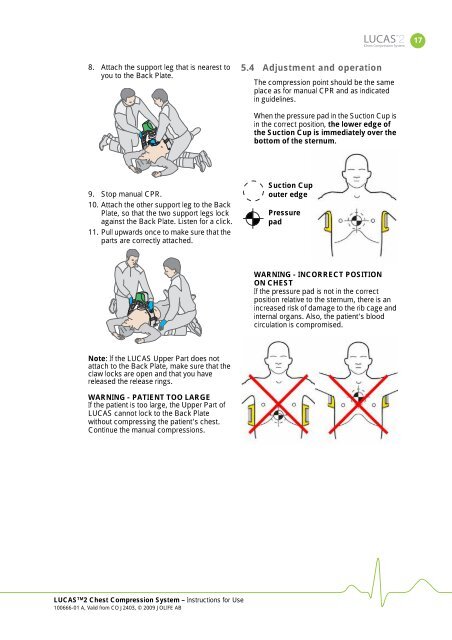
8. Attach the support leg that is nearest to<br />
you to the Back Plate.<br />
5.4 Adjustment and operation<br />
The compression point should be the same<br />
place as <strong>for</strong> manual <strong>CPR</strong> and as indicated<br />
in guidelines.<br />
When the pressure pad in the Suction Cup is<br />
in the correct position, the lower edge of<br />
the Suction Cup is immediately over the<br />
bottom of the sternum.<br />
9. Stop manual <strong>CPR</strong>.<br />
10. Attach the other support leg to the Back<br />
Plate, so that the two support legs lock<br />
against the Back Plate. Listen <strong>for</strong> a click.<br />
11. Pull upwards once to make sure that the<br />
parts are correctly attached.<br />
Suction Cup<br />
outer edge<br />
Pressure<br />
pad<br />
WARNING - INCORRECT POSITION<br />
ON CHEST<br />
If the pressure pad is not in the correct<br />
position relative to the sternum, there is an<br />
increased risk of damage to the rib cage and<br />
internal organs. Also, the patient's blood<br />
circulation is compromised.<br />
Note: If the LUCAS Upper Part does not<br />
attach to the Back Plate, make sure that the<br />
claw locks are open and that you have<br />
released the release rings.<br />
WARNING - PATIENT TOO LARGE<br />
If the patient is too large, the Upper Part of<br />
LUCAS cannot lock to the Back Plate<br />
without compressing the patient's chest.<br />
Continue the manual compressions.<br />
LUCAS TM 2 Chest Compression System – <strong>Instructions</strong> <strong>for</strong> <strong>Use</strong><br />
100666-01 A, Valid from CO J2403, © 2009 JOLIFE AB