
You also want an ePaper? Increase the reach of your titles
YUMPU automatically turns print PDFs into web optimized ePapers that Google loves.
-<br />
\<br />
-<br />
-<br />
-<br />
-<br />
-<br />
-<br />
-<br />
-<br />
-
APPENDIX<br />
FUNCTION CODE REFERENCE<br />
Appendix A contains an entire listing of the codes used for every<br />
function performed by your printer. Many of these codes appear<br />
throughout the manual, but there are a number of additional functions<br />
that are described only in this appendix. So if you’d like to learn<br />
about all the capabilities of your printer, you can find them here.<br />
Each function is listed by name, followed by a short description.<br />
Since there are several different ways to access a function-through<br />
escape, control, decimal, and hexadecimal codes, and also through<br />
BASIC character strings-we have listed each of your possible<br />
choices. The codes are also cross-referenced to other related codes,<br />
and to the proper section of the manual. Here are a few tips on using<br />
the codes listed in Appendix A:<br />
This symbol represents the escape function; for instructions<br />
on enabling this function, please consult<br />
your computer manual or software manual.<br />
n or “n” The “n” appears in the codes for user-selectable<br />
functions, such as horizontal tab settings. When you<br />
see “n”, you may substitute a number or value within<br />
the parameters given in the function’s description.<br />
CHR$ The character string command, CHR$, is used to<br />
“capture” a code entered when you are programming<br />
in BASIC. For details, please see Section 6.<br />
Always be sure to enter the code exactly as it appears in the listing.<br />
(If a letter is shown in uppercase, enter it in its uppercase form, and<br />
vice-versa.)
FONT STYLES AND PRINT CONTROLS<br />
-<br />
• ;z$ECT THE DRAFT-QUALITY (DQ) CHARACTER<br />
This code switches the printer to the draft-quality character set.<br />
You can also access the DQ set by turning DIP switch 1-5 on.<br />
CODE: 5<br />
HEX: 1B 35<br />
DECIMAL: 27 53<br />
BASIC:<br />
CHR$(27) CHR$(53)<br />
REFERENCE: < ESC > 4, Section 4<br />
-<br />
• ;E+ECT THE LETTER-QUALITY (LQ) CHARACTER<br />
This command switches the printer to the LQ character set. (You<br />
may also set LQ as the power-on default by turning DIP switch 1-5<br />
off. See Appendix D.)<br />
CODE: 4<br />
HEX<br />
1B34<br />
DECIMAL: 27 52<br />
BASIC:<br />
CHR$(27) CHR$(52)<br />
REFERENCE: < ESC > 5, Section 4.<br />
62
• SELECT AN INTERNATIONAL CHARACTER SET<br />
This command selects one of eight international character sets<br />
determined by thevalue of “n”, as shown below. (You can also select<br />
a particular International Character Set as a power-on default. To<br />
do this, please turn to Appendix D, “DIP Switches.“)<br />
CODE: R “n”<br />
HEX:<br />
DECIMAL:<br />
BASIC:<br />
IB 52 “n”<br />
27 82 “n”<br />
CHRS(27) CHR$(82) CHR$(n)<br />
USA=0 France=1 Germany=2 England=3 Denmark=4<br />
Sweden = 5 Italy = 6 Spain = 7<br />
• SET THE PROPORTIONAL SPACING<br />
In the letter-quality mode, this command causes all subsequent<br />
printing to be done in proportional spacing.<br />
CODE: P 1<br />
HEX: iB 70 01<br />
DECIMAL: 27 112 1<br />
BASIC:<br />
REFERENCE:<br />
CHR$(27) CHR$(112) CHR$(l)<br />
< ESC > P 0, Section4<br />
63
• CANCEL PROPORTIONAL SPAClNG<br />
This command cancels the proportional spacing and returns the<br />
print pitch to pica.<br />
CODE: PO<br />
HEX: 1B 70 00<br />
DECIMAL: 27 1120<br />
BASIC: CHR$(27) CHR$(ll2) CHR$(O)<br />
REFERENCE: < ESC > p 1, Section4<br />
• SET THE PRINT PITCH TO PICA (IO CPI)<br />
In the draft mode, this command causes all subsequent printing<br />
to be done in pica type. This command also sets the maximum line<br />
length to 80 characters. You can select pica type as the power-on<br />
default by turning on DIP switch l-6.<br />
CODE: P<br />
HEX: 1B 50<br />
DECIMAL: 27 80<br />
1<br />
-<br />
-<br />
BASIC:<br />
CHW(27) CHR$(80)<br />
REFERENCE: < ESC > M, Section 4.<br />
64
• SET THE PRINT PITCH TO ELITE (12 CPI)<br />
In the draft mode, this command causes all subsequent printing<br />
to be done in elite type, and sets the maximum line length to 96<br />
characters. You can select elite type as the power-on default by<br />
turning DIP switch l-6 off.<br />
CODE: M<br />
HEX:<br />
lB4D<br />
DECIMAL: 27 77<br />
BASIC:<br />
CHR$(27) CHRS(77)<br />
REFERENCE: < ESC > P, Section 4.<br />
• SET THE PRINT PITCH TO CONDENSED (76.7 CPI)<br />
In the draft mode, this command instructs the printer to print in<br />
the condensed pitch, and also sets the maximum line length to 132<br />
characters.<br />
CODE: <br />
-c SI ><br />
HEX:<br />
1BOForOF<br />
DECIMAL: 27 15 or 15<br />
BASIC:<br />
CHRS(27) CHR$(l5) or CHR$(15)<br />
REFERENCE: < ESC> P, < ESC> M, Section 4.
w SELECT EXPANDED PRINT<br />
This instruction causes all subsequent printing to be in expanded<br />
type. The size of the type is determined by the pitch in use at the time<br />
the command is sent:<br />
PITCH<br />
Pica<br />
Elite<br />
Condensed<br />
NORMAL<br />
<strong>10</strong> cpi<br />
12 cpi<br />
16.7 cpi<br />
EXPANDED<br />
5 cpi<br />
6 cpi<br />
8.3 cpi -<br />
CODE: W 1<br />
HEX:<br />
lB5701<br />
DECIMAL: 27 87 1<br />
-<br />
BASIC: CHW27) CHR$(87) CHR$(l)<br />
REFERENCE: < ESC > W 0. Section 4.<br />
4 1 LINE EXPANDED PRINT<br />
Another code for expanded type activates this function for one line<br />
only. Here are the codes:<br />
CODE: <br />
<br />
HEX:<br />
1B OE or OE<br />
-<br />
-<br />
DECIMAL: 27 14 or 14<br />
BASIC:<br />
CHR$(27) CHR$(14) or CHR$(14)<br />
REFERENCE: W 1. W 0<br />
66
• CANCEL EXPANDED PRINT<br />
Resets the print size to the pitch in use before expanded<br />
began.<br />
print<br />
CODE: W 0<br />
HEX:<br />
lB5700<br />
DECIMAL: 27 87 0<br />
BASIC:<br />
CHR$(27) CHR$(87) CHR$(O)<br />
REFERENCE: < ESC > W 1, Section 4.<br />
• SELECT DOUBLE-STRIKE PRINTING<br />
After this command is sent, all characters will be printed in the<br />
double-strike mode.<br />
CODE: G<br />
HEX:<br />
lB47<br />
DECIMAL: 27 71<br />
BASIC:<br />
CHR$(27) CHR$(71)<br />
REFERENCE: < ESC > H, Section 4.<br />
w CANCEL DOUBLE-STRIKE PRlNTlNG<br />
This command returns printer to normal printing, canceling the<br />
double-strike mode.<br />
CODE: H<br />
HEX:<br />
lB48<br />
DECIMAL: 27 72<br />
BASIC:<br />
CHR$(27) CHR$(72)<br />
REFERENCE: < ESC > G, Section 4<br />
67
• SELECT EMPHASIZED PRINTING<br />
This command causes all subsequent characters to be printed in<br />
the emphasized mode.<br />
CODE: E<br />
HEX:<br />
lB45<br />
DECIMAL: 27 69<br />
BASIC:<br />
CHR$(27) CHR!$(69)<br />
REFERENCE: < ESC > F. Section 4.<br />
w CANCEL EMPHASIZED PRINTING<br />
Returns normal printing, canceling the emphasized print mode.<br />
CODE: F<br />
HEX:<br />
lB46<br />
DECIMAL: 27 70<br />
BASIC:<br />
CHR$(27) CHR$(70)<br />
REFERENCE: < ESC > E. Section 4.<br />
• SELECT UNDERLINING<br />
After this command is given, all characters will be underlined until<br />
this function is canceled.<br />
CODE: - 1<br />
HEX:<br />
lB2DOl<br />
DECIMAL: 27 45 1<br />
BASIC:<br />
CHRS(27) CHR$(45) CHR$(l)<br />
REFERENCE: < ESC > - 0, Section 4.<br />
68
• CANCEL UNDERLINING<br />
After this code is sent, underlining<br />
will be canceled.<br />
CODE: -0<br />
HEX:<br />
lB2DOO<br />
DECIMAL: 27 45 0<br />
BASIC:<br />
CHR!$(27) CHR$(45) CHR$(O)<br />
REFERENCE: < ESC > - 1, Section 4.<br />
w SELECT SUPERSCRIPTS<br />
With this command, all subsequent characters are printed as<br />
superscripts until this function is canceled.<br />
CODE: SO<br />
HEX:<br />
lB5300<br />
DECIMAL: 27 83 0<br />
BASIC:<br />
CHR$(27) CHR$(83) CHR$(O)<br />
REFERENCE: < ESC > S 1, < ESC > T, Section 5.<br />
• SELECT SUBSCRIPTS<br />
This code causes all subsequent characters to be printed at the<br />
subscript level, until this function is canceled.<br />
CODE: S 1<br />
HEX:<br />
lB5301<br />
DECIMAL: 27 83 1<br />
BASIC:<br />
CHR$(27) CHR$(83) CHR$(l)<br />
REFERENCE: < ESC> S 0, T, Section 5.
• CANCEL SUPERSCRIPTS AND SUBSCRIPTS<br />
This command is used to cancel either super- or subscript printing.<br />
CODE: T<br />
HEX:<br />
lB54<br />
DECIMAL: 27 84<br />
BASIC:<br />
CHW(27) CHR$(84)<br />
-<br />
REFERENCE: < ESC > S 0, < ESC > S 1, Section 5.<br />
FORMATTING<br />
CONTROLS<br />
• SELECT UN/DIRECTIONAL PRINTING<br />
This command causes all subsequent lines to be printed in the<br />
unidirectional mode, until canceled. Unidirectional printing is useful<br />
in printing tables or charts, since it ensures that vertical columns of<br />
characters will be in alignment in the draft mode.<br />
CODE: U 1<br />
HEX: 1B 55 01<br />
DECIMAL: 27 85 1<br />
BASIC: CHR$(27) CHR$(85) CHR$(l) -<br />
REFERENCE: U 0,
• CANCEL UNIDIRECTIONAL PRINTING<br />
This command cancels unidirectional printing, returning the<br />
printer to its standard bidirectional printing.<br />
CODE: U 0<br />
HEX:<br />
lB5500<br />
DECIMAL: 27 85 0<br />
BASIC:<br />
CHR$(27) CHR$(85) CHR$(O)<br />
REFERENCE: U 1.<br />
• ADVANCE<br />
THE PAPER ONE LINE (LINE FEED)<br />
The actual distance advanced by the line feed is set either through<br />
DIP Switch l-3 or through other line spacing methods outlined in<br />
Section 5.<br />
CODE:<br />
HEX:<br />
<br />
OA<br />
DECIMAL: <strong>10</strong><br />
BASIC:<br />
CHR$(lO)<br />
REFERENCE: 0, 1, 2, a “n”,<br />
< ESC> A “n”, < ESC> 3 “n”, J “n”,<br />
< ESC > j “n”, Section 5.<br />
71
• REVERSE THE PAPER ONE LINE (REVERSE LINE<br />
FEED)<br />
This command causes the printer to reverse the paper one line.<br />
The distance reversed by this instruction is set either through DIP<br />
switch l-3 or through other line spacing methods outlined in Section<br />
5.<br />
CODE: <br />
HEX:<br />
IBOA<br />
DECIMAL: 27 <strong>10</strong><br />
BASIC: CHR$(27) CHR$(lO) -<br />
-<br />
REFERENCE: 0, cESC> 1, 2, a “n”,<br />
-cESC> A “n”, cESC> 3 “n”, J “n”,<br />
< ESC > j “n”, Section 5.<br />
• CHANGE THE LINE SPACING TO l/8 IPICH<br />
This instructs your printer to print 8 lines per inch. (You can also<br />
select 1/8th inch line spacing by turning off DIP switch l-3.)<br />
CODE: 0<br />
HEX:<br />
lB30<br />
DECIMAL: 27 48<br />
BASIC:<br />
CHRS(27) CHR$(48)<br />
-<br />
REFERENCE: 1, 2, a “n”,<br />
A “n”, 3 “n”, J “n”,<br />
< ESC > j “n”, Section 5.<br />
72
W CHANGE THE LINE SPACING TO l/<strong>10</strong> INCH<br />
After this instruction is given, all subsequent line feeds will be set<br />
to l/lOth inch, or <strong>10</strong> lines per inch, as described in Section 5.<br />
CODE: 1<br />
HEX:<br />
lB31<br />
DECIMAL: 27 49<br />
BASIC:<br />
CHR$(27) CHR$(49)<br />
REFERENCE: 0, 2, a “n”,<br />
A “n”, 3 “n”, J “n”,<br />
< ESC > j “n”, Section 5.<br />
• CHANGE THE LINE SPACING TO l/6 INCH<br />
This command returns the line spacing on the printer to 1/6th inch,<br />
which is the American standard. You can also select 1/6th inch line<br />
spacing as the power-on default by turning DIP switch l-3 on.<br />
CODE: 2<br />
HEX:<br />
lB32<br />
DECIMAL: 27 50<br />
BASIC:<br />
CHR$(27) CHR$(50)<br />
REFERENCE: 0, 1, A”n”,<br />
3 “n”, J “n”,<br />
< ESC > j “n”, Section 5.
• ;yHNGE<br />
THE LINE SPACING TO nI60THS OF AN<br />
This command allows you to select the line spacing you want,<br />
to n/60ths of an inch. You may choose a value for “n” between<br />
0 and 255.<br />
CODE: A “t-t”<br />
HEX:<br />
DECIMAL:<br />
BASIC:<br />
1B 41 “n”<br />
27 65 “n”<br />
CHR$(27) CHR$(65) CHR$(n)<br />
REFERENCE: 0, 1, cESC> 2, a “n”,<br />
3 “n”, J “n”, j ‘In”,<br />
Section 5.<br />
• CHANGE THE LINE SPACING TO nl120THS OF AN<br />
INCH<br />
This command allows you to select the line spacing you want,<br />
to nll20ths of an inch. You may choose a value for “n” between<br />
0 and 255.<br />
CODE: 3 “n”<br />
-.-.-<br />
-<br />
-<br />
-<br />
HEX:<br />
DECIMAL:<br />
BASIC:<br />
1B 33 “n”<br />
27 51 “n”<br />
CHR$(27) CHR$(51) CHR$(n)<br />
-<br />
REFERENCE: 0, 1, 2, a “n”, - --<br />
< ESC > A “n”, < ESC > J “n”, < ESC > j ‘In”,<br />
-<br />
Section 5.<br />
-<br />
74<br />
-
• SEND A ONE-TIME-ONLY LINE FEED OF<br />
n/720THS OF AN INCH<br />
This command causes the printer to advance the paper<br />
n/l 20ths of an inch, for the remainder of the line. It does not change<br />
the current value of the line spacing, and it does not cause a carriage<br />
return. You may substitute for “n” any number between 0 and 255.<br />
CODE: J “n”<br />
c<br />
HEX:<br />
1B 4A “n”<br />
L<br />
DECIMAL:<br />
27 74 “n”<br />
i<br />
BASIC:<br />
CHRs(27) CHR$(74) CHR$(n)<br />
c<br />
REFERENCE: 0, -cESC> 1, 2, a “n”,<br />
A “n”, 3 “n”, j “n”.<br />
c.<br />
• SEND A ONE-TIME-ONLY REVERSE LINE FEED<br />
OF nll20THS OF AN INCH<br />
You can use this command to reverse the paper nll20ths of an<br />
inch. It does not change the current value of the line spacing, and<br />
it does not cause a carriage return. You may choose a value between<br />
0 and 255.<br />
CODE:<br />
< ESC > j “n”<br />
.<br />
HEX:<br />
IB 6A “n”<br />
DECIMAL:<br />
27 <strong>10</strong>6 “n”<br />
L.<br />
-<br />
BASIC:<br />
CHR$(27) CHR$(<strong>10</strong>6) CHR$(n)<br />
L.<br />
REFERENCE: 0, 1, 2, a “r-t”,<br />
A “n”, 3 “n”, J “n”.<br />
75
• ADVANCE PAPER TO TOP OF NEXT PAGE (FORM<br />
FEED)<br />
The length of a page selected by the form feed is set either through<br />
DIP switch l-2 or through various codes listed below.<br />
CODE:<br />
<br />
HEX:<br />
oc<br />
DECIMAL: 12<br />
-<br />
t BASIC: CHR$(12)<br />
i REFERENCE: C “n”, C 0 “n”<br />
• REVERSE PAPER TO TOP OF CURRENT PRINTING<br />
PAGE (REVERSE FORM FEED)<br />
This command causes the printer to reverse the paper to the top<br />
line of the page.<br />
CODE: <br />
, HEX: IBOC<br />
I<br />
i<br />
DECIMAL: 27 12<br />
i<br />
BASIC: CHR$(27) CHR$( 12)<br />
REFERENCE: C “n”, C 0 “n”.<br />
• SET PAGE LENGTH TO “n” LINES<br />
This command sets the length of all subsequent pages to “n” lines. -<br />
You may choose for “n” any whole number between 1 and 127.<br />
-<br />
CODE: C “n”<br />
HEX:<br />
1B 43 “n”<br />
DECIMAL: 27 67 “n”<br />
BASIC: CHRS(27) CHR$(67) CHR$(n)<br />
REFERENCE: < ESC > C 0 “‘n”, Section 5.<br />
-<br />
-<br />
-<br />
76
W SET PAGE LENGTH TO “n” INCHES<br />
When you send thiscommand, you set the length of all subsequent<br />
pages to “n” inches. You may choose for “n” any whole number<br />
value between 1 and 32. (You may also select a power-on default<br />
form length of 11 inches or 12 inches by setting DIP switch l-2.)<br />
i<br />
CODE: C 0 “n”<br />
L.<br />
HEX:<br />
DECIMAL:<br />
BASIC:<br />
1B 43 00 “n”<br />
27 67 0 “n”<br />
CHR$(27) CHR$(67) CHR$(O) CHR$(n)<br />
REFERENCE: < ESC > C “n”, Section 5.<br />
• SET TOP MARGIN<br />
This command allows you to redefine the top margin of the page.<br />
For “n”, you may enter any number between 1 and 16.<br />
CODE: r “n”<br />
1<br />
HEX: 1B 72 “n”<br />
. DECIMAL: 27 114 “n”<br />
BASIC:<br />
CHR$(27) CHR$(114) CHR$(n)<br />
REFERENCE: < ESC > N “n”, Section 5.
• SET THE BOTTOM MARGlN<br />
With this command, you set the bottom margin of the page to<br />
“n” lines. The printer automatically executes a form feed when the<br />
number of lines left on a page is equal to the “r-r” value you choose.<br />
You may enter for “n” any value between 1 and 127.<br />
CODE: N “n”<br />
HEX:<br />
DECIMAL:<br />
BASIC:<br />
1B 4E “n”<br />
27 78 “n”<br />
CHR$(27) CHR$(78) CHR!$(n)<br />
REFERENCE: < ESC > 0, Section 5.<br />
• CANCEL TOP AND BOTTOM MARGINS<br />
This command cancels both the top margin set by r<br />
“n” and the bottom margin set by N “n”.<br />
--.<br />
1<br />
-<br />
-<br />
-<br />
CODE: 0<br />
HEX:<br />
1B4F<br />
DECIMAL: 27 79<br />
BASIC: CHR$(27) CHR$(79) -<br />
REFERENCE: < ESC > r “n”, < ESC > N “n”, Section 5.<br />
--
a SET VERTICAL TAB POSITIONS<br />
This command cancels all previous vertical tab positions and sets<br />
those defined at lines “nl","n2", etc. The maximum number of<br />
vertical tab positions you can set is 12. This instruction must be<br />
terminated with the “NUL” code, CHR$(O). Each vertical tab must<br />
be specified in ascending order.<br />
CODE: B "nl" "n2" . ..O<br />
HEX: IB 42 "nl " “n2" . . 0<br />
DECIMAL: 2766 "nl " "n2" . . . 0<br />
BASIC: CHR$(27) CHR$(66) CHR$(nl) CHR$(n2) . . . CHR$(O)<br />
REFERENCE: , Section 5.<br />
.<br />
• ADVANCE TO NEXT VERTICAL TAB POSITION<br />
This command causes to the paper to advance to the next vertical<br />
tab position or the top of the page, whichever comes first. Thevertical<br />
tab positions are set automatically at power-on to lines 6, 12, 18, 24,<br />
30, 36, 42, 48, 54, and 60.<br />
CODE:<br />
HEX:<br />
<br />
OB<br />
DECIMAL: 11<br />
BASIC:<br />
CHR$(ll)<br />
REFERENCE: B "nl" “n2" 0, < ESC> a ‘In",<br />
Section 5.
• ADVANCE THE PAPER “n” LINES<br />
This command causes the paper to advance "n" lines, but does<br />
not change any values of the vertical tab positions. You may choose<br />
any number between 1 and 255 for "n".<br />
CODE:<br />
< ESC > a “n”<br />
/<br />
/<br />
i<br />
HEX:<br />
1B 61 “n”<br />
DECIMAL: 2797 "n"<br />
BASIC: CHW(27) CHR$(97) CHR$(n) -<br />
r<br />
REFERENCE: B “nl" “n2" . . . 0. -<br />
m SET VERTICAL FORM UNIT (VFU)<br />
The vertical form unit command can be used to help you print<br />
multipage forms. If each page of the form has different vertical tab<br />
positions, the tabs can be set in “channels”. There are 7 channels<br />
which are numbered from 0 to 6, you can program the tab positions<br />
for up to 7 different pages of a form. In the example below the variable<br />
"n" is used to select which channel will be used. The variables<br />
‘dm, 11, “m2”,<br />
“m3”... are used to define the vertical tab positions for<br />
a given channel. The command must be terminated with a nul code<br />
to signify the end of data for that command. The maximum<br />
number of tab positions for a channel is 12.<br />
CODE: "n" "ml" "m2" . 0<br />
HEX: 1F "n" “ml " "m2" . . . 00<br />
DECIMAL: 31 "n" "ml" "m2" . ..O<br />
BASIC: CHR$(31) CHR$(n) CHR$(ml) CHR$(m2) -.<br />
CHR$(O)<br />
REFERENCE: < ESC > B “nl" "n2" . ..O. / n<br />
80
• SELECT VERTICAL FORM UNIT (VFU) CHANNEL<br />
This command causes the printer to execute all subsequent vertical<br />
tabs in accordance with the format you specified for VFU<br />
channel “n”.<br />
CODE:<br />
HEX:<br />
DECIMAL:<br />
BASIC:<br />
< ESC > I "n"<br />
19 2F "n"<br />
2747 "n"<br />
CHRS(27) CHR$(47) CHR!$(n)<br />
REFERENCE: “n" “ml" "m2" . 0<br />
B “t-t"n2" ...O<br />
• CARRIAGE RETURN<br />
This command returns the print head to its “home” position at the<br />
left margin.<br />
CODE:<br />
HEX:<br />
<br />
OD<br />
DECIMAL: 13<br />
BASIC:<br />
CHR$(13)<br />
REFERENCE: Appendix D.<br />
87
• SET THE LEFT MARGIN<br />
You can use this instruction to set the left printing margin of your<br />
page. This margin will be the “home” position of all subsequent<br />
carriage returns until it is canceled or changed. The power-on default<br />
for this position is 1. The value for “n” must be between 1 and 155.<br />
The maximum print position for pica type is 80 for elite, 96 and for<br />
condensed type, 132.<br />
CODE:<br />
HEX:<br />
DECIMAL:<br />
BASIC:<br />
< ESC > I “n”<br />
19 6C “n”<br />
27 <strong>10</strong>8 “n”<br />
CHR$(27) CHW(<strong>10</strong>8) CHR$(n)<br />
REFERENCE: < ESC > Q “n”, Section 5.<br />
• SET THE RIGHT MARGIN<br />
Use this command to set the right printing margin on the page.<br />
Any attempt to print beyond your chosen right-hand margin will<br />
cause an automatic carriage return and line feed. Choose any value<br />
between 1 and 155.<br />
CODE: Q “n”<br />
-<br />
-<br />
-<br />
-<br />
-<br />
HEX:<br />
DECIMAL:<br />
19 51 “n”<br />
27 81 “n”<br />
-<br />
BASIC:<br />
CHR$(27) CHR$(81) CHR$(n)<br />
REFERENCE: < ESC > I “n”, Section 5.<br />
-.<br />
-<br />
82
w SET HORIZONTAL TAB POSITIONS<br />
With this command, you cancel all previously set horizontal tabs,<br />
and set new positions at lines "nl ”,"n2", etc. There are255 available<br />
tab positions. Use 0 to terminate this command. Each horizontal<br />
tab must be between 1 and 255, and must be specified in ascending<br />
order.<br />
CODE: < ESC > D "n" "n2" 0<br />
HEX: 19 44 "nl" "n2" ,.. 00<br />
DECIMAL: 27 68 "nl" "n2" . 0<br />
BASIC: CHR$(27) CHR$(68) CHR$(nl) CHR$(n2)<br />
CHW(O)<br />
REFERENCE: < ESC > b "n", < HT >, Section 5.<br />
w ADVANCE TO NEXT HORIZONTAL TAB<br />
This command moves the print head to the next available horizontal<br />
tab position. Horizontal tabs are set at power-on to positions<br />
9, 17, 25, 33, etc., to the maximum print position.<br />
CODE:<br />
<br />
HEX: 09<br />
DECIMAL: 9<br />
BASIC:<br />
CHRS(9)<br />
REFERENCE: D “nl” "n2" ,., 0, Section 5.
I SKIP HORIZONTAL TAB POSITIONS<br />
Causes the print head to advance "n" print positions to the right.<br />
It does not, however, change the current values of the horizontal tabs.<br />
You may choose any number for “n" between 1 and 255.<br />
CODE: b "n"<br />
HEX:<br />
19 62 "n"<br />
--<br />
DECIMAL: 2798 “n" -<br />
BASIC: CHR$(27) CHR$(98) CHR$(n) -<br />
REFERENCE: D "r-t"n2" ...O. -<br />
• MOVE THE PRINT HEAD BACK ONE POSITION<br />
(BACKSPACE)<br />
Shifts the print head one column to the left. This command can<br />
be used to overstrike characters.<br />
-<br />
CODE:<br />
CBS><br />
HEX: 08<br />
DECIMAL: 8<br />
BASIC:<br />
CHRS(8)<br />
REFERENCE: Section 2.<br />
-<br />
-<br />
84
.<br />
• PRINT 8-BIT GRAPHICS<br />
This command selects the 8-bit graphics mode. Please see Appendix<br />
F for a detailed explanation of this mode.<br />
L..<br />
CODE: -cESC> Y “t-11” “n2” “ml” “m2” ..<br />
HEX:<br />
19 59 “nl” “r-12” “ml” “m2” .<br />
DECIMAL: 27 89 “nl” “n2” “ml” “m2” ..<br />
BASIC: CHR$(27) CHR$(89) CHR$(nl) CHR$(n2) CHR$(ml)<br />
CHR$(m2)... .<br />
REFERENCE: Appendix F.<br />
• PRINT 16-BIT GRAPHICS<br />
This command switches the printer into its 16-bit graphics mode.<br />
Please see Appendix F for more on the printer’s graphics modes.<br />
CODE: I “r-17” “n2” “ml” “m2”<br />
HEX: 19 49 “nl” “n2” “ml” “m2” .<br />
DECIMAL:<br />
27 73 “nl” “n2” “ml” “m2”<br />
BASIC: CHR$(27) CHRW3) CHR$(nl) CHR$(n2) CHR$(ml)<br />
CHR$(m2) ...<br />
REFERENCE: Appendix F.<br />
85
• PRINT 24-BIT GRAPHICS -<br />
With this command, you can print high-resolution 24-bit graphics.<br />
Please see Appendix F for details.<br />
-<br />
CODE: V “nl” “n2” “ml” “m2” ..<br />
HEX: 19 56 “nl” “n2” “ml” “m2” ..<br />
DECIMAL: 27 86 “nl” “n2” “ml” “m2” . . .<br />
BASIC:<br />
REFERENCE: APPENDIX F.<br />
CHR$(27) CHR$(86) CHR$(n<br />
CHR$(m2)...<br />
7) CHR$(n2) CHR$(m<br />
W PRINT 8X3-BIT GRAPHICS<br />
This command enables the 8x3-bit graphics mode, which prints<br />
about three times as dense and three times as wide as simple 8-bit<br />
graphics. Please see Appendix F for details.<br />
1)<br />
-<br />
.-<br />
-<br />
-<br />
-<br />
--<br />
-<br />
CODE: K “nl” “n2” “ml” “m2” -<br />
HEX:<br />
DECIMAL:<br />
19 49 “nl” “n2” “ml” “m2”<br />
27 75 “nl” “n2” “ml” “m2”<br />
BASIC: CHRS(27) CHR$(75) CHR$(nj) CHR$(n2) CHR$(mj)<br />
CHR$(m2)...<br />
-<br />
REFERENCE: Appendix F. -<br />
-<br />
-<br />
-<br />
-<br />
86
.<br />
H SELECT MASTER PRINT MODE<br />
With this command, you can select one of 16 unique print mode<br />
combinations shown in Table A-l, for the value of “n”.(You may<br />
choose for “r-t” any number between 0 and 255.) This command<br />
precedes other commands (such as < ESC > G, etc.) which set the<br />
print mode.<br />
*<br />
CODE: ! “n”<br />
*<br />
HEX:<br />
1921 “n”<br />
L<br />
DECIMAL:<br />
27 33 “n”<br />
L<br />
BASIC:<br />
CHR$(27) CHR$(33) CHR$(n)<br />
REFERENCE: < ESC > ,
Table A-l.<br />
Options for the master print mode.<br />
PITCH NORMAL EMPHASIZED DOUBLE-STRIKE<br />
DOUBLE-STRIKE<br />
& EMPHASIZED<br />
Pica 0, 2, 64, 8, <strong>10</strong>, 12, 16, 18, 80, 24, 26, 28,<br />
66, 128, 130, 14, 72, 74, 82,144,146, 30, 88, 90,<br />
192, 194 76, 78, 136, 208,2<strong>10</strong> 92, 94, 152,<br />
138, 140, 142, 154, 156, 158;<br />
200, 202, 204, 216, 218, 220,<br />
206 222<br />
Elite 1, 3, 5, Elite takes 17, 19, 21, Elite takes<br />
7, 9, 11, precedence 23, 25, 27, precedence<br />
13, 15, 65, over 29, 31, 81, over<br />
67, 69, 71, Emphasized. 83, 85, 87, Emphasized.<br />
73, 75, 77, 89, 91, 93,<br />
79, 129, 131, 95,145,147,<br />
133, 135, 137, 149,151,153,<br />
139, 141, 143, 155,157,159,<br />
193, 195, 197, 209,211,213,<br />
199, 201, 203, 215,217,219,<br />
205, 207 221,223<br />
Condensed 4, 6, 68, Emphasized 20, 22, 84, Emphasized<br />
70, 132, 134, takes 86,148,150, takes<br />
196,198 precedence 212,214 precedence<br />
over<br />
over<br />
condensed. condensed.<br />
Expanded 32, 34, 96, 40, 42, 44, 48, 50, 112, 56, 58, 60<br />
Pica 98, 160, 162, 46, <strong>10</strong>4, <strong>10</strong>6, 114,176,178, 62, 120, 122<br />
224, 226 <strong>10</strong>8, 1<strong>10</strong>, 168, 240,242 124, 126, 184<br />
170, 172, 174, 186, 188, 190<br />
232, 234, 236, 248, 250, 252<br />
238 254<br />
Expanded 33, 35, 37, Elite takes 49, 51, 53, Elitetakes<br />
Elite 39, 41, 43, precedence 55, 57, 59, precedence<br />
45, 47, 97, over 61, 63,113, over<br />
99, <strong>10</strong>1, <strong>10</strong>3, Emphasized. 115,117,119, Emphasized.<br />
<strong>10</strong>5, <strong>10</strong>7, <strong>10</strong>9, 121,123,125,<br />
111, 161, 163, 127,177,179,<br />
165, 167, 169, 181,183,185,<br />
171, 173, 175, 187,189,191,<br />
225, 227, 229, 241,243,245,<br />
231, 233, 235, 247,249,251,<br />
237, 239 253,255<br />
Expanded 36, 38, <strong>10</strong>0, Emphasized 52, 54,116, Emphasized<br />
Condensed <strong>10</strong>2, 164, 166, takes 118,180,182, takes<br />
228,230 precedence 244,246 precedence<br />
over<br />
over<br />
condensed. condensed.<br />
-<br />
-<br />
-._<br />
-<br />
--<br />
-<br />
-<br />
-<br />
-<br />
-<br />
88
• DEFINE MACRO INSTRUCTION<br />
This command cancels any existing macro instruction and replaces<br />
it with a new macro defined by you. Your maximum number<br />
of codes in this instruction is 16. The last character in each of the<br />
codes below is used to terminate the command.<br />
CODE: + . ..<br />
HEX:<br />
192B...lE<br />
DECIMAL: 27 43 30<br />
BASIC: CHRW) CHR$(43) . . . CHR$(30)<br />
REFERENCE: < ESC > , Section 4<br />
• EXECUTE MACRO INSTRUCTION<br />
This command is used to execute your previously defined macro<br />
instruction.<br />
CODE: <br />
HEX:<br />
lB3F<br />
DECIMAL: 27 63<br />
BASIC:<br />
CHR$(27) CHR$(63)<br />
REFERENCE: < ESC > + < RS>, Section 4.<br />
. .<br />
a ;cE;L<br />
HEX:<br />
lB3E<br />
DECIMAL: 27 62<br />
BASIC:<br />
CHR$(27) CHR$(62)<br />
REFERENCE: #, =.<br />
89
• scELLTHE VALUE OF THE 8TH DATA BIT TO LOG-<br />
This command causes the printer to ignore the eighth data bit.<br />
CODE: =<br />
HEX:<br />
lB3D<br />
-<br />
DECIMAL: 27 61<br />
BASIC:<br />
CHR$(27) CHR$(Gl)<br />
REFERENCE: >, #.<br />
-<br />
• ;CCEPT THE VALUE OF THE 8TH DATA BIT AS - -<br />
This command cancels either setting of the 8th data bit, causing<br />
the printer to use the value of the eighth data bit that is sent from<br />
the computer.<br />
CODE: #<br />
HEX: 1923<br />
DECIMAL: 27 35<br />
BASIC:<br />
CHR$(27) CHR$(35)<br />
REFERENCE: >, =.<br />
-<br />
• DELETE THE LAST CHARACTER SENT<br />
This command deletes the last character received by the printer; I ~~~<br />
it is ignored if the last character received has already been printed,<br />
or if the last character received was all or part of a function code.<br />
CODE:<br />
HEX:<br />
<br />
7F<br />
DECIMAL: 127<br />
BASIC:<br />
CHR$(127)<br />
90
• SET PRINTER OFF-LINE<br />
This command causes the printer to set itself off-line, disregarding<br />
all subsequent characters and function codes (with the exception<br />
of < DC1 >, which returns the printer to its on-line state). When the<br />
ON LINE lamp on the printer is off, the printer will not respond to<br />
.<br />
! *<br />
CODE:<br />
<br />
k<br />
HEX: 13<br />
L *<br />
DECIMAL: 19<br />
li BASIC:<br />
L<br />
CHR$(lS)<br />
REFERENCE: < DC1 ><br />
b<br />
• SET THE PRINTER ON-LINE<br />
This code resets the printer to an on-line state, allowing it to again<br />
I *<br />
receive and process characters and function codes. The ON LINE<br />
lamp must be lit for the printer to respond to this code.<br />
L<br />
CODE:<br />
<br />
.<br />
HEX:<br />
11<br />
DECIMAL: 17<br />
BASIC:<br />
REFERENCE:<br />
CHR$(17)<br />
< DC3>.<br />
• SOUND THE PRINTER BELL<br />
This command causes the printer tone to sound for approximately<br />
1/4th second.<br />
CODE:<br />
<br />
HEX: 07<br />
DECIMAL: 7<br />
BASIC:<br />
CHRW)<br />
REFERENCE: y 1, y0.<br />
91
• DISABLE THE PRINTER BELL<br />
This command causes the printer to ignore the < BEL > code.<br />
CODE: y0<br />
HEX:<br />
lB7900<br />
DECIMAL: 27 121 0<br />
BASIC:<br />
CHR$(27) CHR$(121) CHR$(O)<br />
REFERENCE: y 1, <br />
• ENABLE PRINTER BELL<br />
This command causes the printer to respond to the < BEL > code<br />
by sounding the printer tone. -<br />
CODE: y 1<br />
HEX:<br />
lB7901<br />
DECIMAL: 27 121 1<br />
BASIC:<br />
CHR$(27) CHR$(121) CHR$(l)<br />
REFERENCE: y0, .<br />
• DISABLE PAPER-OUT DETECTOR<br />
This command causes the printer to disregard the signal sent by<br />
the paper-out detector. The paper-out signal normally sounds the<br />
printer bell and stops printing until paper is inserted and the printer<br />
is reset.<br />
CODE: 8<br />
-<br />
_<br />
-<br />
HEX: 1838<br />
DECIMAL: 27 56<br />
BASIC: CHR$(27) CHR$(56) -<br />
REFERENCE: 9.<br />
92 -
• ENABLE PAPER-OUT DETECTOR<br />
This command restores the function of the paper-out detector.<br />
CODE: 9<br />
HEX:<br />
lB39<br />
DECIMAL: 27 57<br />
BASIC:<br />
CHR$(27) CHR$(57)<br />
REFERENCE: < ESC> 8.<br />
• CANCEL TEXT IN PRINT BUFFER<br />
This command cancels all the data previously stored in the print<br />
buffer of your printer.<br />
CODE:<br />
<br />
HEX: 18<br />
DECIMAL: 24<br />
BASIC:<br />
CHR$(24)<br />
REFERENCE: < DEL ><br />
• INITIALIZE PRINTER<br />
This command is used to reinitialize the printer. The print buffer<br />
is cleared and the form length, character pitch, character set, line<br />
feed pitch, and international character set are all reset to the values<br />
defined by their respective DIP switches. The main difference between<br />
this code and simply turning the printer off isthat download character<br />
RAM is preserved with this command.<br />
CODE: @<br />
HEX:<br />
lB40<br />
DECIMAL: 27 64<br />
BASIC:<br />
CHR$(27) CHR$(64)
• SELECT INCREMENTAL MODE<br />
This command causes the printer to print each character as it is<br />
typed in. If the data is input at intervals of less than approximately<br />
0.1 second, printout will be performed continuously. This is useful<br />
for completing forms, or whenever you need to print a character on<br />
command.<br />
CODE:<br />
HEX:<br />
i 1<br />
lB6901<br />
DECIMAL .. 27 <strong>10</strong>5 1<br />
BASIC:<br />
CHR$(27) CHR$(<strong>10</strong>5) CHR$(l)<br />
REFERENCE: < ESC > i 0.<br />
• CANCEL INCREMENTAL MODE<br />
This command cancels incremental mode.<br />
CODE: i0<br />
HEX:<br />
lB6900<br />
DECIMAL: 27 <strong>10</strong>5 0<br />
BASIC:<br />
CHR$(27) CHR$(<strong>10</strong>5) CHR$(O)<br />
REFERENCE: < ESC > i 1.<br />
-<br />
***********<br />
-
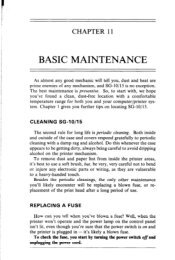
APPENDIX<br />
INSTALLING THE PRINTER<br />
INTO YOUR WORD PROCESSING<br />
PACKAGE<br />
In Section 1, we listed the basic information you will need to know<br />
when you install the printer into your word processing package.<br />
Now let’s look at a typical installation for WordStar, one of the<br />
first-and still the most popular-word processors made for the<br />
personal computer. If you aren’t planning to use WordStar as your<br />
word processor, you can still benefit by reading the following<br />
step-by-step description-it will take you through a typical “custom<br />
installation”, giving you valuable information you can use with any<br />
word processor.<br />
To get to the WordStar installation program, insert the disk into<br />
your computer as you normally do; at the A >, type the word WIN-<br />
STALL. The installation program will appear, prompting you with<br />
a few preliminary questions (such as “Do you want to continue with<br />
this installation“; answer these questions, and when you get to the<br />
query “Name of file to install”, enter WSCOM and press the return<br />
key three times.<br />
• THE INSTALLATION MENU<br />
The next menu to appear on your screen will be the WordStar<br />
Installation Menu, with several choices, including “Menu of Printers”<br />
and “Custom Installation of Printers.” As we said, you may want to<br />
look at the menu of printers and experiment with any of the dot matrix<br />
printers listed.<br />
However, you’ll get your best results by using WordStar’s “Custom<br />
Installation of Printers.” This choice requires some detailed information<br />
about your printer, which you’ll find in the following pages.<br />
When you choose “Custom Installation of Printers,” you are immediately<br />
given a submenu called the Printer Installation Menu. The
Printer Installation Menu contains a separate entry for each category<br />
of information you will provide concerning the printer.<br />
From this menu your choice is “Automatic Installation for Specialty<br />
Printers,” which will lead you through each individual category under<br />
the heading “All printers”; in addition, it will lead you through the<br />
categories for “Specialty printers only”.<br />
Printer Name<br />
Your first category is an easy one-the optional “Printer Name.”<br />
If this is your first installation of WordStar, there will be a blank space<br />
next to the words “Current name is:“. Press C to change this status,<br />
and type in your printer’s name.<br />
Printer Initialization<br />
This important category tells WordStar the exact code sequence<br />
needed to communicate with your printer. The sequence is “currently<br />
empty,” so press C to change this status; then enter the following<br />
hexadecimal numbers in the exact order shown here (press the return<br />
key when you see the word < return >):<br />
OD <br />
1 B < return ><br />
40 < return ><br />
1 B < return ><br />
34 < return ><br />
1B <br />
1 E < return ><br />
09 <br />
1B <br />
1F <br />
OD <br />
00 <br />
00 <br />
00 <br />
00 <br />
00 < return > < return ><br />
When you’re finished entering the initialization code, press Y or<br />
< return > to confirm your choices.<br />
Printer De-initialization<br />
You will automatically advance to this category when you have<br />
finished entering the information concerning printer initialization.<br />
No de-initialization code is needed for your printer, so just press<br />
< return > to advance to the next category.
Overprinting<br />
The “Overprinting” category will want to know how your printer<br />
backspaces. Press C and, from a list of three choices, choose<br />
“backspacing standard printer”; then press Y or to<br />
confirm your choice.<br />
Next you will be prompted to enter the “backspacing code sequence.”<br />
Press C, then type in “8h”, and finish by pressing the return<br />
key.<br />
Boldfacing<br />
Your next category, “Boldfacing”, informs you directly of the<br />
correct number of strikes for boldface printing: 2. So, press C, 2,<br />
and .<br />
Communications<br />
protocol<br />
If you are using the parallel interface, no protocol is necessary for<br />
this printer. (For the code sequences used in the various serial interface<br />
protocols, please see Appendix H.)<br />
Printer driver<br />
If you have chosen “Primary list device” as your printer driver, then<br />
the correct codes for that device will already be entered in this category,<br />
and no further input is necessary on your part. Press < return<br />
> to exit this category.<br />
Ribbon selection<br />
This category also does not apply to your printer, so please press<br />
< return > to exit.<br />
Vertical motion and Horizontal motion<br />
When you chose “Automatic Installation for Specialty Printers,”<br />
the installation program automatically entered the necessary codes<br />
for these two categories. No further input is necessary, so just press<br />
to pass through them unchanged.<br />
Print modes<br />
This category asks for the code sequences of the backward and<br />
forward print modes, You should also pass through these sequences<br />
unchanged.<br />
Print phantom characters<br />
This category does not apply to your printer , so press <br />
to pass through it. You will be returned to the Printer Installation<br />
Menu, and may now enter the special features of the printer that<br />
you’ll want to use on a regular basis: emphasized, expanded, and<br />
underlined printing, or any of the other features you’ve iearned about<br />
in this book.<br />
97
• USER FUNCTIONS<br />
Once you have entered them, you’ll be able to call up each of these<br />
features from the WordStar Print Menu, under the heading “User<br />
Patches. ”<br />
You can enter these features into WordStar by choosing theoption<br />
“User-defined functions” from the Printer Installation Menu; “User<br />
function #lo will appear on your screen.<br />
WordStar allows you four separate “user functions,” each of which<br />
represents a feature of the printer (and requires a specific code).<br />
Now, remember that most printer features need both a code to turn<br />
them on and a code to turn them off. So, you will need two user<br />
functions for, say, expanded print. Using expanded print as a typical<br />
feature you might want to install, let’s proceed with user function<br />
#l. (Before we do, however, please note that function #l is given the -<br />
designation ” h PQ”; when you are word processing in WordStar, you<br />
can call up this function simply by typing in “PQ.)<br />
Begin by pressing C to change the status of user function #l.<br />
WINSTALL will present you with an explanation of how to enter three<br />
different kinds of codes: “ASCII”, decimal and hexadecimal. In this<br />
particular installation program, the method described for entering<br />
“ASCII” codes can be used to enter both escape codes and control<br />
codes: for each character in the code sequence,<br />
*press ‘I:“,<br />
aenter the character itself, and<br />
• press < return >.<br />
The code sequence to activate expanded print is W 1;<br />
to enter this code in WordStar, type in:<br />
: < ESC > < return ><br />
:W < return ><br />
:l < return > <br />
WordStar will next read back to you the hexadecimal form cf this<br />
code: 1 B 57h 1 h Oh (the lowercase “h” denotes hexadecimal numerals,<br />
and the “Oh” means that the fourth space remains empty).<br />
You can check the hexadecimal code displayed on your screen with<br />
the hexadecimal code for expanded print in Appendix A of this manual.<br />
If they match, you’ll know that you have entered the code<br />
correctly. Press Y or < return > to confirm your choice.<br />
You will next be presented with WordStar user function #2. Here<br />
you’ll want to enter the code to cancel expanded print. You can enter<br />
the code to cancel expanded print, < ESC > W 0, using the same<br />
method you employed for user function #l. At a later time, when you<br />
are word processing with WordStar, you can access this function<br />
by entering “PW.
You can program user functions #3 and #4 the same way you<br />
did for #l and #2, employing any other feature that you wish to use.<br />
By following these procedures, you’ll have successfully completed<br />
the WordStar installation program, and will have up to four special<br />
features of the printer at your command.<br />
99
MEMO<br />
--<br />
-.
APPENDIX<br />
ASCII CODE CONVERSION<br />
CHART<br />
STANDARD ASCII CODES<br />
DECIMAL HEXADECIMAL BINARY<br />
0<br />
00 0000 0000<br />
01 0000 0001<br />
2 02 0000 00<strong>10</strong><br />
3 03 0000 001 I<br />
4 04 0000 0<strong>10</strong>0<br />
5 05 0000 0<strong>10</strong>1<br />
6 06 0000 01<strong>10</strong><br />
7 07 00000111<br />
a 08 0000 <strong>10</strong>00<br />
9 09 0000 <strong>10</strong>01<br />
IO OA 0000 <strong>10</strong><strong>10</strong><br />
11 OB 0000 <strong>10</strong>11<br />
12 oc 0000 1<strong>10</strong>0<br />
13 OD 0000 1<strong>10</strong>1<br />
14 OE 0000 11<strong>10</strong><br />
15 OF 0000 1111<br />
16 <strong>10</strong> 0001 0000<br />
17 11 0001 0001<br />
18 12 0001 00<strong>10</strong><br />
19 13 0001 0011<br />
20 14 0001 0<strong>10</strong>0<br />
21 15 0001 0<strong>10</strong>1<br />
22 16 0001 01<strong>10</strong><br />
23 17 0001 0111<br />
24 18 0001 <strong>10</strong>00<br />
25 19 0001 <strong>10</strong>01<br />
26 1A 0001 <strong>10</strong><strong>10</strong><br />
CONTROL<br />
CHARACTER<br />
CTRL-@<br />
CTRL-A<br />
CTRL-B<br />
CTRL-C<br />
CTRL-D<br />
CTRL-E<br />
CTRL-F<br />
CTRL-G<br />
CTRL-i-l<br />
CTRL-I<br />
CTRL-J<br />
CTRL-K<br />
CTRL-L<br />
CTRL-M<br />
CTRL-N<br />
CTRL-0<br />
CTRL-P<br />
CTRL-Q<br />
CTRL-R<br />
CTRL-S<br />
CTRL-T<br />
CTRL-U<br />
CTRL-V<br />
CTRL-W<br />
CTRL-X<br />
CTRL-Y<br />
CTRL-Z<br />
CHARACTER<br />
<br />
<br />
<br />
<br />
<br />
<br />
<br />
<br />
<br />
< SI ><br />
<br />
<br />
<br />
<br />
STANDARD ASCII CODES<br />
DECIMAL HEXADECIMAL BINARY<br />
27 18 0001 <strong>10</strong>11<br />
28 1c 0001 1<strong>10</strong>0<br />
29 1D 0001 1<strong>10</strong>1<br />
30 1E 000111<strong>10</strong><br />
31 1F 0001 1111<br />
32 20 00<strong>10</strong>0000<br />
33 21 00<strong>10</strong>0001<br />
34 22 00<strong>10</strong>00<strong>10</strong><br />
35 23 00<strong>10</strong>0011<br />
36 24 00<strong>10</strong>0<strong>10</strong>0<br />
37 25 00<strong>10</strong>0<strong>10</strong>1<br />
38 26 00<strong>10</strong>01<strong>10</strong><br />
39 27 00<strong>10</strong>0111<br />
40 28 00<strong>10</strong><strong>10</strong>00<br />
41 29 00<strong>10</strong><strong>10</strong>01<br />
42 2A 00<strong>10</strong><strong>10</strong><strong>10</strong><br />
43 2B 00<strong>10</strong><strong>10</strong>11<br />
44 2c 00<strong>10</strong>1<strong>10</strong>0<br />
45 20 00<strong>10</strong>1<strong>10</strong>1<br />
46 2E 00<strong>10</strong>11<strong>10</strong><br />
47 2F 00<strong>10</strong>1111<br />
CHARACTER<br />
<br />
<br />
<br />
SP<br />
I<br />
$4<br />
48 30 0011 0000<br />
49 31 0011 0001<br />
50 32 0011 00<strong>10</strong><br />
51 33 0011 0011<br />
52 34 0011 0<strong>10</strong>0<br />
53 35 0011 0<strong>10</strong>1<br />
54 36 0011 01<strong>10</strong><br />
55 37 0011 0111<br />
56 38 0011 <strong>10</strong>00<br />
57 39 0011 <strong>10</strong>01<br />
58 3A 0011 <strong>10</strong><strong>10</strong><br />
59 3B 0011 <strong>10</strong>11<br />
60 3c 0011 1<strong>10</strong>0<br />
61 3D 0011 1<strong>10</strong>1<br />
62 3E 0011 11<strong>10</strong><br />
63 3F 0011 1111<br />
64 40 0<strong>10</strong>00000<br />
65 41 0<strong>10</strong>00001<br />
66 42 0<strong>10</strong>0 00<strong>10</strong><br />
67 43 0<strong>10</strong>00011<br />
68 44 0<strong>10</strong>00<strong>10</strong>0<br />
69 45 0<strong>10</strong>0 0<strong>10</strong>1<br />
70 46 0<strong>10</strong>001<strong>10</strong><br />
<strong>10</strong>2
STANDARD ASCII CODES<br />
DECIMAL HEXADECIMAL BINARY<br />
71 47 0<strong>10</strong>00111<br />
72 48 0<strong>10</strong>0<strong>10</strong>00<br />
73 49 0<strong>10</strong>0<strong>10</strong>01<br />
74 4A 0<strong>10</strong>0<strong>10</strong><strong>10</strong><br />
75 4B 0<strong>10</strong>0<strong>10</strong>11<br />
76 4c 0<strong>10</strong>01<strong>10</strong>0<br />
77 4D 0<strong>10</strong>01<strong>10</strong>1<br />
78 4E 0<strong>10</strong>011<strong>10</strong><br />
79 4F 0<strong>10</strong>01111<br />
80 50 0<strong>10</strong>1 0000<br />
81 51 0<strong>10</strong>1 0001<br />
82 52 0<strong>10</strong>1 00<strong>10</strong><br />
83 53 0<strong>10</strong>1 0011<br />
84 54 0<strong>10</strong>1 0<strong>10</strong>0<br />
85 55 0<strong>10</strong>1 0<strong>10</strong>1<br />
86 56 0<strong>10</strong>1 01<strong>10</strong><br />
87 57 0<strong>10</strong>1 0111<br />
88 58 0<strong>10</strong>1 <strong>10</strong>00<br />
89 59 0<strong>10</strong>1 <strong>10</strong>01<br />
90 5A 0<strong>10</strong>1 <strong>10</strong><strong>10</strong><br />
91 5B 0<strong>10</strong>1 <strong>10</strong>11<br />
92 5c 0<strong>10</strong>1 1<strong>10</strong>0<br />
93 5D 0<strong>10</strong>1 1<strong>10</strong>1<br />
94 SE 0<strong>10</strong>1 11<strong>10</strong><br />
95 5F 0<strong>10</strong>1 1111<br />
96 60 01<strong>10</strong>0000<br />
97 61 01<strong>10</strong>0001<br />
98 62 01<strong>10</strong>00<strong>10</strong><br />
99 63 01<strong>10</strong>0011<br />
<strong>10</strong>0 64 01<strong>10</strong>0<strong>10</strong>0<br />
<strong>10</strong>1 65 01<strong>10</strong>0<strong>10</strong>1<br />
<strong>10</strong>2 66 01<strong>10</strong>01<strong>10</strong><br />
<strong>10</strong>3 67 01<strong>10</strong>0111<br />
<strong>10</strong>4 68 01<strong>10</strong><strong>10</strong>00<br />
<strong>10</strong>5 69 01<strong>10</strong><strong>10</strong>01<br />
<strong>10</strong>6 6A 01<strong>10</strong><strong>10</strong><strong>10</strong><br />
<strong>10</strong>7 6B 01<strong>10</strong><strong>10</strong>11<br />
<strong>10</strong>8 6C 01<strong>10</strong> 7<strong>10</strong>0<br />
<strong>10</strong>9 6D 01<strong>10</strong>1<strong>10</strong>1<br />
1<strong>10</strong> 6E 01<strong>10</strong>11<strong>10</strong><br />
111 6F 01<strong>10</strong>1111<br />
112 70 0111 0000<br />
113 71 0111 0001<br />
114 72 0111 00<strong>10</strong><br />
CHARACTER<br />
G<br />
t-l<br />
I<br />
J<br />
bl<br />
L<br />
M<br />
i-4<br />
0<br />
F’<br />
0<br />
R<br />
s<br />
-!-<br />
L!<br />
v<br />
w<br />
x<br />
L I i<br />
P<br />
t<br />
1<br />
.<br />
‘;<br />
a<br />
b<br />
:<br />
e<br />
f<br />
g<br />
h<br />
i<br />
i<br />
k<br />
1<br />
rti<br />
n<br />
0<br />
;3<br />
4<br />
jr-<br />
703
STANDARD ASCII CODES<br />
DECIMAL HEXADECIMAL BINARY<br />
115 73 0111 0011<br />
116 74 0111 0<strong>10</strong>0<br />
117 75 0111 0<strong>10</strong>1<br />
118 76 0111 01<strong>10</strong><br />
119 77 0111 0111<br />
120 78 0111 <strong>10</strong>00<br />
121 79 0111 <strong>10</strong>01<br />
122 7A 0111 <strong>10</strong><strong>10</strong><br />
123 78 0111 <strong>10</strong>11<br />
124 7c 0111 1<strong>10</strong>0<br />
125 7D 0111 1<strong>10</strong>1<br />
126 7E 011111<strong>10</strong><br />
127 7F 0111 1111<br />
128 80 <strong>10</strong>000000<br />
129 81 <strong>10</strong>000001<br />
130 82 <strong>10</strong>0000<strong>10</strong><br />
131 83 <strong>10</strong>000011<br />
132 84 <strong>10</strong>000<strong>10</strong>0<br />
133 85 <strong>10</strong>000<strong>10</strong>1<br />
134 86 <strong>10</strong>0001<strong>10</strong><br />
135 87 <strong>10</strong>000111<br />
136 88 <strong>10</strong>00<strong>10</strong>00<br />
137 89 <strong>10</strong>00<strong>10</strong>01<br />
138 8A <strong>10</strong>00<strong>10</strong><strong>10</strong><br />
139 8B <strong>10</strong>00<strong>10</strong>11<br />
140 8C <strong>10</strong>001<strong>10</strong>0<br />
141 8D <strong>10</strong>001<strong>10</strong>1<br />
142 8E <strong>10</strong>0011<strong>10</strong><br />
143 8F <strong>10</strong>001111<br />
144 90 <strong>10</strong>01 0000<br />
145 91 <strong>10</strong>01 0001<br />
146 92 <strong>10</strong>01 00<strong>10</strong><br />
147 93 <strong>10</strong>01 0011<br />
148 94 <strong>10</strong>01 0<strong>10</strong>0<br />
149 95 <strong>10</strong>01 0<strong>10</strong>1<br />
150 96 <strong>10</strong>01 01<strong>10</strong><br />
151 97 <strong>10</strong>01 0111<br />
152 98 <strong>10</strong>01 <strong>10</strong>00<br />
153 99 <strong>10</strong>01 <strong>10</strong>01<br />
154 9A <strong>10</strong>01 <strong>10</strong><strong>10</strong><br />
155 9B <strong>10</strong>01 <strong>10</strong>11<br />
156 9c <strong>10</strong>01 1<strong>10</strong>0<br />
157 9D <strong>10</strong>01 1<strong>10</strong>1<br />
158 9E <strong>10</strong>01 11<strong>10</strong><br />
CHARACTER<br />
5,<br />
t<br />
U<br />
‘V<br />
w<br />
X<br />
Y<br />
z<br />
<br />
<br />
<br />
<br />
<br />
<br />
<br />
<br />
<br />
< SI ><br />
-<br />
<br />
<br />
<br />
<br />
<br />
<br />
-.<br />
-<br />
<strong>10</strong>4
STANDARD ASCII CODES<br />
DECIMAL HEXADECIMAL BINARY<br />
159 9F <strong>10</strong>01 1111<br />
160 A0 <strong>10</strong><strong>10</strong>0000<br />
161 Al <strong>10</strong><strong>10</strong>0001<br />
162 A2 <strong>10</strong><strong>10</strong>00<strong>10</strong><br />
163 A3 <strong>10</strong><strong>10</strong>0011<br />
164 A4 <strong>10</strong><strong>10</strong>0<strong>10</strong>0<br />
165 A5 <strong>10</strong><strong>10</strong>0<strong>10</strong>1<br />
166 A6 <strong>10</strong><strong>10</strong>01<strong>10</strong><br />
167 A7 <strong>10</strong><strong>10</strong>0111<br />
168 A8 <strong>10</strong><strong>10</strong><strong>10</strong>00<br />
169 A9 <strong>10</strong><strong>10</strong><strong>10</strong>01<br />
170 AA <strong>10</strong><strong>10</strong><strong>10</strong><strong>10</strong><br />
171 A8 <strong>10</strong><strong>10</strong> <strong>10</strong>11<br />
172 AC <strong>10</strong><strong>10</strong>1<strong>10</strong>0<br />
173 AD <strong>10</strong><strong>10</strong>1<strong>10</strong>1<br />
174 AE <strong>10</strong><strong>10</strong>11<strong>10</strong><br />
175 AF <strong>10</strong><strong>10</strong>1111<br />
176 80 <strong>10</strong>1<strong>10</strong>000<br />
177 61 <strong>10</strong>11 0001<br />
178 82 <strong>10</strong>11 00<strong>10</strong><br />
CHARACTER<br />
<br />
:::<br />
/:.<br />
::.: .:.:_<br />
,:.:<br />
::i,<br />
,.,:i. ::.<br />
179 83 <strong>10</strong>11 0011<br />
180 84 <strong>10</strong>11 0<strong>10</strong>0<br />
181 85 <strong>10</strong>11 0<strong>10</strong>1<br />
182 86 <strong>10</strong>11 01<strong>10</strong><br />
183 67 <strong>10</strong>1<strong>10</strong>111<br />
184 88 <strong>10</strong>11 <strong>10</strong>00<br />
185 09 <strong>10</strong>11 <strong>10</strong>01<br />
186 BA <strong>10</strong>11 <strong>10</strong><strong>10</strong><br />
187 BB <strong>10</strong>11 <strong>10</strong>11<br />
188 BC <strong>10</strong>11 1<strong>10</strong>0<br />
189 BD <strong>10</strong>11 1<strong>10</strong>1<br />
190 BE <strong>10</strong>11 11<strong>10</strong><br />
191 BF <strong>10</strong>11 1111<br />
192 co 1<strong>10</strong>00000<br />
193 Cl 1<strong>10</strong>00001<br />
.I..<br />
194 c2 1<strong>10</strong>000<strong>10</strong><br />
195 c3 1<strong>10</strong>00011<br />
196 c4 1<strong>10</strong>00<strong>10</strong>0<br />
197 c5 1<strong>10</strong>00<strong>10</strong>1<br />
198 C6 1<strong>10</strong>001<strong>10</strong><br />
<strong>10</strong>5
-<br />
STANDARD ASCII CODES<br />
DECIMAL HEXADECIMAL<br />
199 c7<br />
200 C8<br />
201 c9<br />
202 CA<br />
203 CB<br />
204 cc<br />
205 CD<br />
206 CE<br />
207 CF<br />
208 DO<br />
209 Dl<br />
2<strong>10</strong> D2<br />
211 D3<br />
212 04<br />
213 D5<br />
214 D6<br />
215 D7<br />
216 D8<br />
217 D9<br />
218 DA<br />
219 DB<br />
220 DC<br />
221 DD<br />
222 DE<br />
223 DF<br />
224 EO<br />
225 El<br />
226 E2<br />
227 E3<br />
228 E4<br />
229 E5<br />
230 E6<br />
231 E7<br />
232 E8<br />
233 E9<br />
234 EA<br />
235 EB<br />
236 EC<br />
237 ED<br />
238 EE<br />
239 EF<br />
240 FO<br />
241 Fl<br />
BINARY<br />
1<strong>10</strong>00111<br />
1<strong>10</strong>0<strong>10</strong>00<br />
CHARACTER<br />
1<strong>10</strong>0<strong>10</strong>01 I<br />
1<strong>10</strong>0<strong>10</strong><strong>10</strong><br />
.I..<br />
1<strong>10</strong>0<strong>10</strong>11<br />
1<strong>10</strong>01<strong>10</strong>0<br />
1<strong>10</strong>0 1<strong>10</strong>1<br />
t<br />
1<strong>10</strong>011<strong>10</strong> ,j., -<br />
1<strong>10</strong>01111<br />
.I..<br />
1<strong>10</strong><strong>10</strong>000 1..<br />
1<strong>10</strong>1 0001 '1"<br />
I<br />
1<strong>10</strong>1 00<strong>10</strong> 'l- -<br />
1<strong>10</strong><strong>10</strong>011 i.<br />
1<strong>10</strong>1 0<strong>10</strong>0<br />
1<strong>10</strong>1 0<strong>10</strong>;<br />
1<strong>10</strong>1 01<strong>10</strong><br />
1<strong>10</strong>1 0111<br />
1<strong>10</strong>1 <strong>10</strong>00<br />
..i..<br />
1<strong>10</strong>1 <strong>10</strong>01 1<br />
I”<br />
1<strong>10</strong>1 <strong>10</strong><strong>10</strong><br />
1<strong>10</strong>1 <strong>10</strong>11<br />
1<strong>10</strong>1 1<strong>10</strong>0<br />
1<strong>10</strong>1 1<strong>10</strong>1<br />
1<strong>10</strong>111<strong>10</strong><br />
1<strong>10</strong>11111<br />
11<strong>10</strong>0000<br />
11<strong>10</strong>0001<br />
11<strong>10</strong>00<strong>10</strong><br />
11<strong>10</strong>0011<br />
11<strong>10</strong>0<strong>10</strong>0<br />
11<strong>10</strong>0<strong>10</strong>1<br />
11<strong>10</strong>01<strong>10</strong><br />
11<strong>10</strong>0111<br />
11<strong>10</strong><strong>10</strong>00<br />
11<strong>10</strong><strong>10</strong>01<br />
11<strong>10</strong><strong>10</strong><strong>10</strong><br />
11<strong>10</strong><strong>10</strong>11<br />
11<strong>10</strong>1<strong>10</strong>0<br />
11<strong>10</strong>1<strong>10</strong>1<br />
11<strong>10</strong>11<strong>10</strong><br />
11<strong>10</strong>1111<br />
1111 0000<br />
1111 0001<br />
r<br />
--<br />
-<br />
-~.<br />
-<br />
-<br />
<strong>10</strong>6
STANDARD ASCII CODES<br />
DECIMAL HEXADECIMAL<br />
242 F2<br />
243 F3<br />
244 F4<br />
245 F5<br />
246 F6<br />
247 F7<br />
248 F8<br />
249 F9<br />
250 FA<br />
251 FB<br />
252 FC<br />
253 FD<br />
254 FE<br />
255 FF<br />
BINARY<br />
1111 00<strong>10</strong><br />
1111 0011<br />
111<strong>10</strong><strong>10</strong>0<br />
1111 0<strong>10</strong>1<br />
1111 01<strong>10</strong><br />
1111 0111<br />
1111<strong>10</strong>00<br />
1111<strong>10</strong>01<br />
1111 <strong>10</strong><strong>10</strong><br />
1111<strong>10</strong>11<br />
11111<strong>10</strong>0<br />
1111 1<strong>10</strong>1<br />
1111 11<strong>10</strong><br />
1111 1111<br />
CHARACTER
MEMO<br />
-<br />
-<br />
-<br />
<strong>10</strong>8
APPENDIX<br />
DUAL IN-LINE PACKAGE (DIP)<br />
SWITCHES<br />
Some of your printer’s most important functions are user-selectable<br />
through its DIP switches. The following table gives both the<br />
preset positions of the switches and their characteristics in the on<br />
and off modes.<br />
Table D-I. DIP switch settings and their functions.<br />
ISWITCH No. FUNCTION ON OFF PRESET 1<br />
I<br />
l-1 Paper-out Disables printer Allows printer<br />
detector when paper is to print without<br />
out oaoer<br />
l-2 Form 11 inches 12 inches<br />
length<br />
l-3<br />
l-4<br />
l-5<br />
l-6<br />
Line<br />
spacing<br />
On-line/<br />
off-line<br />
Character<br />
set<br />
Print<br />
Ditch<br />
116th inch<br />
On-line at<br />
power-on<br />
Draft-quality<br />
Pica (<strong>10</strong> cpi)<br />
118th inch<br />
Off-line at<br />
power-on<br />
Letter-quality<br />
Elite (12 cpi)<br />
l-7 7- or 8-bit Set to 8 bits Set to 7 bits ON<br />
interface<br />
1-8 Auto line Line feed not Automatic line ON<br />
feed performed by feed performed<br />
input of CR by input of CR<br />
code<br />
code<br />
ON<br />
ON<br />
ON<br />
ON<br />
ON
2-l Selection of<br />
2-2 international<br />
2-3 character set<br />
I 2-4 Unused<br />
See Table D-2<br />
below<br />
Print quality alignment adjustment, preset at factory for<br />
2-5<br />
2-6<br />
each printer.<br />
Record original factory set position for future<br />
2-7 reference.<br />
2-8<br />
Do not change factory adjustment.<br />
These switches should be adjusted only by authorized<br />
service technicians.<br />
I 2-9 unused I -<br />
ON<br />
ON<br />
ON<br />
1 2-<strong>10</strong> Allocated for future use ON -<br />
-<br />
--<br />
Table D-2. Selection of the International Character Set.<br />
SWITCH NO. COUNTRY<br />
I 2-1 2-2 2-3 I<br />
1 ON ON ON USA I<br />
ON OFF OFF Italy<br />
OFF OFF OFF Spain<br />
--<br />
-<br />
-<br />
-<br />
-<br />
-<br />
1<strong>10</strong><br />
-
APPENDIX<br />
CHARACTER SETS OF<br />
THE PRINTER<br />
LETTER-QUALITY LQ) CHARACTER SET AND<br />
DRAFT-QUALITY ( A Q) CHARACTER SET<br />
The code lists of the letter-quality character set and 1 :he<br />
draft-character set are shown below.<br />
Decimal Character Function<br />
0 End tab settings<br />
7 Bell<br />
8 CBS> Backspace<br />
9 Horizontal tab<br />
IO Line feed<br />
!l<br />
12<br />
13<br />
14<br />
15<br />
17<br />
18<br />
19<br />
20<br />
24<br />
27<br />
30<br />
31<br />
32<br />
33<br />
<br />
<br />
<br />
<br />
< SI ><br />
<br />
<br />
<br />
<br />
<br />
<br />
<br />
<br />
! !<br />
Vertical tab<br />
Form feed<br />
Carriage return<br />
Expanded print on<br />
Condensed print on<br />
On line<br />
Prca pitch<br />
Off line<br />
Expanded pnnt off<br />
Cancel text<br />
Escape<br />
End macro<br />
VFU setting<br />
Space<br />
Decimal Character<br />
34 11 ”<br />
35 # R *<br />
36 $ $<br />
37 % %<br />
38 & i<br />
39 ’ ’ Apostrophe<br />
40 ( I:<br />
41 ) )<br />
42 * *<br />
43 + +<br />
44<br />
45 I<br />
. Comma<br />
- Hyphen<br />
46 . . Period<br />
47 / /<br />
48 0 c!<br />
49 1 1<br />
50 2 <br />
51 3 3<br />
52 4 4<br />
53 5 5<br />
*This character may be different if you are using an international<br />
character set other than the USA set. The characters for each set<br />
are shown on page 113.
Decimal Character<br />
54 6 6 91<br />
55 7 7 92<br />
56 8 8 93<br />
57 9 9 94<br />
58 : 95<br />
59 ; ‘ 96<br />
60 < ‘< 97<br />
61 = = 98<br />
62 > ;;- 99<br />
63 7 <strong>10</strong>0<br />
64 @ @ * <strong>10</strong>1<br />
65 A A <strong>10</strong>2<br />
66 B E <strong>10</strong>3<br />
67 c c <strong>10</strong>4<br />
68 D 'D <strong>10</strong>5<br />
69 E II <strong>10</strong>6<br />
70 F F <strong>10</strong>7<br />
71 G Et <strong>10</strong>8<br />
72 H H <strong>10</strong>9<br />
73 I I 1<strong>10</strong><br />
74 J J 111<br />
75 K :< 112<br />
76 L I 113<br />
77 M M 114<br />
78 N N 115<br />
79 0 0 116<br />
80 P P 117<br />
81 Q 0 118<br />
82 R R 119<br />
83 s s 120<br />
84 T T 121<br />
85 u 1J 122<br />
86 v v 123<br />
87 w w 124<br />
88 x x 125<br />
89 Y Y 126<br />
90 z 2 127<br />
Decimal character<br />
: :<br />
1 3<br />
1 h<br />
z- ;<br />
: z<br />
e<br />
f<br />
e<br />
f<br />
i! :<br />
ii . .<br />
il i<br />
1 1<br />
m m<br />
n n<br />
0 0<br />
P l-2<br />
q 9<br />
r r<br />
s 5<br />
t t<br />
u<br />
v<br />
w<br />
x<br />
Y<br />
z<br />
u<br />
v<br />
w<br />
x<br />
Y<br />
z<br />
t 1<br />
; ;<br />
H<br />
<br />
x<br />
*<br />
t<br />
* -<br />
*<br />
Delete<br />
-<br />
*Thesecharacters may bedifferent if you are using an international<br />
character set other than the USA set. The characters for each set<br />
are shown on page 113.<br />
-
international Character Sets<br />
If you want to access the international character sets, you can<br />
get to them in either of two ways: (1) position the DIP switches according<br />
to Table D-2 in Appendix D, or (2) use the appropriate escape<br />
code shown below in Figure E-3. Then enter the decimal or hexadecimal<br />
codes for the character you want, as illustrated in the chart.<br />
Decimal<br />
USA<br />
35 2<br />
64 @<br />
91<br />
92<br />
; i<br />
93 I<br />
94 -<br />
96<br />
123 i<br />
124 I<br />
125 :,<br />
126 "<br />
• BLOCK GRAPHICS CHARACTER SET<br />
The codes for block graphics characters are shown below. The<br />
printer always uses unidirectional printing when it prints block<br />
graphics.<br />
Decimal Character<br />
176 ;I;<br />
177 .;lj .:j;:<br />
: :',<br />
178 :.zj<br />
179 I<br />
180 1<br />
181 i<br />
Decimal Character<br />
192 I.<br />
193 1..<br />
194 'I..<br />
195 I<br />
196 "<br />
197 1,.<br />
182 .i<br />
183 i<br />
184<br />
185<br />
/<br />
I<br />
186 j<br />
187<br />
188<br />
189<br />
190<br />
;<br />
I<br />
1<br />
198 1<br />
199 I,<br />
200 L<br />
201<br />
I<br />
202 1..<br />
203<br />
T<br />
204 !<br />
205<br />
206 .t,<br />
191 I 207 ..i<br />
8<br />
113
Decimal Character<br />
208 1.<br />
209 i<br />
270 :<br />
211 I<br />
212 I<br />
213 1'.<br />
214<br />
215 1.<br />
216 1<br />
Decimal Character<br />
217 J<br />
218 i’<br />
219 &<br />
220<br />
221 i<br />
222 !I<br />
223 Inn<br />
.<br />
224 j<br />
225 3<br />
-<br />
***********<br />
-.<br />
-<br />
-
j . . .<br />
APPENDIX<br />
DES/GN/NG BIT-IMAGE<br />
GRAPHICS<br />
b<br />
*-<br />
b”.<br />
c-<br />
..-<br />
In Appendix E, we showed you the many block graphic characters<br />
provided by the printer. You can use these characters to create bar<br />
graphs, pie charts, or just about any kind of graphic image you can<br />
think of. In addition to block graphics, we’d like to introduce you to<br />
bit-image graphics-for the truly imaginative user who will settle for<br />
nothing less than total control of the printer. You’ll see that its<br />
bit-image graphics give you new capabilities in business applications,<br />
computer art, and even allows you to create your own<br />
“alphabet”!<br />
When you program the printer to perform bit-image graphics, you<br />
literally control every pin on its 24-pin print head. As a result, you<br />
can print as many as 1,440 dots horizontally, and up to 1,320 dots<br />
vertically on an 8 112-x-i l-inch page.<br />
.<br />
.<br />
L<br />
c<br />
h<br />
• FOUR MODES FOR BIT-IMAGE GRAPHICS<br />
The printer has four distinct bit-image modes, allowing you to print:<br />
• 8-bit graphics, with 1 data byte controlling each column,<br />
• 16-bit graphics, with 2 data bytes controlling each column,<br />
• 24-bit graphics, with 3 data bytes controlling each column, and<br />
@8x3-bit graphics, in which each byte controls 3 columns of<br />
graphics data and each bit controls 3 pins of the print head.<br />
The relationships between your graphics data and the pins on the<br />
print head are shown in Figures F-l, F-2, F-3 and F-4 for the four<br />
bit-image modes.<br />
c<br />
.
Graphics<br />
Data<br />
:<br />
i<br />
I<br />
] 7.bit Interface<br />
1 ] I-bit tnterface<br />
Pin 1<br />
Pin 2<br />
Pin 3<br />
Pin 4<br />
Pin 5<br />
Pin 6<br />
Pin 7<br />
Pin 8<br />
Pin 9 ,H<br />
Pin <strong>10</strong><br />
Pin 11<br />
Pin 12<br />
Pin 13<br />
Pin 14<br />
Pin 15<br />
Pin 16<br />
Pin 17<br />
Pin 18<br />
Pin 19<br />
Pin 20<br />
Pin 21<br />
Pin 22<br />
Pin 23<br />
Pin 24<br />
0<br />
0<br />
0<br />
0<br />
0 I<br />
0+<br />
-1<br />
• ’<br />
0<br />
0<br />
0<br />
0<br />
0<br />
0<br />
0<br />
0<br />
0<br />
/<br />
2<br />
-<br />
-<br />
Figure F-l. Pin relationship of the 8-bit graphics mode.<br />
Graphics<br />
Data<br />
(2nd<br />
Dot Wire of<br />
Print<br />
Head<br />
6<br />
] 7.bit Interface<br />
] 8-bit Interface<br />
Pin 1<br />
Pin 2<br />
Pin 3<br />
Pin 4<br />
Pin 5<br />
Pin 6<br />
Pin 7<br />
Pin 8<br />
Pin 9<br />
Pin <strong>10</strong><br />
Pin 11<br />
Pin 12<br />
Pin 13<br />
Pin 14<br />
Pin 15<br />
Pin 16<br />
Pin 17<br />
Pin 18<br />
Pin 19<br />
Pin 20<br />
Pin 21<br />
Pin 22<br />
Pin 23<br />
Pin 24<br />
-<br />
-<br />
-<br />
-<br />
-<br />
-<br />
0<br />
0<br />
0<br />
0<br />
e<br />
e<br />
e<br />
t<br />
c<br />
c<br />
t<br />
c<br />
0<br />
0<br />
0<br />
0<br />
Figure F-2. Pin relationship of the l&bit graphics mode.<br />
-’<br />
-<br />
.-<br />
-<br />
-<br />
-<br />
116
Graphics Data<br />
(2nd Byte)<br />
(3rd Byte)<br />
7-bit<br />
,nterfaee<br />
Pin 1<br />
Pin 2<br />
Pin 3<br />
Pin 4<br />
Pin 5<br />
Pin 6<br />
Pin 7<br />
Pin 8<br />
Pin 9<br />
Pin <strong>10</strong><br />
Pin 11<br />
Pin 12<br />
Pin 13<br />
Pin 14<br />
15<br />
8-hit<br />
terfece<br />
Pm :“7<br />
Pin 18<br />
Pin 19<br />
Pin 20<br />
Pin 21<br />
Pin 22<br />
Pin 23<br />
Pin 24<br />
J<br />
Figure F-3. Pin relationship of the 24-bit graphics mode.<br />
Graphics Data<br />
--<br />
Dot Wire of<br />
Print Head<br />
Pin 1<br />
Pin 2<br />
Pin 3<br />
Pin 4<br />
Pin 56<br />
Pin 6<br />
Pin 7<br />
Pin 8<br />
Pin 9<br />
Pin <strong>10</strong><br />
Pin 11<br />
Pin 12<br />
Pin 13<br />
Pin 14<br />
Pin 15<br />
Pin 16<br />
Pin 17<br />
Pin 18<br />
;i; 2<br />
I 7<br />
-1<br />
e- I<br />
*<br />
*<br />
•<br />
*<br />
Pin 21<br />
Pin 22 0<br />
I<br />
Pin 23 • !<br />
Pin 24<br />
I<br />
• ! I<br />
Figure F-4. Pin relationship of the 8x3-bit graphics mode.<br />
117
• PRINTING 8-61-r GRAPHICS<br />
In 8-bit, normal-density graphics, the graphic image is divided into<br />
“dot columns”, each directly corresponding to the pin configuration<br />
in the print head. Each “dot column” can be controlled by 1 byte<br />
of data. As a result, every bit in the byte corresponds to a particular<br />
pin in the print head (Figure F-l). This mode, which yields 180 dots<br />
per inch horizontally and up to 120 dots per inch vertically, uses the<br />
following setup format:<br />
Table F-l. Setup codes for the printer’s four graphics modes.<br />
GRAPHICS MODE<br />
ESCAPE CODE SEQUENCE<br />
8-bit<br />
Y “nl” “n2” “ml” “m2”.. .<br />
16-bit<br />
I “nl” “172” “ml” “m.‘.. .<br />
24-bit<br />
< ESC> V “nl *I “n2” “ml” “m2”.. .<br />
8x3-bit<br />
K “n” “n2” “ml” “n-L..<br />
Using this code sequence, the “r-t” and “n2” tell the printer how<br />
many bytes of graphics data (measured in dot columns) you are<br />
going to send per line. (The “ml”, “m2”, etc., tell the printer exactly<br />
which pins to fire on each column. We’ll demonstrate this shortly.)<br />
-<br />
H SPECIFYING THE NUMBER OF DOT COLUMNS.<br />
To determine the values of nl and n2, you will need to calculate<br />
the width (in dot columns) of your graphics image and send this<br />
information to the printer. To do this, you’ll have to convert the<br />
number of dot columns into two separate values, using the formula<br />
given in Table F-2. This conversion is necessary because the maximum<br />
number you can send in one byte is 255, while normal-density<br />
graphics mode can print as many as 1,440 columns across the page.<br />
The formula shown in Table F-2 allows you to tell the printer exactly<br />
what your printing parameters will be, specifying the exact number -<br />
of bytes to represent dot columns. (In the formula, x = the number<br />
of dot columns in your graphic image; thus, if you have a total of<br />
500 columns, divide 500 by 256. Since 256 “goes into” 500 only once,<br />
n2 = 1. nl is the remainder of this division, so nl = 244.<br />
Specifying the graphics data<br />
When you have entered < ESC > Y nl and n2, you’ve set up the<br />
8-bit graphics mode, telling the printer how much data to expect per<br />
line. Now you are free to specify the exact picture itself (the “ml,<br />
m2, etc.“of the sequence). Figure F-5 shows that each pin on the<br />
print head is labeled with a value; the topmost pin has the highest<br />
value, and each pin corresponds to a particular value in descending<br />
order.<br />
778
Table f-2. Calculating the width of your graphic image.<br />
IF THE NUMBER OF<br />
COLUMNS RANGES FROM: THEN nl IS: AND n2 IS:<br />
1to255 X 0<br />
256 to 511 x -256 1<br />
512 to 767 x-512 2<br />
768 to <strong>10</strong>23 x -768 3<br />
<strong>10</strong>24 to 1279 x-<strong>10</strong>24 4<br />
1280 to 1440 x-1280 5<br />
128<br />
64<br />
32<br />
16<br />
8<br />
4<br />
2<br />
1<br />
Figure F-5. Pin values for 8-bit graphics.<br />
To fire, say, the second pin from the top, you’ll send the BASIC<br />
code CHR$(64). You can fire several pins at once by adding their<br />
values and sending the sum total in a single BASIC CHR$ code. Thus:<br />
To fire the<br />
then send<br />
1st 3rd and 4th -> the BASIC -> CHR$(176)<br />
pins, add their<br />
CHR$ code:<br />
values (128 + 32 + 16)<br />
Here’s a short program to show you how you can implement 8-bit<br />
graphics to make a simple zigzag image (Figure F-6).<br />
NEW<br />
<strong>10</strong> 'PRINT GRAPHIC PATTERN<br />
20 WIDTH "LPT1:".255<br />
30 LPRINT CHR$(27) CHR$(89) CHR$(94) CHR$(l);<br />
40 FOR I=1 TO 25<br />
50 FOR J=O TO 6<br />
60 L-PRINT CHR$(2-J);<br />
779
70 NEXT J<br />
80 FOR J==6 TO 0 STEP -1<br />
90 L-PRINT CHR$( 23);<br />
<strong>10</strong>0 NEXT .J<br />
1<strong>10</strong> NEXT I<br />
1 2 0 W I D T H "LPTI : " ,80<br />
'1:I 0 I. P R 1 N T<br />
:vivsli\~~w~w~~~~<br />
Figure F-6. A zigzag pattern created with 8-bit graphics.<br />
In line 30 of this program, we selected normal-density graphics<br />
and indicated that 350 characters of graphics data would follow (94 _<br />
+ (1 * 256) = 350). The loop between lines 40 and 1<strong>10</strong> is repeated<br />
25 times; this is what gives us the zigzag effect. The loop from lines<br />
50 to 70 creates the lines that slope up; the loop between lines 80<br />
and <strong>10</strong>0 prints downward-sloping lines. This is an example of plotting<br />
a very simple mathematical function to create a design.<br />
Combining<br />
text and graphics<br />
It’s also possible to mix text and graphics in one line. This can<br />
be useful for labeling charts and graphs, or even for inserting<br />
graphics into text. Try adding these lines to the program:<br />
25 LPRINT "WOW! " ;<br />
115 LPRINT " THIS IS GREAT!";<br />
If you run the program with these lines added, you should get a<br />
printout that looks like this:<br />
Figure F-7. Graphics pattern inserted within text.<br />
There is one thing you must remember when you print this kind<br />
of program: all graphics data must print on the same line. The<br />
graphics command is turned off at the end of each line, even if you<br />
have specified that more graphics codes will follow.<br />
-<br />
• PRINTING A DESIGN OR GRAPHIC PICTURE<br />
Since you control the firing of every pin, you can print nearly<br />
anything that you can draw. In our next example, we’ll demonstrate<br />
the printer’s ability to plot computer art of your own design.<br />
The best way to start is to lay out your image on graph paper.<br />
You can print eight rows (seven with a 7-bit interface) of dot columns<br />
with each pass of the print head, so begin by drawing a heavy hor-<br />
720
izontal tine every eight rows on your graph paper. The dot columns<br />
are represented by the column of eight blocks between the horizontal<br />
lines. Each of the blocks on the graph represents a pin on the print<br />
head. It may be helpful to write the pin values (128,64,32, etc.) down<br />
the left side of each row. Now you can use a pencil or felt tip marker<br />
to draw the picture you want on the graph paper (Figure F-8). After<br />
you have filled in the “dots” that you want to print, add up the values<br />
of each column of dots: the sum total represents one byte.<br />
Figure F-8. Planning your graphic design on graph paper.<br />
In the program below, we have taken the graphics information<br />
from the design in Figure F-8 and put it into BASIC data statements:<br />
NEW<br />
<strong>10</strong> WIDTH “LPT1:“,255<br />
20 LPRINT CHR$(27) CHR$(Sl) CHR$(lO)<br />
30 FOR ROW=1 TO 8<br />
40 LPRINT CHR$(27) “Y“ CHR$(GO) CHR$(O);<br />
50 FOR COLUMN=1 TO 60<br />
60 READ X<br />
70 LPRINT CHR$(X);<br />
80 NEXT COLUMN<br />
90 LPRINT CHR$(lO);<br />
<strong>10</strong>0 NEXT ROW<br />
1<strong>10</strong> LPRINT<br />
120 LPRINT “SMILE”<br />
130 DATA O,O,O,O,O,O,O.O,O,O<br />
727
140 DATA 1,,2,4,12,8,16,16,48,32<br />
150 DATA 32,96,64,64,192,128,128,128,128,128<br />
160 DATA 128,128,128,128,128,192,64,64,96,32<br />
170 DATA 32,48,16,16,8,12,4,2,1,1<br />
180 DATA O,O,O,O,O,O,O,O,O,O<br />
190 DATA 0,0,0,0,1,6,8,48,64,192<br />
200 DATA 128,0,0,0,0,0,0,0,0,0<br />
2<strong>10</strong> DATA O,O,O,O,O,O,O,O,O,O<br />
220 DATA O,O,O,O,O,O,O,O,O,O<br />
230 DATA 0,0,0,0,0,0,0,0,0,128<br />
240 DATA 192,64,48,8,6,1,0,0,0,0<br />
250 DATA 0,7,57,195,5,5,9.9,17,17<br />
260 DATA 33,33,65,65,255,153,165,197,177,255<br />
270 DATA 65,65,33,33,17,17,9,5,2,0<br />
280 DATA 0,2,5,9,17,17,33,33,65,65<br />
290 DATA 255.177,197,165,153,255,65,65,33,33<br />
300 DATA 17,17,9,9,5,5,195,57,7,0<br />
3<strong>10</strong> DATA 63,192,0,0,0,0,0,0,0,0<br />
320 DATA 0,0,1,2,4,0,0,0,0,0<br />
330 DATA 0,0,0,0,0,0,1,12,48,192<br />
340 DATA 192,48,12,1,0,0,0,0,0,0<br />
350 DATA 0,0,0,0,0.4,2,1,0,0<br />
360 DATA 0,0,0,0,0,0,0,0,192,63<br />
370 DATA 252,3,0,0,0,0,0,8,16,32<br />
380 DATA 32,96,151,4,3,0,0,0,0,0<br />
390 DATA 0,0,0,0,16,112,208,16.16,16<br />
400 DATA 16,16,16,208,112,16,0,0,0,0<br />
4<strong>10</strong> DATA 0,0,0,0,0,3,4,151,96,32<br />
420 DATA 32,16,0,0,0,0,0,0,3,252<br />
430 DATA 0,0,192,48,12,6,1,0,0,0<br />
440 DATA 0,0,128,96,16.140,66,33,16,16<br />
450 DATA 8,8,4,4,2,2,2,2,1,1<br />
460 DATA 1,1,2,2,2,2,4,4,8,8<br />
470 DATA 16,16,33,66,140,16,96,128,0,0<br />
480 DATA 0,0,0,1,6,12,48,192,0,0<br />
490 DATA 0,0,0,0,0,0,0,128,96,48<br />
500 DATA 24,8,4,6,2,1,0,0,128,64<br />
5<strong>10</strong> DATA 32,32,16,16,16,16,8,8,8,8<br />
520 DATA 8,8,8,8,16,16,16,16,32,32<br />
530 DATA 64,128.0,0,1,2,6,4,8,24<br />
540 DATA 48,96,128,0,0,0,0,0,0,0<br />
550 DATA O,O,O,O,O,O,O.O,OrO<br />
560 DATA o,o,O,O,O,O,128,128,64,64<br />
570 DATA 64,32,32,32,32,32,16,16,l6,16<br />
580 DATA 16,16,16,16,32,32,32,32.32,64<br />
-<br />
722
590 DATA 64,64,128,128,0,0,0,0,~,~<br />
600 DATA O,O,O,O,O,O,O,O,O,O<br />
SMILE<br />
Figure F-9. Picture of a smile.<br />
The data lines of our program (lines 130-600) correspond to the<br />
eight horizontal sections of the graph. In each line, we have entered<br />
the pin firing values calculated from the information drawn on the<br />
graph. The program used to create a picture from this data is actually<br />
quite simple. Please follow along for a brief explanation of how it<br />
works:<br />
LINE 20<br />
In this statement, we enter the codes to change line<br />
spacing to <strong>10</strong>/120ths of an inch. This causes the lines<br />
to just slightly touch each other, but not to overlap.<br />
You can experiment with line spacing in your<br />
graphics, but in general, overlapping lines will cause<br />
your picture to be distorted. On the other hand, if the<br />
line spacing is too wide, your image will have unwanted<br />
“gaps” in it. To adjust the line spacing in your<br />
graphic image, just enter a different value in n/l20ths<br />
of an inch: a higher value for wider spacing, or a lower<br />
value for narrower spacing.<br />
LINE 30<br />
LINE 40<br />
LINE 50<br />
LINE 60<br />
In this statement, we set up the number of rows to<br />
print-in our example, eight-by using the BASIC<br />
“for/next” loop.<br />
Now we’re ready to enter the code to set up the<br />
graphics mode we want to use. The < ESC > “Y” sets<br />
up 8-bit graphics, and the “60” and “0” are thevalues<br />
of n7 and n2, respectively.<br />
This statement sets up the number of dot columns that<br />
will be contained in the image, by using a BASIC<br />
“nested” for/next loop.<br />
Reads the data for a single column.<br />
123
A!<br />
LINE 70<br />
LINE 80<br />
LINE 90<br />
Prints the data read in line 60.<br />
Continues the nested for/next loop, which causes all<br />
60 columns in a row to be read and printed.<br />
Causes a line feed.<br />
LINE<br />
LINE<br />
<strong>10</strong>0 Instructs the nested for/next loop to continue to read<br />
and print subsequent rows until all eight rows have<br />
been printed.<br />
120 Tells the printer to print the word “smile” underneath<br />
the graphic image.<br />
When you’ve run this program, your result should be similar to the<br />
picture illustrated in Figure F-9. Now try running the same program<br />
again, with the following minor changes to lines 90 and 1<strong>10</strong>:<br />
*In line 20, change “<strong>10</strong>” to “15”.<br />
.In line 40, change “Y” to “K”.<br />
When your printer prints the new program, it will look like this:<br />
SMILE<br />
Figure F-<strong>10</strong>. “Smiling” in the 8x3-bit mode.<br />
That’s how easy it is to print a picture using 8x3-bit mode! 8x3-bit<br />
graphics mode is similar to the 8-bit mode, except that each bit in -<br />
the data byte controls three pins, not just one. Thus, the 8x3-bit mode<br />
will print the same image three times as wide and three times as dense<br />
as the one shown in Figure F-9.<br />
To print in the 8x3-bit mode, remember: just use < ESC> K to<br />
set up the mode, and change the line spacing to 151120ths of an inch.<br />
We hope you enjoy experimenting with 16-bit and 24-bit modes,<br />
too-you just may unleash a creative streak you never knew you had!<br />
124
APPENDIX<br />
TECHNICAL SPECIFICATIONS<br />
The following specifications are subject to change without notice.<br />
• PRINTING<br />
Method Serial impact dot matrix<br />
Speed<br />
Direction<br />
Paper feed<br />
Line spacing<br />
Draft quality:<br />
144 cps in elite<br />
120 cps in pica<br />
78 cps in condensed<br />
Letter quality:<br />
47 cps in pica<br />
54 cps in proportional printing<br />
Bidirectional logic-seeking<br />
Unidirectional in LQ and graphics modes<br />
Sprocket or friction feed, IO lines per second at 116th<br />
inch line spacing<br />
6 or 8 lines per inch (switch- and software selectable)<br />
Software selectable in increments of nll20ths of an<br />
inch<br />
Character set 96 Letter-Quality characters<br />
99 International LQ characters<br />
96 Draft-Quality characters<br />
99 International DQ characters<br />
50 Block graphic characters
Character<br />
matrix<br />
24 dot x 13 dot standard with true descenders<br />
30 dot x 18 dot block graphics<br />
24 dot x 34 dot LQ characters<br />
24 dot x 14 - 36 dot proportional LQ characters<br />
8 dot x 1440 dot 8-bit graphics<br />
16 dot x 1440 dot 16-bit graphics<br />
24 dot x 1440 dot 24-bit graphics<br />
24 dot x 1440 dot 8x3-bit graphics<br />
Character<br />
fonts<br />
Pica (<strong>10</strong> cpi)<br />
Elite (12 cpi)<br />
Condensed (16.7 cpi)<br />
Proportional<br />
Expanded (5, 6, and 8.35 cpi and proportional)<br />
Emphasized<br />
Double-strike<br />
-<br />
-<br />
Special<br />
features<br />
Self-test<br />
Continuous underline<br />
Backspace<br />
Vertical and horizontal programmable tabs<br />
Left and right margin set<br />
7- or 8-bit selectable interface<br />
Bit-image column scan<br />
Perforation skip<br />
Reversible paper feed<br />
Macro instruction<br />
Column<br />
width<br />
Draft quality:<br />
80 characters per line (pica)<br />
96 characters per line (elite)<br />
132 characters per line (condensed)<br />
40 characters per line (pica expanded)<br />
48 characters per line (elite expanded)<br />
66 characters per line (condensed expanded)<br />
Letter quality:<br />
Proportional spacing<br />
80 characters per line (pica)<br />
40 characters per line (pica expanded)<br />
Form<br />
length<br />
11 or 12 inches<br />
-<br />
-<br />
126
L<br />
• PAPER AND RIBBON<br />
Single-sheet 5.5 - 8.5 inches wide<br />
paper 0.07 - 0.<strong>10</strong> mm thick (1 part)<br />
L<br />
c<br />
Sprocketfeed<br />
paper<br />
4 - <strong>10</strong> inches wide<br />
0.07 - 0.<strong>10</strong> mm thick (1 part)<br />
0.28 mm thick (3-part copies)<br />
L<br />
L<br />
Ribbon<br />
• PRINTER<br />
Width<br />
Black nylon ribbon cassette, multistrike, endless<br />
420 mm (16.5 in.)<br />
cc.<br />
Depth<br />
368 mm (14.5 in.)<br />
b‘”<br />
Height<br />
148 mm (5.8 in.)<br />
Ill.“.<br />
Weight<br />
Power<br />
11 kg (approx.)<br />
120VAC + /-1 O%, 60 Hz, approx. <strong>10</strong>0 watts<br />
Operating <strong>10</strong> - 40 deg. C (50 - <strong>10</strong>4 deg. F)<br />
environment 20 - 80% relative humidity, noncondensing<br />
I<br />
Paper feed<br />
system<br />
Sprocket and friction feed<br />
L.<br />
Buffer l-line, expandable to 128K<br />
L<br />
*<br />
L<br />
I<br />
L<br />
-<br />
• PARALLEL INTERFACE (STANDARD)<br />
Interface Centronics-compatible<br />
Transfer<br />
rate<br />
1.000 - 6,000 cps<br />
Synchron- By externally-supplied STROBE pulses<br />
ization<br />
Handshaking<br />
Logic level<br />
By ACK and BUSY signals<br />
TTL-compatible<br />
127
• SERIAL INTERFACE(OPTIONAL)<br />
Interface RS-232C levels/20mA current loop (selectable)<br />
Transfer<br />
rate<br />
Word length<br />
Handshaking<br />
RS-232C: 150 - 19,200 bits per second (selectable)<br />
Current loop: 150 - 9,600 bits per second<br />
1 start bit, 7 or 8 data bits, 1 or 2 stop bits; odd, even<br />
or no parity<br />
By ACK, BUSY and XONIXOFF signals (selectable)<br />
-<br />
Signal Mark: logic “1” (-3V to -15V or current on)<br />
polarity Space: logic “0” (+3V to + 15V or current off)<br />
• IEEE-488 INTERFACE(OPTIONAL)<br />
-<br />
see Appendix<br />
H<br />
128
APPENDIX<br />
INTERFACES<br />
This appendix contains the technical information necessary to<br />
connect the printer to your computer using each of the three possible<br />
interfaces: parallel, serial, and IEEE-488.<br />
• THE PARALLEL INTERFACE<br />
Your printer uses a Centronics-compatible parallel interface capable<br />
of transferring from 1,000 to 6,000 characters per second.<br />
Externally supplied STROBE pulses accomplish synchronization of<br />
data transmission. ACK and BUSY signals govern the<br />
“handshaking” between your computer and the printer. Parallel<br />
interface uses a TTL-compatible logic level.<br />
Functions of the connector signals<br />
Pin 1 carries the STROBE pulse signal from the computer to the<br />
printer (see Figure H-l). When the computer has data ready for the<br />
printer it sets this signal to low value for at least 0.5 microseconds.<br />
When the printer sees this pulse on the STROBE pin, it reads the data<br />
supplied by the computer on pins 2-9. Each of these lines carries<br />
one bit of information. A logical “1” is represented by a high signal<br />
level, and a logical “0” is represented by a low signal level. The<br />
computer must maintain these signals for at least 0.5 microseconds<br />
before-and 0.5 microseconds after-the STROBE pulse.<br />
When the printer has successfully received the byte of data from<br />
the computer, it sets the Am signal (pin <strong>10</strong>) low for approximately<br />
9 microseconds. A high BUSY signal (pin 11) reportswhen the printer<br />
is unable to receive data. This signal will be high during data transfer<br />
when the printer is off-line, or when an error condition exists. See<br />
the circuit example of these signals in Figure H-2.
ACK<br />
I<br />
I<br />
I<br />
;-$-_I<br />
DATA ; 9p5ec. Approx. S/lsec.<br />
sTRosE[<br />
I<br />
I<br />
I<br />
I<br />
I<br />
BUSY<br />
T: More than O.SjJ.sec.<br />
Figure H-l. Data transfer timing chart for the parallel interface.<br />
Signal Name<br />
Circuit<br />
Example<br />
DATA 1 - DATA 8<br />
(To Printer)<br />
407k* 1 7Fibie<br />
STROBE<br />
(To Printer)<br />
BUSY, =<br />
(From<br />
Printer)<br />
Figure H-2. Circuit example of the parallel interface.<br />
Connector signals<br />
The following chart describes the connector<br />
of the parallel interface.<br />
signals for the 36 pins<br />
130
Table H-l. Parallel interface connector signals.<br />
PIN SIGNAL NAME DIRECTION FUNCTION<br />
I STROBE IN The STROBE pulse is used to<br />
read data. When this signal<br />
goes low, data is read in.<br />
DATA 1<br />
3 DATA 2 The signals on pins 2-9<br />
d DATA 3 represent parallel data<br />
5 DATA 4 1: bits l-8. Each signal is at<br />
5 DATA 5 a high level for logical 1<br />
DATA 6 INN and at a low level for a<br />
L DATA 7 IN logical 0.<br />
Q DATA 8 IN<br />
<strong>10</strong> ACK OUT This 9-microsecond pulse<br />
acknowledges the receipt<br />
of data.<br />
11 BUSY<br />
OUT The BUSY signal indicates<br />
the operating condition of<br />
the printer. When this<br />
signal goes low, the printer<br />
is ready to accept data.<br />
12<br />
13<br />
14-15<br />
16<br />
17<br />
18<br />
19-30<br />
PAPER END<br />
SELECTED<br />
N/C -<br />
SIGNAL GND -<br />
CHASSIS GND -<br />
OUT<br />
OUT<br />
+ SVDC OUT<br />
TWISTED PAIR -<br />
RETURN GND<br />
31 INPUT PRIME IN<br />
32 ERROR<br />
33 EXT GND<br />
34-35 N/C<br />
36 N/C<br />
OUT<br />
This signal is used to indicate<br />
“paper-out” status to the<br />
computer. This signal is<br />
normally low; when DIP<br />
switch l-l is off, this<br />
signal is held low.<br />
The SELECTED signal is high<br />
when the printer is on-line.<br />
Unused.<br />
Signal ground.<br />
Chassis ground.<br />
External supply of + SVDC<br />
power (max. 50 mA).<br />
Return line of various<br />
Resets all control circuits.<br />
A low signal level<br />
initializes the printer and<br />
clears buffer memory.<br />
signals.<br />
This signal goes low when<br />
the printer detects an<br />
error.<br />
External<br />
Unused.<br />
ground.<br />
TTL high level.<br />
131
• THE SERIAL INTERFACE(OPTlONAL)<br />
Your printer uses either an RS-232C level or 20mA current loop<br />
to provide serial communication with your computer. (See the circuit<br />
diagrams contained in Figure H-3.) Using either interface, it can<br />
transfer from 150 to 9,600 bits per second. However, the printer can<br />
communicate at 19,200 bits per second using only an RS-232C level<br />
interface. Its word length is:<br />
01 start bit<br />
07 or 8 data bits (selectable)<br />
01 or 2 stop bits (selectable)<br />
@Odd, even or no parity (selectable)<br />
-<br />
You can select from the following four “handshake” modes:<br />
WSerial BUSY, l-byte mode<br />
@Serial BUSY, l-block mode<br />
.ACK mode<br />
• XON/XOFF mode<br />
A mark or ON (logical 1) generates a signal of -3V to -15V. A space<br />
or OFF (logical 0) generates a signal of + 3V to + 15V.<br />
Line Driver<br />
[MCl488L, 75189<br />
or equivalent]<br />
TTY -TX D<br />
Optcoupler<br />
TTY-TXDR<br />
-.<br />
Line Receiver<br />
(MC1489L. 75189<br />
or equivalent 1<br />
I - TTY-RXD<br />
q=I;-j<br />
Optcoupler<br />
TTY-RXDR<br />
[For RS232Cl<br />
[For 20mA Current Loop]<br />
Figure H-3. Circuit diagrams of the serial interface.<br />
132
Table H-2. Connector sianals for the serial interface.<br />
PIN SIGNAL NAME DIRECTION FUNCTION<br />
1 F-GND Frame ground.<br />
3 TXD . .-<br />
OUT The TXD ftransmit data) sianal<br />
carries data from the printer<br />
3 RXD IN The RXD (receive data) signal<br />
carries data to the printer<br />
A FITS OUT The FITS (reauest to send)<br />
I sional is on when the minter I<br />
isready to receive data.<br />
5 CTS IN The CTS (clear to send) signal<br />
is on when the computer is<br />
ready to send data.<br />
6 DSR IN This signal line is used<br />
to check if the printer<br />
7 S-GND<br />
6 DCD<br />
9 TTY TXDR<br />
<strong>10</strong> TTY TXD<br />
11 REV-CH<br />
12 N/C<br />
13 S-GND<br />
14-16 N/C<br />
17 TTY TXDR<br />
18 TTY RXDR<br />
19 TTY RXD<br />
20 DTR<br />
21-22 N/C<br />
23 TTY RXDR<br />
,‘:!<br />
IN<br />
OUT<br />
OUT<br />
IN<br />
OUT<br />
is ready for operation.<br />
Signal ground.<br />
When the DCD (data carrier<br />
detect) signal is on,, the<br />
receive signal is wrthin a<br />
specified range.<br />
This pin indicates the<br />
signal line return of 20mA<br />
current loop for data transmission.<br />
Indicates the signal line of<br />
20mA current loop for data<br />
transmission.<br />
The REV-CH (reverse channel) pin<br />
is the signal line for busy<br />
protocols. This pin goes off<br />
when the buffer fills, and on<br />
when the printer is ready to<br />
receive data.<br />
Unused.<br />
Signal ground.<br />
Unused.<br />
Indicates the signal line<br />
return of the 20mA current<br />
loop for data transmission.<br />
Indicates the signal line<br />
return of the 20mA current<br />
loop for data reception.<br />
Indicates the signal line<br />
of the 20mA current loop for<br />
data reception.<br />
The DTR (data terminal ready)<br />
Din is on when the minter is<br />
ready to receive data.<br />
Unused.<br />
Indicates the signal line<br />
return of the 20mA current<br />
Indicates the signal line of the<br />
I
Serial busy protocols<br />
In these protocols, the printer uses DTR (pin 20) and REV-CH (pin<br />
11) to signal to the computer when it is able to accept data. These<br />
pins go on when the printer is ready to accept data. In the l-byte<br />
mode, they go off after each character is received. In the l-block<br />
mode, they go off only as the printer buffer approaches capacity.<br />
In both cases, they stay off if the buffer is too full to accept more data.<br />
XONIXOFF protocol<br />
This protocol uses the ASCII characters DC1 and DC3 (sometimes<br />
called XON and XOFF, respectively) to communicate with the corn- -<br />
puter. When the printer buffer approachescapacity, the printer sends<br />
a DC3 on TXD (pin 2) to tell the computer that it must stop sending --<br />
data. When the printer is able to receive more data, it sends a DC1<br />
on the TXD pin. The computer can then send more data until the - --<br />
printer sends another DC3.<br />
ACK protocol<br />
-<br />
In the ACK protocol, the printer sends an ACK (ASCII 6) signal on<br />
the TXD pin each time it is prepared to receive a byte of data.<br />
• THE IEEE-488 INTERFACE<br />
You may also use the IEEE-488 interface to connect printer to your<br />
computer. This 8-bit parallel interface uses a TTL-compatible logic<br />
level, and is capable of transferring characters at rates of up to 1<br />
megabyte per second. Its transfer system is governed by a three-wire<br />
handshaking protocol, illustrated in Figure H-4.<br />
NRFD<br />
(LIstenerI<br />
I<br />
I<br />
I<br />
I<br />
I<br />
I<br />
I<br />
I<br />
I<br />
I<br />
I<br />
Data Walt<br />
------DataProcessing<br />
Data Invalid<br />
-<br />
DAV<br />
(Talker)<br />
I<br />
I<br />
--- --_- ------Data”a,,,,<br />
I<br />
NDAC<br />
lLlrtenerl<br />
I<br />
I<br />
I<br />
I<br />
I<br />
I<br />
I<br />
I<br />
I !<br />
-------- DataReceptionComplete<br />
Data not yet recewed or<br />
currenfly bemg received<br />
Figure H-4. Data transfer timing chart for the IEEE-488 interface.<br />
_<br />
134
Signal Name<br />
Circuit Example<br />
74LS Compatible<br />
3ks-h<br />
I3<strong>10</strong>1<br />
-DlOB<br />
(To Printer) -<br />
6.2 ki-h<br />
T<br />
7438 Compatible<br />
NRFD<br />
(From Printer) ’<br />
6.2 k&<br />
5<br />
74LS14<br />
Compatible<br />
DAV<br />
(To Printer) o<br />
0<br />
7438 Compatible<br />
NDAC<br />
(From Printer) o<br />
0<br />
6.2 kfs<br />
Figure H-5. Circuit example of the IEEE-488 parallel interface.<br />
135
Table H-3. Connector signals for the IEEE-488 interface.<br />
PIN SIGNAL NAME DIRECTION FUNCTION<br />
1 DIO 1 IN These signals represent<br />
2 DIO 2 IN parallel data bits 1-4.<br />
3 DIO 3 IN Each signal is at a low<br />
4 DIO 4 IN level for a logical 1, and<br />
at a high level for logical 0.<br />
5 N/C Unused.<br />
6 Data Valid IN Indicates valid data.<br />
(DA’4<br />
7 Not Ready For OUT Indicates the completion<br />
Data (NRFD) of preparation for data<br />
reception.<br />
6 Not Data OUT Indicates the completion<br />
Accepted (NDAC)<br />
of data reception.<br />
9 Interface IN Initializes the<br />
Clear (IFC)<br />
interface.<br />
<strong>10</strong> N/C Unused.<br />
11 Attention (ATN) IN Indicates that d&a on the<br />
data bus is either an<br />
address or a command.<br />
12 SHIELD Shield.<br />
These signals represent<br />
13 DIO 5 IN parallel data bits 5-8.<br />
14 DIO 6 IN Each signal is at a low<br />
15 DIO 7 IN Level for a logical 1, and<br />
16 DIO 8 IN a high level for a<br />
logical 0.<br />
17 Remote Enable IN Specifies remote/local.<br />
(REV<br />
18-23 GND Ground.<br />
24 LOGIC GND Logic ground.<br />
-.<br />
-<br />
-<br />
***********<br />
136
INDEX<br />
•<br />
ACK protocol,1 34<br />
Adjusting the print head gap,1 1<br />
Advance paper,71<br />
ASCII codes,17 - 19.<strong>10</strong>1 - <strong>10</strong>7<br />
introduction to,17<br />
conversion chart,<strong>10</strong>1 - <strong>10</strong>7<br />
•<br />
Back cover,5<br />
Backspace,84<br />
Bail lever,5<br />
BASIC,47.61<br />
Belt,91<br />
Bit-image graphics,1 15 - 124<br />
8-bit85.118<br />
16-bit85.118<br />
24-bit86.118<br />
8x3-bit86.118<br />
Block graphics characters1 13 - 114<br />
Boldface,20.97<br />
BUSY lamp,6<br />
BUSY signal protocol,134<br />
Buffer,6<br />
Buffer case,6<br />
•<br />
Carriage return,81<br />
Character sets,1 11 - 114<br />
letter-quality,1 11.112<br />
draft-quality,1 11 ,112<br />
block graphics1 13.114<br />
international,1 13<br />
Character string,47<br />
CHR$,47.61<br />
Cleaning,54<br />
Codes17 - 19<br />
ASCII,17 - 19<br />
decimal,19<br />
hexadecimal,19<br />
escape,1 9<br />
control, 19<br />
Condensed print34.65<br />
Control codes, 19.61 - 94<br />
Custom installation,95<br />
Cut sheet guide,4<br />
•<br />
Decimal codes18<br />
DIP switches,7.57.<strong>10</strong>9 - 1<strong>10</strong><br />
Dot columns1 18<br />
Double-strike printing,30.48.67<br />
Draft-quality mode,32.62<br />
•<br />
Elite pitch,33.65<br />
Emphasized printing,20.30.48.68<br />
Entry slot,6<br />
Escape codes,1 9<br />
Expanded printing,46.48<br />
•<br />
Form feed (FF) button,7<br />
Front cover,5<br />
Front-cover-open detector,6<br />
Fuse,6.54<br />
Fuse holder,6<br />
•<br />
Graphics120<br />
Block,1 13 - 114<br />
Bit-image,85 - 86.115 - 124<br />
137
•<br />
Hexadecimal codes18<br />
Horizontal tabs43.83<br />
•<br />
IEEE-488 interface,134<br />
Incremental mode,94<br />
Initialization code,93<br />
Installation,95<br />
Interface,127 - 136<br />
parallel,1 27.129<br />
serial,l28.132<br />
IEEE-488,129.134<br />
connector,6<br />
cable,13<br />
International character sets35.63<br />
H<br />
Letter-quality mode,30.62<br />
Line feed,7<br />
button7.12<br />
codes,71<br />
reverse,72<br />
Line spacing,41.50<br />
1/6th-inch,73<br />
1/8th-inch,72<br />
l/lOth-inch,73<br />
nf60ths of an inch,74<br />
nll20ths of an inch,74<br />
Lotus l-2-3,26 - 27<br />
•<br />
Macro instruction35.89<br />
defining,35.89<br />
using,35.89<br />
Margins,39 - 40<br />
left and right39.82<br />
top and bottom,40.77.78<br />
MBASIC,47<br />
•<br />
On Line,6.7<br />
button,7<br />
lamp,6<br />
overprinting,97<br />
•<br />
Page length,40.76<br />
Paper-empty (PE) lamp,6<br />
Paper-out detector,5.92<br />
Pause,6<br />
button,6<br />
lamp,6<br />
mode,6<br />
Pica,33.64<br />
Pitch,20.32<br />
pica,33.64<br />
elite,33.65<br />
condensed,34.65<br />
Platen knob,5<br />
Power cord,4<br />
Power lamp,6<br />
Power switch,6<br />
Primary list device,20<br />
Printer<br />
cleaning,54<br />
driver,97<br />
placement of,2<br />
features5.126<br />
Print head,1 1.55<br />
gap adjustment1 1<br />
replacement of,55<br />
Proportional spacing,20.31.63<br />
Protocols.97.134<br />
•<br />
Release lever,5<br />
Reverse form feed,76<br />
Reverse line feed,50.72<br />
Ribbon cassette,3<br />
-<br />
138
w<br />
Self-test,1 2<br />
Specifications,1 25 - 128<br />
Spreadsheets,23 - 27<br />
Subscripts42.50.69<br />
SuperCalc,25<br />
Superscripts,42.50.69<br />
Surge protector,4<br />
•<br />
Tabs,43<br />
Horizontal,43.83<br />
VerticaL43.79<br />
Top-of-Form button,7<br />
Tractor feed guides,6<br />
•<br />
Underlined printing,31.49.68<br />
Unidirectional printing,70<br />
User functions,98<br />
•<br />
Vertical tabs43.79<br />
Vertical form unit (VFU),80.81<br />
VisiCalc,23 - 25<br />
•<br />
XON/XOFF protocol,134
Federal Communications Commission Radio Frequency<br />
Interference Statement<br />
This equipment generates and uses radio frequency energy and, if not installed and used<br />
properly-that is, in strict accordance with the manufacturer’s instructions-may cause interference<br />
to radio and television reception. It has been type-tested and found to comply<br />
with the limits for a Class B computing device in accordance with the specifications in Subpart<br />
J of Part 15 of FCC Rules. which are designed to provide reasonable protection against such<br />
interference in a residential installation. If this equipment does cause interference to radio<br />
or television reception- which can be determined by turning the equipment off and on-the<br />
user is encouraged to try to correct the interference by one or more of the following measures:<br />
-.<br />
• Reorient the receiving antenna<br />
• Relocate the computer with respect to the receiver<br />
• Move the computer away from the receiver<br />
• Plug the computer into a different outlet so that computer and receiver are on different<br />
branch circuits<br />
-.<br />
._<br />
If necessary, the user should consult the dealer or an experienced radio/television technician<br />
for additional suggestions. The user may find the following booklet prepared by the Federal<br />
Communications Commission helpful: “How to Identify and Resolve Radio-TV Interference<br />
Problems.” This booklet is available from the U.S. Government Printing Office, Washington,<br />
DC. 20402, Stock No. 004-000-00345-4.<br />
For compliance with Federal Noise Interference Standard, this equipment requires a shielded<br />
cable.<br />
This statement will apply only for printers marketed in the U.S.A.<br />
--<br />
140
WARRANTY<br />
STAR MICRONICS, INC., warrants this product to be free from<br />
defects in material and/or workmanship for a period of one year (if<br />
purchased after July 1, 1984) from the original date of purchase by<br />
the buyer other than for the purpose of resale. This warranty shall<br />
apply only if such original purchase by the buyer was made in the<br />
United States of America, of Canada.<br />
This warranty shall apply only if the product fails to function<br />
properly under normal use. Should this product fail to be in good<br />
working order anytime during the one year warranty period, Star<br />
Micronics, Inc., will, at its sole option, repair or replace this product<br />
at no additional charge except as set forth below. The forgoing is<br />
STAR MICRONICS, INC., sole responsibility under this warranty, and<br />
any liability for incidental or consequential damages, is expressly<br />
disclaimed. Repair parts and replacement products shall be furnished<br />
on an exchange basis and shall be either new or reconditioned.<br />
All replaced parts and products shall become the property<br />
of STAR MICRONICS, INC.<br />
Warranty coverage will not be granted if, in the sole opinion of<br />
STAR MICRONICS, INC., the defect or malfunction was caused by<br />
accident, abuse or misuse, neglect, improper packing or improper<br />
modifications, service by other than an authorized STAR service<br />
center, or where the serial number or rating label has been removed,<br />
defaced or altered.<br />
Requests for warranty service shall include the buyer’s purchase<br />
receipt or other valid proof of date of original consumer purchase,<br />
including the serial number of the product when a request for warranty<br />
service is made. The buyer is responsible for returning the STAR<br />
product, properly packaged in its original container, or an equivalent,<br />
to the nearest authorized STAR service center or to the dealer from<br />
whom the product was purchased. Any postage, insurance or<br />
741
shipping costs incurred in presenting or sending the product for<br />
service is the sole responsibility of the buyer.<br />
ALL EXPRESS AND IMPLIED WARRANTIES FOR THIS PRODUCT,<br />
INCLUDING THE WARRANTIES OF MERCHANTABILITY AND FIT-<br />
NESS FOR A PARTICULAR PURPOSE, ARE LIMITED IN DURATION<br />
.~<br />
TO A PERIOD OF ONE YEAR FROM THE DATE OF PURCHASE AND<br />
NO WARRANTIES EITHER EXPRESS OR IMPLIED WILL APPLY AF- ---<br />
TER THIS PERIOD. Some states do not allow limitations on how long<br />
an implied warranty lasts, so the above limitations may not apply to -<br />
you. Some states do not allow the exclusion or limitation of incidental<br />
or consequential damages for consumer products, so the above Ii- --<br />
mitations or exclusions may not apply to you. This warranty gives<br />
you specific legal rights and you may also have other rights which - _<br />
may vary from state to state.<br />
-<br />
-<br />
-<br />
-<br />
-<br />
742 -_
TRADEMARK<br />
ACKNO<br />
WLEDGEMEIVTS<br />
<strong>SB</strong>-<strong>10</strong>: Star Micronics, Inc.<br />
WORDSTAR: MicroPro International Corporation<br />
MBASIC: Microsoft Corporation<br />
VISICALC: VisiCorp<br />
SUPERCALC: Sorcim Corporation<br />
LOTUS l-2-3: Lotus Development Corporation<br />
IBM PC: international Business Machine Corporation<br />
CPM: Digital Research<br />
PFS WRITER: Perfect Software Inc.<br />
EASYWRITER II: Information Unlimited Software Inc.<br />
-<br />
144
COMMAND QUICK REFERENCE<br />
Print Sty/e Commands<br />
< ESC > 4.. ................................... letter-quality mode<br />
< ESC > 5 ..................................... draft-quality mode<br />
< ESC > R “n” ............................ International Character Set<br />
Font Pitch Controls<br />
< ESC > p 1 ................................. proportional print<br />
p0. ................................ cancel proportional print<br />
< ESC z=- P .................................... pica pitch<br />
< ESC > M.. .................................. elite pitch<br />
< SI > ....................................... condensed pitch<br />
........................... condensed pitch<br />
....................................... expanded pitch<br />
< ESC > ........................ one line expanded print<br />
< DC2 > ....................................... cancel condensed print<br />
< DC4 > ....................................... cancel expanded print<br />
< ESC > W 1 ................................ expanded print<br />
< ESC > W 0.. .............................. cancel expanded print<br />
Special Print Modes<br />
< ESC > G .................................... double-strike print<br />
< ESC > H .................................... cancel double-strike print<br />
< ESC > E ..................................... emphasized print<br />
< ESC > F ..................................... cancel emphasized print<br />
< ESC > - 1 ............................... underlined print<br />
< ESC > - 0 ............................... cancel underlined print<br />
< ESC > S 0 ................................. superscript printing<br />
< ESC > S 1 ................................. subscript printing<br />
< ESC > T ..................................... cancel superscript and subscript<br />
printing<br />
745
ESC > i 1 ................................... incremental mode<br />
< ESC > i 0.. ................................. cancel incremental mode<br />
< ESC > U 1 ................................. select unidirectional print<br />
< ESC > U 0.. ............................... cancel unidirectional print<br />
< ESC > < ................................... one line of unidirectional print<br />
Format Controls<br />
< LF> ....................................... advance paper to the next line<br />
< FF> ....................................... advance paper to the top of the next<br />
form<br />
....................................... advance paper to the next vertical __<br />
tab<br />
< ESC > 0 ..................................... 1/8th-inch line spacing<br />
< ESC > 1 ..................................... 1 /l Oth-inch line spacing<br />
< ESC > 2.. ................................... l/Gth-inch line spacing<br />
< ESC > A “n” ............................ n/60ths-inch line spacing<br />
< ESC > 3 “n” ............................. nll20ths-inch line spacing<br />
< ESC > J “n” ............................. one time line feed of nll20th inch<br />
< ESC > j “n” .............................. one time reverse line feed of<br />
n/l 20th inch<br />
C “n”. ........................... set page length to “n” lines<br />
C 0 “n”. ........................ set page length to “n” inches.<br />
r “n”. ............................. set top margin<br />
N “n”. ........................... set bottom margin<br />
< ESC > 0 .................................... cancel top and bottom margins<br />
I “n”. ............................. set left margin<br />
Q “n”. ........................... set right margin<br />
< ESC > B “n" “n2"...O.......... set vertical tabs<br />
D “nl" "n2"...O..<br />
........ set horizontal tabs<br />
a “n" ............................. advance page "n" lines<br />
< ESC > < LF > ......................... reverse the paper one line<br />
< ESC > < FF > ......................... reverse the paper to top of the page<br />
< US > ....................................... set the vertical form unit (VFU)<br />
< ESC > / “n".............................. select VFU channel<br />
< ESC > b “n"............................. skip “n" print positions<br />
....................................... carriage return<br />
< HT > ....................................... advance the paper to the next<br />
horizontal tab<br />
< BS > ....................................... back space<br />
746
! c<br />
L<br />
/<br />
I<br />
Graphics Controls<br />
yun,u "n2" Urn," Um2"<br />
...................... 8-bit graphics mode<br />
K”n7” “n2” “ml” “m2” ...................... 8x3-bit graphics mode<br />
< ESC> I “nl” “n2” “ml” “1772”...................... 16-bit graphics mode<br />
V “nl” “n2” “ml” “m2” .....................24-bit graphics mode<br />
Macro Instruction<br />
Commands<br />
< ESC > + ... < RS > ................ define macro<br />
< ESC > ..................................... execute macro<br />
Other Commands<br />
/ .<br />
I<br />
r .<br />
c<br />
....................................... set printer off-line<br />
< DC1 > ....................................... set printer on-line<br />
< BEL> ....................................... sound printer bell<br />
....................................... delete the last printable<br />
< DEL > ....................................... character sent<br />
< ESC > > ................................... sets 8th bit to a logical 1<br />
< ESC > = ................................... sets 8th bit to a logical 0<br />
< ESC > # ..................................... accepts bit to a logical 0<br />
< ESC > y 0 .................................. disable the printers bell<br />
y 1.. ................................ enable the printers bell<br />
< ESC > 8.. ................................... disable the paper-out detecter<br />
< ESC > 9 ..................................... enable the paper-out detecter<br />
< ESC > @ ................................... reinitialize the printer<br />
: L..<br />
.<br />
.<br />
147