HD Color Video Camera â EVI-H100S/H100V A - Full Compass
HD Color Video Camera â EVI-H100S/H100V A - Full Compass
HD Color Video Camera â EVI-H100S/H100V A - Full Compass
You also want an ePaper? Increase the reach of your titles
YUMPU automatically turns print PDFs into web optimized ePapers that Google loves.
Locations of Controls<br />
IMAGE FLIP switch<br />
Flips the image upside down. Normally set this to OFF when<br />
you use the camera. When the camera is attached to the<br />
ceiling, set this to ON. Before you set the IMAGE FLIP<br />
switch, turn off the unit (or set to standby mode) and then,<br />
turn the power on by connecting the power adaptor, by<br />
VISCA control or the remote commander. When you switch<br />
this, the preset setting is returned to the initial setting.<br />
IR SELECT switch<br />
VISCA RS-422 connector<br />
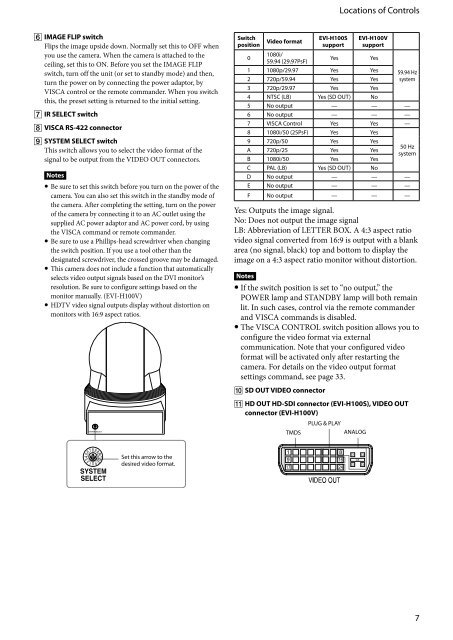
SYSTEM SELECT switch<br />
This switch allows you to select the video format of the<br />
signal to be output from the VIDEO OUT connectors.<br />
Notes<br />
Be sure to set this switch before you turn on the power of the<br />
camera. You can also set this switch in the standby mode of<br />
the camera. After completing the setting, turn on the power<br />
of the camera by connecting it to an AC outlet using the<br />
supplied AC power adaptor and AC power cord, by using<br />
the VISCA command or remote commander.<br />
Be sure to use a Phillips-head screwdriver when changing<br />
the switch position. If you use a tool other than the<br />
designated screwdriver, the crossed groove may be damaged.<br />
This camera does not include a function that automatically<br />
selects video output signals based on the DVI monitor’s<br />
resolution. Be sure to configure settings based on the<br />
monitor manually. (<strong>EVI</strong>-<strong>H100V</strong>)<br />
<strong>HD</strong>TV video signal outputs display without distortion on<br />
monitors with 16:9 aspect ratios.<br />
Switch<br />
position <strong>Video</strong> format <strong>EVI</strong>-<strong>H100S</strong><br />
support<br />
1080i/<br />
0<br />
Yes<br />
59.94 (29.97PsF)<br />
<strong>EVI</strong>-<strong>H100V</strong><br />
support<br />
1 1080p/29.97 Yes Yes 59.94 Hz<br />
2 720p/59.94 Yes Yes system<br />
3 720p/29.97 Yes Yes<br />
4 NTSC (LB) Yes (SD OUT) No<br />
5 No output — — —<br />
6 No output — — —<br />
7 VISCA Control Yes Yes —<br />
8 1080i/50 (25PsF) Yes Yes<br />
9 720p/50 Yes Yes<br />
50 Hz<br />
A 720p/25 Yes Yes<br />
system<br />
B 1080i/50 Yes Yes<br />
C PAL (LB) Yes (SD OUT) No<br />
D No output — — —<br />
E No output — — —<br />
F No output — — —<br />
Yes: Outputs the image signal.<br />
No: Does not output the image signal<br />
LB: Abbreviation of LETTER BOX. A 4:3 aspect ratio<br />
video signal converted from 16:9 is output with a blank<br />
area (no signal, black) top and bottom to display the<br />
image on a 4:3 aspect ratio monitor without distortion.<br />
Notes<br />
If the switch position is set to “no output,” the<br />
POWER lamp and STANDBY lamp will both remain<br />
lit. In such cases, control via the remote commander<br />
and VISCA commands is disabled.<br />
The VISCA CONTROL switch position allows you to<br />
configure the video format via external<br />
communication. Note that your configured video<br />
format will be activated only after restarting the<br />
camera. For details on the video output format<br />
settings command, see page 33.<br />
Yes<br />
SD OUT VIDEO connector<br />
<strong>HD</strong> OUT <strong>HD</strong>-SDI connector (<strong>EVI</strong>-<strong>H100S</strong>), VIDEO OUT<br />
connector (<strong>EVI</strong>-<strong>H100V</strong>)<br />
PLUG & PLAY<br />
TMDS<br />
ANALOG<br />
Set this arrow to the<br />
desired video format.


