HD Color Video Camera â EVI-H100S/H100V A - Full Compass
HD Color Video Camera â EVI-H100S/H100V A - Full Compass
HD Color Video Camera â EVI-H100S/H100V A - Full Compass

You also want an ePaper? Increase the reach of your titles
YUMPU automatically turns print PDFs into web optimized ePapers that Google loves.
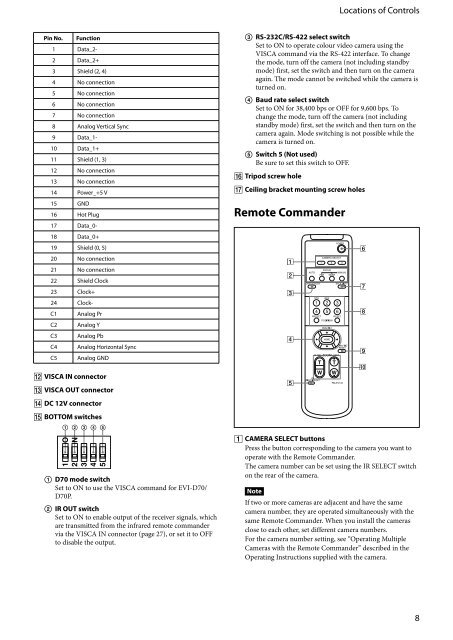
Locations of Controls<br />
Pin No. Function<br />
1 Data_2-<br />
2 Data_2+<br />
3 Shield (2, 4)<br />
4 No connection<br />
5 No connection<br />
6 No connection<br />
7 No connection<br />
8 Analog Vertical Sync<br />
9 Data_1-<br />
10 Data_1+<br />
11 Shield (1, 3)<br />
12 No connection<br />
13 No connection<br />
14 Power_+5 V<br />
15 GND<br />
16 Hot Plug<br />
17 Data_0-<br />
18 Data_0+<br />
19 Shield (0, 5)<br />
20 No connection<br />
21 No connection<br />
22 Shield Clock<br />
23 Clock+<br />
24 Clock-<br />
C1 Analog Pr<br />
C2 Analog Y<br />
C3 Analog Pb<br />
C4 Analog Horizontal Sync<br />
C5 Analog GND<br />
RS-232C/RS-422 select switch<br />
Set to ON to operate colour video camera using the<br />
VISCA command via the RS-422 interface. To change<br />
the mode, turn off the camera (not including standby<br />
mode) first, set the switch and then turn on the camera<br />
again. The mode cannot be switched while the camera is<br />
turned on.<br />
Baud rate select switch<br />
Set to ON for 38,400 bps or OFF for 9,600 bps. To<br />
change the mode, turn off the camera (not including<br />
standby mode) first, set the switch and then turn on the<br />
camera again. Mode switching is not possible while the<br />
camera is turned on.<br />
Switch 5 (Not used)<br />
Be sure to set this switch to OFF.<br />
Tripod screw hole<br />
Ceiling bracket mounting screw holes<br />
Remote Commander<br />
VISCA IN connector<br />
VISCA OUT connector<br />
DC 12V connector<br />
BOTTOM switches<br />
1<br />
2<br />
3<br />
4<br />
5<br />
D70 mode switch<br />
Set to ON to use the VISCA command for <strong>EVI</strong>-D70/<br />
D70P.<br />
IR OUT switch<br />
Set to ON to enable output of the receiver signals, which<br />
are transmitted from the infrared remote commander<br />
via the VISCA IN connector (page 27), or set it to OFF<br />
to disable the output.<br />
CAMERA SELECT buttons<br />
Press the button corresponding to the camera you want to<br />
operate with the Remote Commander.<br />
The camera number can be set using the IR SELECT switch<br />
on the rear of the camera.<br />
Note<br />
If two or more cameras are adjacent and have the same<br />
camera number, they are operated simultaneously with the<br />
same Remote Commander. When you install the cameras<br />
close to each other, set different camera numbers.<br />
For the camera number setting, see “Operating Multiple<br />
<strong>Camera</strong>s with the Remote Commander” described in the<br />
Operating Instructions supplied with the camera.