


Create successful ePaper yourself
Turn your PDF publications into a flip-book with our unique Google optimized e-Paper software.
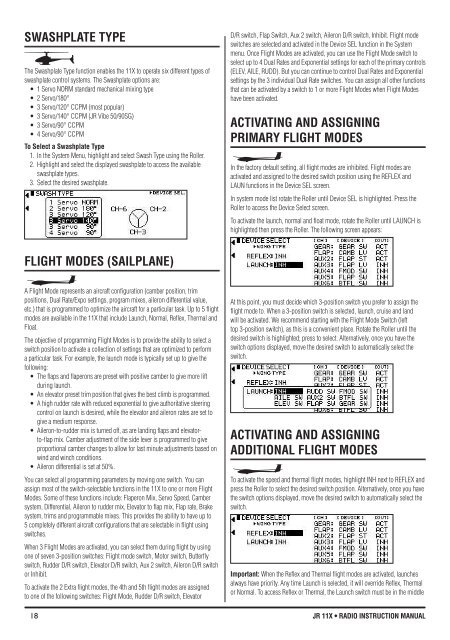
SWASHPLATE TYPE<br />
The Swashplate Type function enables the <strong>11X</strong> to operate six different types of<br />
swashplate control systems. The Swashplate options are:<br />
• 1 Servo NORM standard mechanical mixing type<br />
• 2 Servo/180°<br />
• 3 Servo/120° CCPM (most popular)<br />
• 3 Servo/140° CCPM (<strong>JR</strong> Vibe 50/90SG)<br />
• 3 Servo/90° CCPM<br />
• 4 Servo/90° CCPM<br />
To Select a Swashplate Type<br />
1. In the System Menu, highlight and select Swash Type using the Roller.<br />
2. Highlight and select the displayed swashplate to access the available<br />
swashplate types.<br />
3. Select the desired swashplate.<br />
FLIGHT MODeS (SAILPLANe)<br />
A Flight Mode represents an aircraft configuration (camber position, trim<br />
positions, Dual Rate/Expo settings, program mixes, aileron differential value,<br />
etc.) that is programmed to optimize the aircraft for a particular task. Up to 5 flight<br />
modes are available in the <strong>11X</strong> that include Launch, Normal, Reflex, Thermal and<br />
Float.<br />
The objective of programming Flight Modes is to provide the ability to select a<br />
switch position to activate a collection of settings that are optimized to perform<br />
a particular task. For example, the launch mode is typically set up to give the<br />
following:<br />
• The flaps and flaperons are preset with positive camber to give more lift<br />
during launch.<br />
• An elevator preset trim position that gives the best climb is programmed.<br />
• A high rudder rate with reduced exponential to give authoritative steering<br />
control on launch is desired, while the elevator and aileron rates are set to<br />
give a medium response.<br />
• Aileron-to-rudder mix is turned off, as are landing flaps and elevatorto-flap<br />
mix. Camber adjustment of the side lever is programmed to give<br />
proportional camber changes to allow for last minute adjustments based on<br />
wind and winch conditions.<br />
• Aileron differential is set at 50%.<br />
You can select all programming parameters by moving one switch. You can<br />
assign most of the switch-selectable functions in the <strong>11X</strong> to one or more Flight<br />
Modes. Some of these functions include: Flaperon Mix, Servo Speed, Camber<br />
system, Differential, Aileron to rudder mix, Elevator to flap mix, Flap rate, Brake<br />
system, trims and programmable mixes. This provides the ability to have up to<br />
5 completely different aircraft configurations that are selectable in flight using<br />
switches.<br />
When 3 Flight Modes are activated, you can select them during flight by using<br />
one of seven 3-position switches: Flight mode switch, Motor switch, Butterfly<br />
switch, Rudder D/R switch, Elevator D/R switch, Aux 2 switch, Aileron D/R switch<br />
or Inhibit.<br />
To activate the 2 Extra flight modes, the 4th and 5th flight modes are assigned<br />
to one of the following switches: Flight Mode, Rudder D/R switch, Elevator<br />
D/R switch, Flap Switch, Aux 2 switch, Aileron D/R switch, Inhibit. Flight mode<br />
switches are selected and activated in the Device SEL function in the System<br />
menu. Once Flight Modes are activated, you can use the Flight Mode switch to<br />
select up to 4 Dual Rates and Exponential settings for each of the primary controls<br />
(ELEV, AILE, RUDD). But you can continue to control Dual Rates and Exponential<br />
settings by the 3 individual Dual Rate switches. You can assign all other functions<br />
that can be activated by a switch to 1 or more Flight Modes when Flight Modes<br />
have been activated.<br />
ACTIvATING AND ASSIGNING<br />
PRIMARY fLIGHT MODES<br />
In the factory default setting, all flight modes are inhibited. Flight modes are<br />
activated and assigned to the desired switch position using the REFLEX and<br />
LAUN functions in the Device SEL screen.<br />
In system mode list rotate the Roller until Device SEL is highlighted. Press the<br />
Roller to access the Device Select screen.<br />
To activate the launch, normal and float mode, rotate the Roller until LAUNCH is<br />
highlighted then press the Roller. The following screen appears:<br />
At this point, you must decide which 3-position switch you prefer to assign the<br />
flight mode to. When a 3-position switch is selected, launch, cruise and land<br />
will be activated. We recommend starting with the Flight Mode Switch (left<br />
top 3-position switch), as this is a convenient place. Rotate the Roller until the<br />
desired switch is highlighted; press to select. Alternatively, once you have the<br />
switch options displayed, move the desired switch to automatically select the<br />
switch.<br />
ACTIvATING AND ASSIGNING<br />
ADDITIONAL fLIGHT MODES<br />
To activate the speed and thermal flight modes, highlight INH next to REFLEX and<br />
press the Roller to select the desired switch position. Alternatively, once you have<br />
the switch options displayed, move the desired switch to automatically select the<br />
switch.<br />
Important: When the Reflex and Thermal flight modes are activated, launches<br />
always have priority. Any time Launch is selected, it will override Reflex, Thermal<br />
or Normal. To access Reflex or Thermal, the Launch switch must be in the middle<br />
position. Try selecting the various flight modes several times while looking at the<br />
main info screen to become familiar with the switch priority.<br />
Note: On the main info screen, the active flight mode will display on the top<br />
center of the screen.<br />
MOTOR fUNCTION<br />
You can assign the motor function to operate from several different switches,<br />
buttons or the Spoiler stick. In Device Select, highlight GEAR SW and press<br />
the Roller to access the available outputs for the gear switch. Select the desired<br />
output by highlighting it and press the Roller ( the output options will not be<br />
accessible if the gear channel has been used as a mate for another channel).<br />
Note: Also see Motor System on page 29 for more details.<br />
fLAP AND AUX fUNCTIONS<br />
You can assign the Flap, Gear and Auxiliary channels to operate from several<br />
different switches, buttons or the throttle stick. In Device Select, highlight the<br />
desired Flap, Gear or Aux function. Next, press the Roller to access the available<br />
switches you can program to operate each function. . In this selection screen<br />
you can also set the 2 top trimmers to work as 2-position switches, 3-position<br />
switches, or as momentary switches for a selected channel.<br />
Select the desired switch by highlighting it then press the Roller.<br />
ACTIvATING/INHIbITING CHANNELS<br />
You can inhibit Channels 5 through 11, allowing them to be used as slave<br />
channels, in programmable mix. Highlight the desired ACT/INH next to the<br />
appropriate channel. Press the Roller to inhibit or activate the channel.<br />
WING TYPE<br />
The Wing Type function programs wing and tail types. The Wing Type program<br />
allows the activation of V-tail, tip ailerons, dual elevators, dual rudders, dual flaps<br />
and dual spoilers.<br />
Note: In order to activate any of the Dual Mate functions (dual elevator, rudder or<br />
flaps), the channels must be inhibited in Device Select.<br />
To access Wing type<br />
1. In the System List, rotate the Roller to highlight Wing Type. Press the Roller<br />
to access the wing type screen.<br />
2. If your sailplane has a V-tail, highlighting INH and press the Roller to<br />
activate the V-tail function.<br />
3. If your sailplane has dual elevators, dual rudders or dual flaps, highlight INH<br />
under the desired channel and press the Roller to access a list of channels to<br />
use as a mated channel. Highlight the channel and press the roller to accept.<br />
.<br />
fLAP STICK DIRECTION<br />
You can use the Flap Stick Direction to reverse the direction of the Flap Stick<br />
depending on whether you fly the stick high or low.<br />
To reverse the direction of the Spoiler Stick<br />
1. In the System List, rotate the Roller to highlight FLAP STK DIR. Press the<br />
Roller to access the Flap Stick Direction screen.<br />
2. Highlight FLAP on the screen and press the roller to reverse the direction of<br />
the flap stick.<br />
fUNCTION LIST<br />
The Function List is used to complete the setup and adjust the aircraft’s flight<br />
characteristics. Functions include Servo Reversing, Travel Adjust, Dual Rate and<br />
Expo, Sub-Trim, Servo Speed and Programmable Mix functions, etc. Many of<br />
these functions are frequently used to adjust the flight characteristics during setup<br />
and at the field.<br />
To Enter the function List<br />
With the transmitter on Press LIST and the Function List will appear.<br />
DUAL RATE AND EXPONENTIAL<br />
Four dual and exponential rates are available and selectable via flight modes or<br />
selected switches.<br />
To Program Dual Rate and Exponential values<br />
1 Highlight and select D/R & EXP in the Function List to obtain the Dual Rate<br />
and Exponential display.<br />
2 Highlight and select the desired channel values (Aileron, Elevator or<br />
Rudder), noting that 4 sets of values display. If using the Dual Rate<br />
switches, only 3 of the 4 values (pos0 through pos2) are active.<br />
18 <strong>JR</strong> <strong>11X</strong> • RADIO INSTRUCTION MANUAL <strong>JR</strong> <strong>11X</strong> • RADIO INSTRUCTION MANUAL<br />
19


![P01(Oxalys EP) [更新済み].ai - Kyosho](https://img.yumpu.com/26948574/1/184x260/p01oxalys-ep-ai-kyosho.jpg?quality=85)


