SK-NET™ Operating & Installation Guide - Secura Key
SK-NET™ Operating & Installation Guide - Secura Key
SK-NET™ Operating & Installation Guide - Secura Key

You also want an ePaper? Increase the reach of your titles
YUMPU automatically turns print PDFs into web optimized ePapers that Google loves.
<strong>SK</strong>-NET <br />
<strong>Operating</strong> & <strong>Installation</strong> <strong>Guide</strong><br />
Contents<br />
1. INTRODUCTION ..................................................................... 1<br />
1.1 What is <strong>SK</strong>-NET .................................................................. 1<br />
1.2 <strong>SK</strong>-NET Versions .................................................................. 1<br />
1.3 Computer system requirements ............................................... 1<br />
1.4 How is <strong>SK</strong>-NET organized ..................................................... 2<br />
2. GETTING STARTED ................................................................. 2<br />
2.1 Site Plan ................................................................................. 2<br />
2.2 Connecting <strong>SK</strong>-ACP panels and/or 28SA Plus card readers<br />
to the computer ...................................................................... 3<br />
2.3 Installing <strong>SK</strong>-NET on your computer or network .................... 4<br />
Multi Workstation <strong>Installation</strong> (Client/Server): .......................... 4<br />
Single Workstation <strong>Installation</strong> ................................................ 4<br />
3. QUICK START GUIDE ............................................................... 5<br />
3.1 Starting <strong>SK</strong>-NET ................................................................... 5<br />
3.2 Finding the readers ................................................................. 6<br />
3.3 Naming the readers ................................................................ 7<br />
3.4 Setting a latch time for a connection group ............................. 8<br />
3.5 Enrolling cards into your system .............................................. 9<br />
3.6 Testing the system ................................................................. 10<br />
4. MULTIPLE LOCATIONS ......................................................... 11<br />
4.1 Adding MLD to your basic <strong>SK</strong>-NET Software ........................ 11<br />
4.2 Creating additional Locations ............................................... 11<br />
5. CUSTOMIZE YOUR SYSTEM .................................................. 12<br />
5.1 Common ways of customizing an <strong>SK</strong>-NET system ................ 12<br />
5.2 Time Zones ........................................................................... 12<br />
5.3 Editing a Location Time Zone ................................................ 13<br />
5.4 Delaying the start or end time for the half hour blocks .......... 14<br />
5.5 Limiting the dates a Time Zone is active ................................ 14<br />
5.6 Antipassback ........................................................................ 15<br />
5.7 Selecting Antipassback for a Time Zone ................................ 15<br />
5.8 Timed Antipassback .............................................................. 16<br />
5.9 Real Antipassback (RAPB) ...................................................... 17<br />
5.10 Real Antipassback Forgive ..................................................... 18<br />
5.11 Unscheduled RAPB Forgive ................................................... 19<br />
5.12 Editing a Time Zone for a single reader ................................. 20<br />
5.13 Access Groups ...................................................................... 21<br />
5.14 Creating an Access Group .................................................... 21<br />
5.15 Changing a reader’s Time Zone in an Access Group ............. 22<br />
5.16 Changing the reader icons .................................................... 23<br />
5.17 Door schedules ..................................................................... 23<br />
5.18 Programming a Door Schedule ............................................. 24<br />
Location Door Schedule (All readers): .................................... 24<br />
Single Door Schedule ........................................................... 25<br />
5.19 Holidays ............................................................................... 26<br />
5.20 Programming a Holiday ........................................................ 26<br />
Location Holidays: ................................................................ 26<br />
5.21 Changing the latch timer for a single reader ......................... 27
5.22 Date and time ...................................................................... 27<br />
5.23 Setting the time and date ...................................................... 28<br />
5.24 Overriding U.S. Daylight Savings Time feature ....................... 28<br />
5.25 IN and OUT readers ............................................................. 29<br />
5.26 Programming an “IN” or an “OUT” reader ............................ 29<br />
5.27 Reader Groups ..................................................................... 30<br />
5.28 Creating a Reader Group ...................................................... 30<br />
5.29 Door Controls ....................................................................... 31<br />
5.30 Using Door Controls ............................................................. 31<br />
5.31 Inputs ................................................................................... 32<br />
5.32 Defining an Input ................................................................. 33<br />
5.33 Outputs ................................................................................ 34<br />
5.34 Defining an Output .............................................................. 36<br />
5.35 Programming custom Wiegand data formats ......................... 37<br />
5.36 Adding new readers to the system ......................................... 38<br />
5.37 Adding a Facility Code .......................................................... 39<br />
6. MANAGING USERS .............................................................. 40<br />
6.1 Entering Cardholder Information ........................................... 40<br />
6.2 Adding a new card number ................................................... 41<br />
6.3 Deleting a user ..................................................................... 41<br />
6.4 Changing the names of User data fields ................................ 42<br />
6.5 Sorting cardholders in the User List ....................................... 42<br />
6.6 Filtering Users ...................................................................... 43<br />
6.7 User Reports ......................................................................... 43<br />
6.8 Limited Use Cards ................................................................ 43<br />
6.9 Programming Limited Use Cards ........................................... 44<br />
7. MANAGING TRANSACTIONS ............................................... 46<br />
7.1 Changing Transaction View ................................................... 46<br />
7.2 Filtering Transactions ............................................................ 47<br />
7.3 Viewing cardholder photos ..................................................... 48<br />
7.4 Archiving older transactions .................................................. 48<br />
7.5 Viewing archived transactions ............................................... 49<br />
7.6 Excluding Transaction Types .................................................. 49<br />
7.7 Excluding Transaction Types (Globally) ................................... 50<br />
7.8 Excluding Transaction Types for One Reader .......................... 51<br />
8. REPORTS .............................................................................. 52<br />
8.1 Transaction Report ................................................................ 52<br />
8.2 Printing a User Report ........................................................... 53<br />
8.3 Printing a User Information Report ....................................... 53<br />
8.4 Printing a list of readers in a Location Report ......................... 54<br />
8.5 Printing a list of readers in an Access Group Report ............... 54<br />
8.6 Printing a list of Users in an Access Group Report .................. 55<br />
9. SECURITY .............................................................................. 56<br />
9.1 Changing an <strong>SK</strong>-NET Operator Password ........................... 56<br />
9.2 Assigning Operator Levels .................................................... 57<br />
9.3 System Activity Log ............................................................... 58<br />
9.4 Password Protection .............................................................. 59<br />
10. DIAGNOSTICS ...................................................................... 60<br />
10.1 Communicating with a Location ............................................. 60<br />
10.2 Network Messasges .............................................................. 60<br />
10.3 Self Testing from <strong>SK</strong>-NET .................................................... 61
11. TROUBLESHOOTING ............................................................ 62<br />
11.1 Cards do not work when creating a new Access Group ............. 62<br />
11.2 New Transactions are not appearing in the Transaction Screen ......62<br />
11.3 “Invalid Facility Code” message when using newly-added cards ....63<br />
11.4 Reader does not read-LED is Flashing Red or Green .............. 63<br />
11.5 Lost Communications between PC and Readers ..................... 64<br />
11.6 Using RS-232 Voltage Measurements to Check<br />
Communication Problems ..................................................... 65<br />
RS-232 Direct Connection ..................................................... 65<br />
11.7 NET-CONV Converter Connection ........................................ 66<br />
11.8 Power Reset .......................................................................... 66<br />
11.9 Replacing an <strong>SK</strong>-ACP or 28SA Plus ........................................ 67<br />
12. REMOTE EYES VIDEO INTEGRATION .................................... 68<br />
12.1 The Remote Eyes ® DVR ......................................................... 68<br />
12.2 <strong>SK</strong>-NET Set-up for Remote Eyes® ....................................... 68<br />
12.3 Reviewing a Video Clip ......................................................... 69<br />
Appendix A - <strong>SK</strong>-NET FEATURES ............................................. 70<br />
Appendix B - WORKING IN WINDOWS ..................................... 73<br />
<strong>SK</strong>-NET - GLOSSARY ............................................................... 75<br />
SYSTEM COMPONENTS .............................................................. 78<br />
NOTES ........................................................................................ 79<br />
7308 3321876
<strong>SK</strong>-NET<br />
<strong>Operating</strong> & <strong>Installation</strong> <strong>Guide</strong><br />
1. INTRODUCTION<br />
1.1 What is <strong>SK</strong>-NET<br />
<strong>SK</strong>-NET is a Windows ® based software program designed to monitor<br />
and control networks of <strong>Secura</strong> <strong>Key</strong> 28SA-PLUS access control units or<br />
<strong>Secura</strong> <strong>Key</strong> <strong>SK</strong>-ACP 2-door control panels.<br />
1.2 <strong>SK</strong>-NET Versions<br />
<strong>SK</strong>-NET Download Version &<br />
<strong>SK</strong>-NET-DM (CD-ROM w/Manual)<br />
<strong>SK</strong>-NET-MLD (CD-ROM w/Manual)<br />
<strong>SK</strong>-NET-MLD-CS_<br />
(CD-ROM with Manual)<br />
1.3 Computer system requirements<br />
Workstation (Client) Minimum Requirements:<br />
Windows ® XP, 32 bit 1 GHz, 1 GB RAM, 1 GB Disk Space*<br />
Windows ® Vista, 32 bit 1 GHz, 1 GB RAM, 1 GB Disk Space*<br />
Recommended System:<br />
Windows ® XP or greater 2 GHz, 2 GB RAM, 10 GB Disk Space<br />
(Larger systems may not run properly at the minimum requirements.<br />
Softare can run on Windows ® 98 & ME, but it is not recommended. )<br />
Server Minimum Requirements (For Client/Server Versions):<br />
Windows ® 2000 or greater 2.0 GHz, 1 GB RAM, 1 GB Disk Space*<br />
(For <strong>SK</strong>-NET-MLD-C/S version a server is required)<br />
* For larger systems more disk space may be required.<br />
Basic <strong>SK</strong>-NET for one location and<br />
a single workstation. A single LAN<br />
Connection is now supported.<br />
Upgrade version supports multiple<br />
locations and multiple connection<br />
groups of readers. Also enables<br />
connection(s) via dial-up modem and<br />
TCP/IP (LAN).This version is designed<br />
to run on a single workstation.<br />
All the features of <strong>SK</strong>-NET-MLD, plus<br />
multiple workstations. Licenses are<br />
available for 2, 5, 10 or 15 users. Client/<br />
Server software features five passwordprotected<br />
levels for program access.<br />
Required Peripherials: RS-232 COM Port or TCP/IP, 16 BIT Color Video<br />
Card, CD Drive (unless software is downloaded), a modem if you use<br />
dial-up and a printer for reports.<br />
<strong>Secura</strong> <strong>Key</strong> • 1
<strong>SK</strong>-NET<br />
<strong>Operating</strong> & <strong>Installation</strong> <strong>Guide</strong><br />
1.4 How is <strong>SK</strong>-NET organized<br />
2. GETTING STARTED<br />
2.1 Site Plan<br />
Transactions show all events that have occurred<br />
at the readers and in the system. Users includes<br />
a list of all the cards in the system, along with<br />
cardholder name, access group, in/out status and<br />
other information. This is also the place where you<br />
add new cards or change cardholder privileges. The<br />
tree view on the left shows the layout of the system,<br />
including readers, access groups, reader groups,<br />
holiday schedules, time zones, etc. Any changes to<br />
the system are started here.<br />
To read a comprehensive description of <strong>SK</strong>-NET<br />
features, see Appendix A. <strong>SK</strong>-NET uses many<br />
common Windows functions. For tips on navigating<br />
in Windows ® , see Appendix B.<br />
1. Make a site plan. List each opening where a reader is to be<br />
installed. Note the serial number of the <strong>SK</strong>-ACP panels and/or<br />
28SA-PLUS units for each opening. (NOTE: A reader connected<br />
to the right side of an <strong>SK</strong>-ACP panel (J5) is serial number –1, the<br />
left side (J6) is serial number –2).<br />
2. Install all readers and/or panels following the provided instructions.<br />
Be sure to use the type of wire specified. Do not apply power or<br />
connect the RS-485 bus until all components are installed.<br />
3. Connect the RS-485 bus to one <strong>SK</strong>-ACP or 28SA-PLUS at a time.<br />
Hold the white reset button in for three seconds after applying<br />
power, then release it.<br />
4. Once a panel or 28SA-PLUS is powered, the LED on the reader<br />
will begin flashing alternately RED and GREEN (for <strong>Secura</strong> <strong>Key</strong><br />
readers). Present a sample card to the reader while it is flashing.<br />
This sets the correct facility code in the memory and the flashing<br />
will stop after 10 seconds.<br />
NOTE: A 28SA-PLUS can learn up to three facility codes. An<br />
<strong>SK</strong>-ACP can learn up to 16 facility codes. To add facility codes,<br />
push the reset button, then present a sample of each facility code to<br />
the reader while the LED is flashing RED/GREEN.<br />
<strong>Secura</strong> <strong>Key</strong> • 2
<strong>SK</strong>-NET<br />
<strong>Operating</strong> & <strong>Installation</strong> <strong>Guide</strong><br />
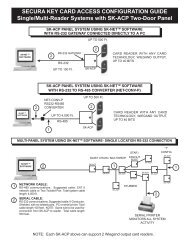
2.2 Connecting <strong>SK</strong>-ACP panels and/or 28SA Plus card<br />
readers to the computer<br />
There are four ways to connect a gateway to your location on the<br />
computer(s) where <strong>SK</strong>-NET will be running:<br />
1. RS-232. Connect the COM port of a PC to the RS-232 connection<br />
of one panel or 28SA-PLUS. This can be a terminal strip or an<br />
RJ-11 jack connection. (RJ11 jack recommended for laptop<br />
or temporary conection only!) RS-232 connections can be up<br />
to 100 feet and require six-conductor shielded cable (not twisted<br />
pairs). This panel or 28SA-PLUS will act as the “Gateway” to any<br />
other linked panels or 28SA-PLUS units.<br />
2. RS-485. Install the NET-CONV-P into the COM port of your<br />
computer. Run a twisted pair (or CAT 5) cable to the nearest panel<br />
(or 28SA-PLUS with an <strong>SK</strong>-NM485 installed. (Newer 28SAs include<br />
an RS-485 cable). RS-485 can be run up to 4000 total feet.<br />
NOTE: When using the NET-CONV-P you must always connect<br />
the first panel to the next in line. You cannot use a stubbed, star<br />
fanout, or “T” configuration.<br />
3. MODEM. Connect the pre-configured <strong>SK</strong>-MDM 56K modem to the<br />
RS-232 port on one of the panels or 28SA-PLUS units. Connect the<br />
modem to a dedicated phone line. The modem currently being<br />
used is a U.S. Robotics model 5686e. If you want to purchase and<br />
configure your own modem, the set-up instructions are located on<br />
our website under “Tech Support”.<br />
4. TCP/IP. Connect the <strong>SK</strong>-LAN device to the RS-232 port on one<br />
of the panels or 28SA-PLUS units. Connect the <strong>SK</strong>-LAN to an<br />
Ethernet jack. Follow the instructions for setting an IP address<br />
in the <strong>SK</strong>-LAN device. Newer <strong>SK</strong>-ACP panels will accept the<br />
<strong>SK</strong>-LAN-MOD plug-in network module. The <strong>SK</strong>-NET connection<br />
wizard will scan the system and automatically locate each module.<br />
Basic <strong>SK</strong>-NET will allow a single TCP/IP connection. Multiple<br />
TCP/IP connections require <strong>SK</strong>-NET-MLD.<br />
NOTE: TCP/IP is the best connection method when using <strong>SK</strong>-NET<br />
Client/Server versions because it enables all clients to connect to<br />
any location, one at a time.<br />
NOTE: The MLD and Client/Server versions allow for multiple<br />
connections simultaneously to a single location. This allows for<br />
virtually unlimited number of doors (readers) within a location.<br />
<strong>Secura</strong> <strong>Key</strong> • 3
<strong>SK</strong>-NET<br />
<strong>Operating</strong> & <strong>Installation</strong> <strong>Guide</strong><br />
2.3 Installing <strong>SK</strong>-NET on your computer or network<br />
NOTE: If you are upgrading from a version of <strong>SK</strong>-NET before<br />
3.00, you should run the “migration tool” when prompted. This will<br />
import databases from your older version to the new version.<br />
NOTE: If you already have a Client Server installation (versions 3.05<br />
or earlier) and you are upgrading to <strong>SK</strong>-NET version 4.00, you must<br />
also upgrade the ADS database. Contact technical support for details.<br />
<strong>SK</strong>-NET Version 4.00 requires ADS Version 8.1 or greater.<br />
Multi Workstation <strong>Installation</strong> (Client/Server):<br />
(See <strong>SK</strong>-NET Client/Server <strong>Installation</strong> Bulletin #24)<br />
1. If you have purchased a multiple workstation client/server version,<br />
you should install Advantage Database Server on your network<br />
server first. Select “Install ADS” from the Main Menu. Follow<br />
the installation prompts.<br />
2. When asked to provide “Serial Number” and “Validation Code”,<br />
you will find these on the inside cover of your <strong>SK</strong>-NET manual.<br />
3. Create a folder on the same drive where you have installed the<br />
ADS software. Give it a name such as “<strong>SK</strong>NETDATA”. This is the<br />
file where all <strong>SK</strong>-NET database files are saved.<br />
4. The directory where the databases on the server are installed<br />
must be shared by the network.<br />
5. After you have installed ADS on the network server, install<br />
<strong>SK</strong>-NET on the client workstations. Select “Install <strong>SK</strong>-NET”<br />
from the Main Menu. Follow the installation prompts.<br />
6. When asked “Install <strong>SK</strong>-NET to:” we recommend that you<br />
accept the default location.<br />
7. When asked “Install <strong>SK</strong>-NET database to:” browse to the<br />
mapped drive where you have installed ADS, and select the<br />
database folder you created.<br />
Single Workstation <strong>Installation</strong><br />
1. Install <strong>SK</strong>-NET on your hard drive by selecting “Install <strong>SK</strong>-NET”<br />
from the Main Menu. Follow the installation prompts.<br />
2. When asked “Install <strong>SK</strong>-NET to:” we recommend that you accept<br />
the default location. When using Windows ® Vista, you must install<br />
directly to the C: drive. DO NOT install to C:/Program Files.<br />
3. When asked “Install <strong>SK</strong>-NET database to:” we recommend<br />
that you accept the default location.<br />
4. If you have purchased <strong>SK</strong>-NET-MLD version, click on Help. Select Upgrade<br />
System. Click on MLD Version. Enter the <strong>SK</strong>-NET serial number<br />
(with no dash), located on the inside cover of your <strong>SK</strong>-NET manual.<br />
<strong>Secura</strong> <strong>Key</strong> • 4
<strong>SK</strong>-NET<br />
<strong>Operating</strong> & <strong>Installation</strong> <strong>Guide</strong><br />
3. QUICK START GUIDE<br />
3.1 Starting <strong>SK</strong>-NET<br />
1. Launch <strong>SK</strong>-NET. Enter Password (The default is 12345).<br />
2. Right-click on Connection 1.<br />
3. Select Properties from the drop-down menu.<br />
4. Click on the Connection tab.<br />
NOTE:: “This Location” is the default name of the first location<br />
in the software. You may rename Locations. In this manual we will<br />
refer to this icon as “Location”.<br />
NOTE:: The Readers, Cards, Configuration and Transaction tabs<br />
will appear as shown above, once you are connected.<br />
<strong>Secura</strong> <strong>Key</strong> • 5
<strong>SK</strong>-NET<br />
<strong>Operating</strong> & <strong>Installation</strong> <strong>Guide</strong><br />
3.2 Finding the readers<br />
1. Click the Edit button.<br />
2. For RS-232 connections, use the “Connection Wizard”. Accept<br />
the baud rate and COM port that Connection Wizard finds.<br />
3. For RS-485 connections, uncheck the “Gateway (RS-232)” box<br />
and use the “Connection Wizard”.<br />
4. For Modems, uncheck Local Connect. Select the COM Port<br />
where your modem is installed. Set the Baud rate to 38,400.<br />
Be sure the Gateway(RS-232) box is checked. Enter the modem<br />
phone number where indicated. (<strong>SK</strong>-NET-MLD version only.)<br />
5. For TCP/IP connections, select TCP/IP from the drop down<br />
list. Use the “Connection Wizard” to find all available TCP/IP<br />
connections. If you find more than one TCP/IP connection, select<br />
one. (<strong>SK</strong>-NET-MLD or Client/Server version only.)<br />
6. Click Apply, Close, and then Connect the Location.<br />
7. After following the appropriate procedure from 1, 2, 3 or 4, close<br />
the Connection Group Properties box. Click on the location.<br />
Right click Connection Group and select New, then Readers and<br />
then Quick Find. (Note: If you have more than 10 <strong>SK</strong>-ACP<br />
panels (20 readers), use the same procedure, but click on<br />
Search instead of Quick Find.) Follow the prompts. <strong>SK</strong>-NET<br />
will find all of the readers and bring them into the software.<br />
8. After the Log-In is complete, close the Login box.<br />
<strong>Secura</strong> <strong>Key</strong> • 6
<strong>SK</strong>-NET<br />
<strong>Operating</strong> & <strong>Installation</strong> <strong>Guide</strong><br />
3.3 Naming the readers<br />
1. Click on the “+” symbol (or in Vista the Symbol) next to the<br />
Connection Group. Every reader found by <strong>SK</strong>-NET will be<br />
listed, by serial number.<br />
2. Right-click on a serial number. Select Rename from the dropdown<br />
menu.<br />
3. Replace the serial number with the name you have selected, from<br />
your site plan. Click OK.<br />
<strong>Secura</strong> <strong>Key</strong> • 7
<strong>SK</strong>-NET<br />
<strong>Operating</strong> & <strong>Installation</strong> <strong>Guide</strong><br />
3.4 Setting a latch time for a Connection Group<br />
Out of the box, 28SA-PLUS and <strong>SK</strong>-ACP latch timers are set to one<br />
second. While this is good for gate operators, it is usually too short for<br />
electrically locked doors.<br />
1. Right click on a Connection Group.<br />
2. Select Properties from the drop down menu.<br />
3. Click on the Configuration tab.<br />
4. Change the latch timer value to the number of seconds you desire<br />
(or leave the default door setting of three seconds).<br />
5. Click on Send. Then Click on Close.<br />
NOTE: This will cause every reader in the connection group to<br />
activate the latch relay for the same time. To set a different latch<br />
timer for a single reader, See Section 5.21.<br />
<strong>Secura</strong> <strong>Key</strong> • 8
<strong>SK</strong>-NET<br />
<strong>Operating</strong> & <strong>Installation</strong> <strong>Guide</strong><br />
3.5 Enrolling cards into your system<br />
The quickest way to enroll a batch of cards is a “Block Load”.<br />
1. Click on Users at the top tool bar.<br />
2. Select Add, then select Range.<br />
3. Enter the lowest card number you have.<br />
4. Enter the highest card number you have.<br />
5. Select an Access Group for all the cards.<br />
6. Click OK. (All of these card numbers are now listed.)<br />
NOTE: It is usually best to add a range of users/cards in the Void<br />
User group. The Access Group for each card can be changed<br />
when it is issued to a specific cardholder (See Section 6.1).<br />
NOTE: If you anticipate adding additional Locations where<br />
cardholders from the first Location may need access, you should<br />
create those Locations in <strong>SK</strong>-NET before loading any cards in the<br />
first Location. For instructions in creating additional Locations See<br />
Section 4.1. (Multiple Locations requires <strong>SK</strong>-NET-MLD version.)<br />
<strong>Secura</strong> <strong>Key</strong> • 9
<strong>SK</strong>-NET<br />
<strong>Operating</strong> & <strong>Installation</strong> <strong>Guide</strong><br />
3.6 Testing the system<br />
1. From the User View, double-click on one of the card numbers<br />
you have block loaded.<br />
2. In the User Properties box, enter a name.<br />
3. In the Access Group field, select Master User.<br />
4. Click OK.<br />
5. Click the Send User Full arrow.<br />
You now have one card that should unlock every door and open every<br />
gate in the system. Try it out.<br />
6. View Transactions.<br />
Make sure that every reader you visited appears in the Transaction list.<br />
<strong>Secura</strong> <strong>Key</strong> • 10
<strong>SK</strong>-NET<br />
<strong>Operating</strong> & <strong>Installation</strong> <strong>Guide</strong><br />
4. MULTIPLE LOCATIONS<br />
With <strong>SK</strong>-NET-MLD version you can create as many different Locations as<br />
you need. A Location is one or more <strong>SK</strong>-ACP panels or 28SA-PLUS readers<br />
connected together via RS-485 and operating as a unified system.<br />
4.1 Adding MLD to your basic <strong>SK</strong>-NET Software<br />
1. Click on Help in the top tool bar.<br />
2. Select Upgrade System.<br />
3. Select MLD.<br />
4. Enter the 12-digit serial number (without the dash) where indicated.<br />
(The serial number is located inside the cover of this manual).<br />
4.2 Creating additional Locations<br />
1. Click on the Explorer menu.<br />
2. Select New.<br />
3. Select Location.<br />
4. Name the New Location. Click OK.<br />
<strong>Secura</strong> <strong>Key</strong> • 11
<strong>SK</strong>-NET<br />
<strong>Operating</strong> & <strong>Installation</strong> <strong>Guide</strong><br />
5. CUSTOMIZE YOUR SYSTEM<br />
5.1 Common ways of customizing an <strong>SK</strong>-NET system<br />
Most installations require that you customize one or more Time Zones<br />
and then create one or more new Access Groups before issuing cards<br />
to users. This allows you to grant access to users for specific doors at<br />
specific times and days.<br />
5.2 Time Zones<br />
A Time Zone is a schedule that governs when a card is valid (allowed<br />
access) and when it is invalid (denied access).<br />
Each Time Zone has a 24-hour schedule for each day of the week, as well<br />
as a 24-hour schedule for “holidays”. Any date designated as a holiday<br />
will follow the holiday schedule, regardless of what day of the week it<br />
falls on.<br />
<strong>SK</strong>-NET has sixteen Time Zones. Time Zone 0 is “Always Void”. (Void<br />
Users access group). Time Zone 1 is “Always Valid” (Masters Users access<br />
group). They cannot be edited. Time Zones 2 through 15 can be edited<br />
any way you choose.<br />
Location Time Zones can be edited for all readers from the<br />
Explorer/Tree View. You can also edit a time zone for a specific<br />
reader (See Section 5.12).<br />
<strong>Secura</strong> <strong>Key</strong> • 12
<strong>SK</strong>-NET<br />
<strong>Operating</strong> & <strong>Installation</strong> <strong>Guide</strong><br />
5.3 Editing a Location Time Zone<br />
1. Starting from the Tree View. Double-Click on Time Zones.<br />
2. Select the Time Zone you want to edit from the drop down list.<br />
3. Every square that is RED is a ½ hour increment when access will<br />
be denied. Every square that is GREEN is a ½ hour increment<br />
when access will be permitted. Click on squares to change them<br />
from RED to GREEN (or GREEN to RED).<br />
4. After editing a Time Zone, click Save.<br />
5. After saving, click Send to send the time zone to all of the readers.<br />
NOTE: To change a block of squares from RED to GREEN, hold<br />
down the CONTROL key, click on the first square, then click on the<br />
last square. The square(s) in between will also change.<br />
NOTE: To change an entire day from RED to GREEN, click on the<br />
big Green button to the left. To change an entire day from GREEN<br />
to RED, click on the big red button to the right.<br />
NOTE: You can change the name of a Time Zone to something that<br />
reminds you of it’s function (i.e. “Day Shift” or “Cleaning Crew”.<br />
<strong>Secura</strong> <strong>Key</strong> • 13
<strong>SK</strong>-NET<br />
<strong>Operating</strong> & <strong>Installation</strong> <strong>Guide</strong><br />
5.4 Delaying the start or end time for the half hour blocks<br />
You may delay the start of a Time Zone, by entering a value (1-29) in<br />
the Delay Start field. This value equals how many minutes after the first<br />
GREEN increment begins when the card will become valid.<br />
You may extend the end of a Time Zone by entering a value (1-29) in<br />
the Delay End field. This value equals how long after the last GREEN<br />
increment the card will continue to be valid.<br />
5.5 Limiting the dates a Time Zone is active<br />
Uncheck the Start Unrestricted box and use the calendar to select the<br />
first date the cards in this Time Zone should become active.<br />
Uncheck the End Unrestricted box and use the calendar to select the last<br />
date that cards in this Time Zone should be valid.<br />
NOTE: This feature is handy for clubs, gyms and other membership<br />
organizations.<br />
NOTE: This feature does not apply to Time Zones 0 or 1.<br />
<strong>Secura</strong> <strong>Key</strong> • 14
<strong>SK</strong>-NET<br />
<strong>Operating</strong> & <strong>Installation</strong> <strong>Guide</strong><br />
5.6 Antipassback<br />
Antipassback is a feature designed to prevent card sharing and/or to<br />
enforce use of IN and OUT readers.<br />
Timed Antipassback does not require IN and OUT readers. After a card<br />
is used at a reader with Timed Antipassback, that card will not be valid<br />
at that reader for a predetermined amount of time (up to 30 minutes).<br />
Real Antipassback requires readers for coming IN and going OUT. If<br />
a card was last used at an IN reader, it must be used at an OUT reader<br />
before it will be valid at an IN reader again.<br />
NOTE: These features do not apply to Time Zones 0 or 1.<br />
5.7 Selecting Antipassback for a Time Zone<br />
Select the type of Antipassback you want from the list.<br />
Hard Antipassback means the card will not be valid and an “antipassback<br />
violation” message will appear in Transactions.<br />
Soft Antipassback means that the card will be valid, but an “antipassback<br />
violation” will appear in Transactions.<br />
NOTE: Time Zones 0 and 1 cannot have antipassback.<br />
<strong>Secura</strong> <strong>Key</strong> • 15
<strong>SK</strong>-NET<br />
<strong>Operating</strong> & <strong>Installation</strong> <strong>Guide</strong><br />
5.8 Timed Antipassback<br />
To set the timed antipassback time for all readers:<br />
1. Right click on a Connection Group.<br />
2. Select Properties.<br />
3. Click on the Configuration tab.<br />
4. Enter the number of TAPB minutes (up to 30).<br />
5. Make sure the Latch Time is correct. Click on Send.<br />
To set the timed antipassback time for a single reader:<br />
1. Right click on the reader name.<br />
2. Select Properties.<br />
3. Click on the Edit button.<br />
4. Enter the number of TAPB minutes up to 30 minutes).<br />
Click on Send.<br />
NOTE: Time Zones 0 and 1 cannot have any type of<br />
antipassback.<br />
NOTE: To complete Timed Antipassback programming, you must<br />
create an Access Group using a Time Zones in the range 2 through 15<br />
(See Section 5.14).<br />
<strong>Secura</strong> <strong>Key</strong> • 16
<strong>SK</strong>-NET<br />
<strong>Operating</strong> & <strong>Installation</strong> <strong>Guide</strong><br />
5.9 Real Antipassback (RAPB)<br />
To program Real Antipassback into your system, you must<br />
complete the following steps:<br />
1. Select the proper antipassback configuration using a Time Zone<br />
in the range 2 through 15 (See Section 5.7).<br />
2. Create an Access Group using a Time Zone in the range 2<br />
through 15 (See Section 5.14).<br />
3. You must define your readers as IN or OUT by dragging all of<br />
the IN readers into the IN Reader group and all of the OUT<br />
readers into the OUT Reader group.<br />
4. If your system has more than one Connection Group, in order<br />
for RAPB to work properly, all of your Connection Groups must<br />
be connected to the system, and the <strong>SK</strong>-NET software must be<br />
running on your PC (it can be minimized).<br />
NOTE: A Global RAPB Forgive All Command takes about ½<br />
second per reader to process. On a 100-door system it will take<br />
approximately 50 seconds to reset Anti-Passback at all doors.<br />
<strong>Secura</strong> <strong>Key</strong> • 17
<strong>SK</strong>-NET<br />
<strong>Operating</strong> & <strong>Installation</strong> <strong>Guide</strong><br />
5.10 Real Antipassback Forgive<br />
Real Antipassback Forgive resets all cards or a single card to a<br />
neutral IN/OUT status, allowing access the next time the card is<br />
used at either an IN or OUT reader. The default setting for all<br />
readers is RAPB off. You can change that to automatic RAPB forgive<br />
which happens once a day. You can also initiate RAPB forgive at<br />
any time using <strong>SK</strong>-NET.<br />
To turn on/off RAPB Forgive, or to change the time setting, for all<br />
readers in a Connection Group:<br />
1. Right Click on a Connection Group.<br />
2. Select Properties.<br />
3. Click on the Configuration tab.<br />
4. Check “ON” or “OFF” for RAPB Forgive.<br />
5. Enter the hour, in military time, when RAPB Forgive should activate.<br />
6. Click the upper Send button.<br />
To change RAPB parameters for a single reader:<br />
1. Right click on the reader name.<br />
2. Select Properties.<br />
3. Click on the Configuration tab.<br />
4. Click on the Edit button<br />
5. Check RAPB Forgive “ON” or “OFF”.<br />
6. Enter the hour, in military time, when RAPB Forgive should activate.<br />
7. Click Send.<br />
<strong>Secura</strong> <strong>Key</strong> • 18
<strong>SK</strong>-NET<br />
<strong>Operating</strong> & <strong>Installation</strong> <strong>Guide</strong><br />
5.11 Unscheduled RAPB Forgive<br />
1. From the Tree View, right-click on Connection1 (or a<br />
connection group).<br />
2. Select Forgive.<br />
3. Choose All to reset all users, Range to enter a range of cards<br />
to forgive or User to forgive a single cardholder.<br />
4. Click OK.<br />
<strong>Secura</strong> <strong>Key</strong> • 19
<strong>SK</strong>-NET<br />
<strong>Operating</strong> & <strong>Installation</strong> <strong>Guide</strong><br />
5.12 Editing a Time Zone for a single reader<br />
1. From the Tree View, right-click on the selected reader.<br />
2. Select Properties.<br />
3. Click on the Zones button.<br />
4. Select the Time Zone to be edited.<br />
5. Follow the procedures described in section 5.3.<br />
6. Click on Send. Close these boxes.<br />
7. Save settings when prompted.<br />
<strong>Secura</strong> <strong>Key</strong> • 20
<strong>SK</strong>-NET<br />
<strong>Operating</strong> & <strong>Installation</strong> <strong>Guide</strong><br />
5.13 Access Groups<br />
An Access Group is assigned to each user defining which readers they<br />
have access to, and what times the readers can be used.<br />
<strong>SK</strong>-NET automatically creates two default Access Groups:<br />
The Master User group always includes all the readers in the location<br />
and is assigned Time Zone 1 (always valid). Master Users can use any<br />
reader at any time.<br />
The Void User group also includes all the readers. It is tied to Time Zone 0<br />
(Never valid). Placing a cardholder in the Void User group means he<br />
can never go anywhere, but his attempts to use the card will appear in<br />
Transactions.<br />
5.14 Creating an Access Group<br />
1. In the Tree View, right-click on This Location (or the new<br />
location name).<br />
2. Select New.<br />
3. Select Access Group.<br />
4. Enter a group name. Enter a Time Zone for the group. Click OK.<br />
5. The name of the new Access Group now appears on the left side of the<br />
screen. At this point there are no readers assigned to this group.<br />
6. Left click on the + next to Connection Group in the Tree View.<br />
A list of all the readers for that location will appear below.<br />
7. Drag and drop the desired readers from the Connection Group<br />
into the new access group. Click on the + next to the new group<br />
and verify all the proper readers appear.<br />
8. After changing all your users to the new Access Group be sure<br />
to click on “Send Users Full”.<br />
<strong>Secura</strong> <strong>Key</strong> • 21
<strong>SK</strong>-NET<br />
<strong>Operating</strong> & <strong>Installation</strong> <strong>Guide</strong><br />
5.15 Changing a reader’s Time Zone in an Access Group<br />
Each reader in an Access Group could be assigned to a different Time<br />
Zone. To edit an Access Group:<br />
1. Right Click on the Access Group name.<br />
2. Select Properties.<br />
3. Click on the Readers tab.<br />
4. Click on the “edit” icon (It looks like a little triangle).<br />
5. Change the Time Zones next to each reader name.<br />
6. Click on the “Send” button.<br />
7. Click on Close.<br />
<strong>Secura</strong> <strong>Key</strong> • 22
<strong>SK</strong>-NET<br />
<strong>Operating</strong> & <strong>Installation</strong> <strong>Guide</strong><br />
5.16 Changing the reader icons<br />
1. From the Tree View, right click on the reader name. Select<br />
Change Icon.<br />
2. Select a suitable icon from the displayed menu. Click OK.<br />
5.17 Door schedules<br />
A Door Schedule is used to automatically lock and unlock a door<br />
according to a regular weekly time schedule. Each Door Schedule has a<br />
24-hour schedule for each day of the week, as well as a 24-hour schedule<br />
for “holidays”. Any date designated as a holiday will follow the holiday<br />
schedule, regardless of what day of the week it falls on.<br />
You may set a Location Door Schedule for all the readers in the location,<br />
or you can set a Door Schedule for an individual reader.<br />
<strong>Secura</strong> <strong>Key</strong> • 23
<strong>SK</strong>-NET<br />
<strong>Operating</strong> & <strong>Installation</strong> <strong>Guide</strong><br />
5.18 Programming a Door Schedule<br />
Location Door Schedule (All readers):<br />
1. In the Tree View, double-click on Door Schedule.<br />
2. Every GREEN square represents a ½ hour increment when the<br />
door will be unlocked. Every RED square is a ½ hour increment<br />
when it will be locked. Change the color of any square by<br />
clicking on it.<br />
3. Select Automatic or Card Activate. Automatic means the door<br />
will unlock at the predetermined time. Card Activate means that<br />
the door will remain locked after the GREEN period begins until<br />
the next valid card is presented. This ensures that someone is in<br />
the building before the door unlocks.<br />
4. For Door Schedules that do not conform to exact half-hours, use<br />
the Delay Start and Delay End feature. (See Section 5.4)<br />
5. Click Send when finished.<br />
NOTE: If you have a Door Schedule, you probably need to define<br />
Holidays.<br />
NOTE: To temporarily override a door schedule, See<br />
Section 5.30d.<br />
<strong>Secura</strong> <strong>Key</strong> • 24
<strong>SK</strong>-NET<br />
<strong>Operating</strong> & <strong>Installation</strong> <strong>Guide</strong><br />
Single Door Schedule<br />
1. In the Tree View, right click on the reader name.<br />
2. Select Properties<br />
3. Click on the Door Controls tab.<br />
4. Click on Schedule.<br />
5. Every GREEN square represents a ½ hour increment when the<br />
door will be unlocked. Every RED square is a ½ hour increment<br />
when it will be locked. Change the color of any square by<br />
clicking on it.<br />
7. Select Automatic or Card Activate. Automatic means the door<br />
will unlock at the predetermined time. Card Activate means that<br />
the door will remain locked after the GREEN period begins until<br />
the next valid card is presented. This ensures that someone is in<br />
the building before the door unlocks.<br />
8. For Door Schedules that do not conform to exact half-hours, use<br />
the Delay Start and Delay End feature. (See Section 5.4)<br />
9. Click on Send. Click OK. Click on Close.<br />
NOTE: If you have a Door Schedule, you probably need to define<br />
Holidays.<br />
<strong>Secura</strong> <strong>Key</strong> • 25
<strong>SK</strong>-NET<br />
<strong>Operating</strong> & <strong>Installation</strong> <strong>Guide</strong><br />
5.19 Holidays<br />
Any date that is designated as a holiday will follow the Holiday schedule<br />
in Time Zones 2-15 and in any Door Schedules you have created. You<br />
may designate up to 32 dates as Holidays.<br />
While it is usually best to create Holidays per Location (for all readers)<br />
you may also create a Holiday for a single reader.<br />
5.20 Programming a Holiday<br />
Location Holidays:<br />
1. In the Tree View, click on Holidays.<br />
2. Click on the “+” plus sign icon to add a Holiday.<br />
3. Enter the date of the Holiday. Type in a name for the Holiday. If<br />
the Holiday always falls on this date, check Yearly. Click OK.<br />
4. To remove a Holiday, highlight the Holiday number and click on<br />
the “-“ minus sign.<br />
5. To edit a Holiday, highlight the Holiday number and click on the edit<br />
icon (up arrow). Make changes to date or name and click OK.<br />
6. After all Holiday additions or changes are made, click Send, then<br />
OK, then Close.<br />
NOTE: At the beginning of each new year, you need to review the<br />
Holiday schedule. Any Holiday which does not have a “X” located<br />
in the yearly box needs to be changed.<br />
<strong>Secura</strong> <strong>Key</strong> • 26
<strong>SK</strong>-NET<br />
<strong>Operating</strong> & <strong>Installation</strong> <strong>Guide</strong><br />
5.21 Changing the latch timer for a single reader<br />
1. Right-click on the name of the reader you want to change.<br />
2. Select Properties.<br />
3. Click on the Edit button.<br />
4. Enter a new Latch Timer value (in seconds).<br />
5. Click on the Send button.<br />
6. Click on Close.<br />
5.22 Date and time<br />
By default, every time you log into a location with your computer, the<br />
time and date in that computer can be transmitted to the system. If<br />
you prefer, you may manually set the system time using <strong>SK</strong>-NET. (For<br />
example, if the computer is in a different time zone, you will want to set<br />
the time manually.)<br />
Automatic Daylight Savings Time adjustments are handled by the system,<br />
unless you override this feature.<br />
<strong>Secura</strong> <strong>Key</strong> • 27
<strong>SK</strong>-NET<br />
<strong>Operating</strong> & <strong>Installation</strong> <strong>Guide</strong><br />
5.23 Setting the time and date<br />
1. In the Tree View, right-click on This Location.<br />
2. Select Properties.<br />
3. Click on the Properties tab.<br />
4. Uncheck the Auto Time Synch box. Close.<br />
5. In the Tree View, click on Time/Date once to display current<br />
time and date settings.<br />
6. Double-click on Time/Date to make changes.<br />
7. Click on Edit.<br />
8. Enter new time and date settings. Click Send. Click Close.<br />
5.24 Overriding U.S. Daylight Savings Time feature<br />
1. From the Tree View, click on Holidays.<br />
2. Uncheck the box next to Daylight Savings Mode (ON).<br />
3. Click Send.<br />
<strong>Secura</strong> <strong>Key</strong> • 28
<strong>SK</strong>-NET<br />
<strong>Operating</strong> & <strong>Installation</strong> <strong>Guide</strong><br />
5.25 IN and OUT readers<br />
<strong>SK</strong>-NET automatically creates a reader group for “IN” readers and a<br />
group for “OUT” readers. If your system has readers on both sides of<br />
an opening to control both access (entry) and egress (exit), you should<br />
place these readers in the IN and OUT groups.<br />
When a reader is neither an IN or an OUT reader, valid card uses appear<br />
as “Valid Access” in Transactions. When a reader has been designated<br />
as an IN reader, the message will say “Valid Entry”. When a reader is<br />
designated as an OUT reader, the message will say “Valid Exit”:<br />
Designating readers as IN and OUT is required in order to have Real<br />
Antipassback. (See Section 5.9, #3)<br />
5.26 Programming an “IN” or an “OUT” reader<br />
1. In the Tree View, click once on Connection Group. This will cause<br />
all of the reader icons to appear on the right side of the screen.<br />
2. Drag-and-Drop the appropriate readers onto the IN Reader group<br />
and the OUT Reader group on the left side of the screen.<br />
3. Click on the “+” plus sign next to IN Readers and OUT Readers<br />
to verify the readers fore each group.<br />
4. Repeat steps for each Connection Group.<br />
<strong>Secura</strong> <strong>Key</strong> • 29
<strong>SK</strong>-NET<br />
<strong>Operating</strong> & <strong>Installation</strong> <strong>Guide</strong><br />
5.27 Reader Groups<br />
A Reader Group is used to set common properties for two or more readers.<br />
<strong>SK</strong>-NET automatically creates two Reader Groups: IN Readers and OUT<br />
Readers. You may create up to 25 additional Reader Groups as you wish.<br />
5.28 Creating a Reader Group<br />
1. From the Tree View, right-click on This Location (or the new<br />
location name).<br />
2. Select New. Select Reader Group.<br />
3. Enter a name for the new Reader Group. Click OK.<br />
4. Click on the Group Name once. This causes all of the reader<br />
icons to appear on the right side of the screen.<br />
5. Drag-and-Drop the desired readers from the right side of the<br />
screen onto the name of the new Reader Group.<br />
NOTE:: Reader Groups are often used with Door Controls.<br />
An “All Readers” group is useful to send parameters and configuration<br />
settings to systems with more than one Connection group. Without an<br />
All Readers group, you would have to send these parameters once for<br />
each Connection Group. <strong>SK</strong>-NET 4.0 does not automatically create an<br />
All Readers group, but you can easily create your own:<br />
1. Right-Click on Location<br />
2. Select New, Reader Group, and name it “All Readers”<br />
3. Click OK.<br />
4. Then drag and drop all the readers from all of your Connection<br />
Groups into your new All Readers group.<br />
If you add any new readers to the system later, always be sure to add<br />
them to this group.<br />
<strong>Secura</strong> <strong>Key</strong> • 30
<strong>SK</strong>-NET<br />
<strong>Operating</strong> & <strong>Installation</strong> <strong>Guide</strong><br />
5.29 Door Controls<br />
Door Controls are functions that you can initiate from <strong>SK</strong>-NET that affect<br />
the door or gate at a connected location. Door Control icons appear at<br />
the top of the Tree View screen. You can send a Door Control command<br />
to a single reader, or to a Reader Group.<br />
5.30 Using Door Controls<br />
1. From the Tree View, click once on the name of a single reader<br />
or a Reader Group ( or a Connection Group).<br />
2. Click on the Door Control icon for the function you want to initiate:<br />
a. Open The Door Now will activate the latch relay(s) for the<br />
same time as presenting a valid card<br />
b. Unlock The Door activates the relay and keeps it activated<br />
until you restore it. During this time the GREEN LED on the<br />
reader will flash slowly.<br />
c. Make Inactive (Locked) prevents even valid cards from<br />
gaining access through the door until you restore it. During<br />
this time the RED LED will flash slowly.<br />
d. Disable Door Schedule is an override that relocks a door,<br />
or group of doors, that have been unlocked by a Door<br />
Schedule.<br />
e. Make Active (Normal) restores a reader to normal operation<br />
after it has been placed in the Unlock or Inactive state by a<br />
Door Control command.<br />
NOTE: Disable Door Schedule is useful when conditions<br />
require that a normally unlocked door be locked early. An example<br />
would be a school that has early dismissal due to bad weather.<br />
NOTE: A Global Door-Open Command takes about ½<br />
second per reader to process. On a 100-door system it will take<br />
approximately 50 seconds to open all doors.<br />
NOTE: A Global Reader Inactive (lock-down) Command<br />
takes about ½ second per reader to process. On a 100-door system<br />
it will take approximately 50 seconds to inactivate all doors.<br />
<strong>Secura</strong> <strong>Key</strong> • 31
<strong>SK</strong>-NET<br />
<strong>Operating</strong> & <strong>Installation</strong> <strong>Guide</strong><br />
5.31 Inputs<br />
Inputs are circuits that connect external sensors or switches to an <strong>SK</strong>-ACP<br />
or 28SA-PLUS. This requires a momentary Normally Open contact switch.<br />
They are used to initiate special functions or to generate messages in<br />
Transactions. There are eight different Input definitions you can choose<br />
in <strong>SK</strong>-NET.<br />
a. Disabled – The Input is not used.<br />
b. Tamper – A switch or sensor that has been installed to<br />
detect interference with a component of the access control<br />
system. If this circuit is closed, the reader will be disabled<br />
and a Tamper message will appear in Transactions.<br />
c. Arming Circuit – The reader is disabled until this input is<br />
closed. Cards presented while the Arming Circuit is open<br />
will be logged in Transactions but access will be denied.<br />
This input is often used for gates where a loop detector<br />
must sense that a vehicle is present before a card can<br />
be valid.<br />
d. Door Monitor – Connected to a door position switch,<br />
this input activates anti-tailgate feature. It is also used<br />
to detect a door forced open or held open too long.<br />
e . Door Bell – Sends an ASCII Bell Character to a PC or<br />
printer, causing an audible tone.<br />
f. Remote Inactive – Closing this input makes the reader<br />
inactive (lockout).<br />
g. Remote Open – This input activates the latch relay for<br />
the same amount of time as a valid card use. A “Door<br />
Opened Via Sensor” message appears in Transactions.<br />
Also called Request-To-Exit or REX.<br />
h. User Defined – This input allows you to write a custom<br />
message that will appear in Transactions. The Input can<br />
be a variation of Remote Open or it can simulate Door<br />
Bell. It can also be used as an alarm reset for certain<br />
auxiliary relay output functions.<br />
<strong>Secura</strong> <strong>Key</strong> • 32
<strong>SK</strong>-NET<br />
<strong>Operating</strong> & <strong>Installation</strong> <strong>Guide</strong><br />
5.32 Defining an Input<br />
1. From the Tree View, right click on a reader name.<br />
2. Select Properties.<br />
3. Click on the Configuration tab.<br />
4. Click on Edit.<br />
5. Select the Input you want to change.<br />
6. Select the Input definition. Click OK.<br />
7. Click on the Send button. Close.<br />
<strong>Secura</strong> <strong>Key</strong> • 33
<strong>SK</strong>-NET<br />
<strong>Operating</strong> & <strong>Installation</strong> <strong>Guide</strong><br />
5.33 Outputs<br />
The <strong>SK</strong>-ACP has a main (latch) relay and an auxiliary relay for each reader.<br />
(28SA-PLUS does not have an auxiliary output.) This extra relay can<br />
be activated by a variety of means to accomplish various functions.<br />
a. Disabled – The output is not used.<br />
b. Input 1 Follow / Latch – Whenever Input 1 is closed the aux.<br />
relay will activate until either 1) a valid card is presented to<br />
the reader, 2) a User Defined Input 2 is activated, 3) a preselected<br />
amount of time elapses or 4) Input 1 is opened.<br />
c. Input 2 Follow / Latch – Whenever Input 2 is closed the<br />
aux. relay will activate until either 1) a valid card is presented<br />
to the reader, 2) a User Defined Input 1 is activated, 3) a preselected<br />
amount of time elapses or 4) Input 2 is opened.<br />
d. Door Monitor Alarm – If one of the Inputs is configured<br />
as Door Monitor, this output will activate if the door is<br />
forced open or if it is left open too long. This output is<br />
typically connected to a local alarm signal or to a remote<br />
monitoring station. Once the auxiliary relay is activated<br />
it will remain activated until 1) a valid card is presented<br />
to the reader, 2) a User Defined Input is activated, 3) a<br />
pre-selected amount of time elapses.<br />
e. Door Forced Alarm - If one of the Inputs is configured as<br />
Door Monitor, this output will activate if the door is forced<br />
open. This output is typically connected to a local alarm<br />
signal or to a remote monitoring station. Once the auxiliary<br />
relay is activated it will remain activated until 1) a valid<br />
card is presented to the reader, 2) a User Defined Input is<br />
activated, 3) a pre-selected amount of time elapses.<br />
f. Door Held Open - If one of the Inputs is configured as<br />
Door Monitor, this output will activate if the door is left<br />
open too long. This output is typically connected to a local<br />
alarm signal or to a remote monitoring station. Once the<br />
auxiliary relay is activated it will remain activated until 1) a<br />
valid card is presented to the reader, 2) a User Defined Input<br />
is activated, 3) a pre-selected amount of time elapses.<br />
g. Emergency Exit Alarm – Used when one of the Inputs<br />
is designated as Remote Open, the auxiliary relay will<br />
activate whenever the main relay is triggered via the<br />
Remote Open Input. This is typically used to sound a local<br />
alarm when the door has been used for egress.<br />
<strong>Secura</strong> <strong>Key</strong> • 34
<strong>SK</strong>-NET<br />
<strong>Operating</strong> & <strong>Installation</strong> <strong>Guide</strong><br />
h. Card Range – Cards in a selected range will activate<br />
the auxiliary relay only or both the auxiliary and main<br />
relays. Typically this is used so specific cards can cause<br />
something special or extra to happen. The relay can be<br />
set to Toggle, (activate until another card in the selected<br />
range is presented) or to activate for a preset amount<br />
of time.<br />
i. Error Alarm – When any one of selected “Error”<br />
conditions occur, the auxiliary relay will activate and stay<br />
activated until a valid card is presented to the reader.<br />
Error Conditions you may select from are “Door Forced”,<br />
Door Held”, Tamper Input”, “Void User”, “Invalid Facility<br />
Code”, “Antipassback Violation”, “Arming”, “Tamper<br />
Card”, “Inactive”, “Invalid ID”, “Time Zone Error”, “Time<br />
Zone Date”, “Limited Use Violation”.<br />
j. Serious Alarm – When any one of the following “Error”<br />
conditions occur, the auxiliary relay will be activated<br />
and remain activated until a valid card is presented:<br />
“Void Card”, “Invalid Facility Code”, ”Tamper”, “Door<br />
Forced”, “Door Held”.<br />
k. Time Zone – The auxiliary relay will be activated during<br />
the GREEN increments of the selected Time Zone.<br />
l. Tamper Alarm – If a Tamper Input is closed, the auxiliary<br />
relay will be activated and will remain activated until<br />
until 1) a valid card is presented to the reader, 2) a User<br />
Defined Input is activated, 3) a pre-selected amount of<br />
time elapses.<br />
m. Door Bell – If a Door Bell Input is closed the auxiliary<br />
relay will be activated and remain activated until 1)<br />
The input is opened or 2) a pre-selected amount of<br />
time elapses.<br />
n. Alarm Shunt – Whenever the main relay is activated by<br />
a valid card or a Remote Open input, the auxiliary relay<br />
will be activated and will remain activated until 1) the<br />
main relay returns to normal or 2) a pre-selected amount<br />
of time elapses.<br />
<strong>Secura</strong> <strong>Key</strong> • 35
<strong>SK</strong>-NET<br />
<strong>Operating</strong> & <strong>Installation</strong> <strong>Guide</strong><br />
5.34 Defining an Output<br />
1. From the Tree View, right click on a reader name.<br />
2. Select Properties.<br />
3. Click on the Configuration tab.<br />
4. Click on Edit.<br />
5. Select the Output.<br />
6. Select the Output definition.<br />
7. Set any applicable Output Parameters - Click OK.<br />
8. Click on the Send button. Close.<br />
<strong>Secura</strong> <strong>Key</strong> • 36
<strong>SK</strong>-NET<br />
<strong>Operating</strong> & <strong>Installation</strong> <strong>Guide</strong><br />
5.35 Programming custom Wiegand data formats<br />
1. From the Tree View, right-click on the reader name.<br />
2. Select Properties.<br />
3. Click on the Service tab.<br />
4. Click on Edit.<br />
5. Uncheck Use Defaults.<br />
6. Enter the total number of bits in your card format.<br />
7. Use the slide scale to set the number of card I.D. bits to 16.<br />
8. If normal parity bits are not used check No Parity and verify whether<br />
the card number is correct. If not, select Ignore Parity.<br />
9. Click Send to change settings for that reader only. Click Send<br />
to All if all the readers require these settings.<br />
NOTE: This feature is not supported with the 28SA Plus.<br />
<strong>Secura</strong> <strong>Key</strong> • 37
<strong>SK</strong>-NET<br />
<strong>Operating</strong> & <strong>Installation</strong> <strong>Guide</strong><br />
5.36 Adding new readers to the system<br />
After the new hardware has been installed and wired into the system, hold in<br />
the reset button while turning on the power. Hold for 3 seconds and release.<br />
<strong>SK</strong>-NET will now be able to find the new reader(s).<br />
1. From the Tree View, right-click on Connection Group.<br />
2. Select New.<br />
3. Select Reader(s).<br />
4. Select Quick Find (unless you have more than 20 readers, then<br />
use Search).<br />
5. <strong>SK</strong>-NET will find the new reader(s) and bring them into the system.<br />
Follow the prompts until the new readers have been logged in.<br />
NOTE: The newly found readers will automatically be added to the<br />
Connection Group, Master Users and Void User groups. Be<br />
sure to drag-and-drop the new readers into any other appropriate<br />
Access Groups before you do a Card Send.<br />
NOTE: This procedure must be followed anytime you perform a<br />
Power Reset on a panel or reader. (See Section 11.8)<br />
<strong>Secura</strong> <strong>Key</strong> • 38
<strong>SK</strong>-NET<br />
<strong>Operating</strong> & <strong>Installation</strong> <strong>Guide</strong><br />
5.37 Adding a Facility Code<br />
<strong>SK</strong>-ACP can learn up to 16 Facility Codes and 28SA-PLUS can learn up to<br />
three. While it is best to have a single Facility Code in each system, this is not<br />
always convenient. You can set Facility Codes in a panel or reader by<br />
pressing the reset button and then presenting a sample of ALL the Facility<br />
Codes to a reader while the LED is flashing alternately RED and GREEN.<br />
If there are multiple panels you can repeat this procedure at each, or you<br />
can send the codes from one unit to all the others through <strong>SK</strong>-NET.<br />
1. From the Tree View, right click on the name of a reader that<br />
has all of the required Facility Codes.<br />
2. Select Properties.<br />
3. Click on the Service tab.<br />
4. In the Facility Code section, click on Edit.<br />
5. Click on Close. Click on Send To All.<br />
6. Click Close.<br />
Now that all the readers have been updated with new facility codes, you<br />
need to update the database files in <strong>SK</strong>-NET.<br />
1. From the Tree View, right click on Location.<br />
2. Select Backup.<br />
3. Select All Readers<br />
NOTE: Sending Facility Codes via <strong>SK</strong>-NET is not supported by<br />
the 28SA-PLUS.<br />
<strong>Secura</strong> <strong>Key</strong> • 39
<strong>SK</strong>-NET<br />
<strong>Operating</strong> & <strong>Installation</strong> <strong>Guide</strong><br />
6. MANAGING USERS<br />
The User screen displays all cards and associated cardholders. This is<br />
where you can add a card, edit card details, monitor in and out status<br />
and generate user reports.<br />
6.1 Entering Cardholder Information<br />
1. In the User View, double click on the card number you want to<br />
issue. A User Detail box will appear.<br />
2. Enter the cardholder name. Select an Access Group from the<br />
dropdown list.<br />
3. Other fields are optional. They are provided for your convenience.<br />
4. To attach a photograph to a user record, click on Load. Use the<br />
browser to locate the jpeg (.jpg) file with the desired picture.<br />
5. Click OK.<br />
6. After all card additions or changes, click the Send Users arrow.<br />
NOTE: Follow the same procedure to edit cardholder information<br />
or change Access Group.<br />
NOTE: Attached photos should be small files (480x640). High<br />
resolution pictures may slow the program and they will not look<br />
any better on a computer screen. Attached photos can be viewed<br />
in Transaction Detail (See Section 7.3) and are available for<br />
use by <strong>SK</strong>-EZ/ID badge-making software.<br />
<strong>Secura</strong> <strong>Key</strong> • 40
<strong>SK</strong>-NET<br />
<strong>Operating</strong> & <strong>Installation</strong> <strong>Guide</strong><br />
6.2 Adding a new card number<br />
1. In the User View, click on the “+” sign (Add).<br />
2. In the User Detail box, enter the cardholder name.<br />
3. Enter the Card Number.<br />
4. Select an Access Group from the drop down list.<br />
5. Enter additional data and/or attach photos if desired.<br />
6. Click OK.<br />
7. After all card additions or changes, click the Send Users<br />
arrow.<br />
6.3 Deleting a user<br />
NOTE: You can remove a card completely from the system. It is<br />
usually better, though, to edit the card and make it a Void User. This<br />
ensures that the card will not open anything, but each attempted<br />
use will be recorded in Transactions.<br />
To remove a single card:<br />
1. In the User View, click on the card number to be removed. This<br />
will position the pointer next to that number.<br />
2. Click on the “X“ (Delete). The record will be removed.<br />
3. After any card additions or changes, click the Send Users arrow.<br />
NOTE: Be sure to backup your system when you exit <strong>SK</strong>-NET.<br />
<strong>Secura</strong> <strong>Key</strong> • 41
<strong>SK</strong>-NET<br />
<strong>Operating</strong> & <strong>Installation</strong> <strong>Guide</strong><br />
6.4 Changing the names of User data fields<br />
1. Click on the word File in the top menu bar.<br />
2. Select Preferences.<br />
3. Click on the User Field Labels tab.<br />
4. Change the text to be displayed for any of the field labels shown.<br />
Click OK.<br />
6.5 Sorting cardholders in the User List<br />
When the User list is displayed, you can sort the User List by clicking on<br />
many of the column headings. For example, clicking on Last Name will<br />
sort the list alphabetically by last name. Clicking on Card Number<br />
will sort the list from lowest to highest card number.<br />
You may also find a specific card or user by clicking on Users on the top<br />
menu bar, then select Find. Select the search field (Last Name, Card<br />
Number, Title, etc.) and enter the corresponding value. A pointer on<br />
the left side of the list will move to the desired record.<br />
<strong>Secura</strong> <strong>Key</strong> • 42
<strong>SK</strong>-NET<br />
<strong>Operating</strong> & <strong>Installation</strong> <strong>Guide</strong><br />
6.6 Filtering Users<br />
Filters allow you to temporarily remove unwanted records from the list. This<br />
allows a limited user report to be generated, for example, users in a single<br />
department or users who are out of the building.<br />
6.7 User Reports<br />
1. From the User View, click on the Filter Users icon.<br />
2. In the Filter Users detail box, select, IN/OUT or Department.<br />
3. Enter the desired filter value. Click OK.<br />
4. To remove any applied filters, repeat the process and select ALL<br />
for each filter type.<br />
NOTE: Users in a particular Access Group can be filtered by simply<br />
clicking on the User icon under a particular Access Group icon.<br />
6.8 Limited Use Cards<br />
Limited Use Cards are valid for a specific number of uses, days or<br />
weeks. After the preset limit is reached, the cards become Void. Limited<br />
Use Cards can also be set to “Count”. This feature keeps track of card<br />
uses, but does not automatically void the card.<br />
Limited Card usage is shared between all of the readers in a location,<br />
but it is not transmitted from one location to another. It is usually best<br />
to set up Limited Use Cards globally, but they may also be created in a<br />
single reader or a Reader Group.<br />
A maximum of 4000 cards can be used as Limited Use Cards. By default<br />
the Limited Use Card range is set from 1 to 4000. This can be changed if the<br />
cards being used in your system are in a different card number range.<br />
<strong>Secura</strong> <strong>Key</strong> • 43
<strong>SK</strong>-NET<br />
<strong>Operating</strong> & <strong>Installation</strong> <strong>Guide</strong><br />
6.9 Programming Limited Use Cards<br />
1. In the Tree View screen, right-click on a Connection Group.<br />
2. Select Properties.<br />
3. Click on the Configuration tab.<br />
4. Enter the lowest and highest Limited Use Card numbers from<br />
among the cards enrolled in your system. (No more than 4000<br />
cards may be Limited Use.)<br />
5. Click Send.<br />
6. Click on the Cards tab.<br />
<strong>Secura</strong> <strong>Key</strong> • 44
<strong>SK</strong>-NET<br />
<strong>Operating</strong> & <strong>Installation</strong> <strong>Guide</strong><br />
7. Select the appropriate Limited Use parameter. Enter a count<br />
value, where required.<br />
8. Enter the lowest and highest cards within the previously defined<br />
limited use card range, that applies to this parameter. (You can<br />
define multiple groups of Limited Cards with various limitation<br />
parameters.)<br />
9. Click Send. Click Close.<br />
NOTE: A similar process can be used in the properties of a Reader<br />
Group or of a single reader. It is usually better to make Limited Use<br />
Cards Location-wide.<br />
NOTE: Limited Use cards cannot be programmed into Time<br />
Zone 1 or Master Users.<br />
NOTE: When the Uses parameter is selected, the system does<br />
not count uses involving an OUT reader.<br />
NOTE: To reprogram a void Limited Use card, follow the<br />
programming steps above for the desired card or card range.<br />
NOTE: If your system has more than one Connection Group, in<br />
order for the Limited Use “Uses” or “Counter” function (number<br />
of uses) to work properly, all of your Connection Groups must<br />
be connected to the system, and the <strong>SK</strong>-NET software must be<br />
running on your PC (it can be minimized). Once programmed, the<br />
Limited Use “Days”, “Days after Use”, and “Weeks” functions will<br />
continue to work, even if the <strong>SK</strong>-NET software is not continuously<br />
connected or running.<br />
<strong>Secura</strong> <strong>Key</strong> • 45
<strong>SK</strong>-NET<br />
<strong>Operating</strong> & <strong>Installation</strong> <strong>Guide</strong><br />
7. MANAGING TRANSACTIONS<br />
The Transaction view displays system activity. Card events that are valid<br />
and invalid are displayed, along with system events such as a door<br />
unlocked by a Door Schedule or automatic RAPB Forgive.<br />
Transactions can be displayed in a list, with the most recent event at the<br />
bottom of the screen. You can also display a single transaction in detail,<br />
including any attached photograph for the cardholder.<br />
7.1 Changing Transaction View<br />
1. From the Transaction screen, click on the Change Colors icon.<br />
2. Click the Change box next to the event type you want to alter.<br />
3. Select a color from the chart. Click Apply to preview how the<br />
color will look. (Some colors are very hard to read.) Click OK to<br />
use the selected color.<br />
4. To change whether a transaction class appears Bold or Italic, click<br />
the appropriate check box.<br />
<strong>Secura</strong> <strong>Key</strong> • 46
<strong>SK</strong>-NET<br />
<strong>Operating</strong> & <strong>Installation</strong> <strong>Guide</strong><br />
7.2 Filtering Transactions<br />
1. From the Transactions screen, click on the Filter icon.<br />
2. In the Transaction Filter box, select one or more filter criteria<br />
types. Each filter criteria requires a value to be entered.<br />
3. Click OK.<br />
4. To remove any filters, repeat the process and select ALL for each<br />
filter criteria (or click on Defaults to reset all filters.)<br />
NOTE: To View Transactions of Users from a particular Access<br />
Group or location, simply click on the Transactions icon under a<br />
particular Access Group or location.<br />
<strong>Secura</strong> <strong>Key</strong> • 47
<strong>SK</strong>-NET<br />
<strong>Operating</strong> & <strong>Installation</strong> <strong>Guide</strong><br />
7.3 Viewing cardholder photos<br />
1. From the Transaction View, click on the Zoom In icon<br />
(magnifying glass icon).<br />
2. The selected transaction will be displayed with user details<br />
and photo (if loaded), To view previous transactions, use the<br />
navigation buttons.<br />
7.4 Archiving older transactions<br />
1. From the Transaction View, click on the word “Transactions”<br />
in the menu bar.<br />
2. Select Archive, then New/Append.<br />
3. Enter the a name for the archive file destination.<br />
4. If you do not want to archive all the transaction records, enter a<br />
starting and/or ending date.<br />
5. Click OK.<br />
NOTE: In the same menu you may choose to delete an archive<br />
file that you no longer wish to retain.<br />
<strong>Secura</strong> <strong>Key</strong> • 48
<strong>SK</strong>-NET<br />
<strong>Operating</strong> & <strong>Installation</strong> <strong>Guide</strong><br />
7.5 Viewing archived transactions<br />
1. From the Transaction View, click on the selector arrow for Select<br />
Transactions to View.<br />
2. Select the archive file you want to see.<br />
3. You may navigate through archived transactions the same way<br />
you navigate through current transactions.<br />
7.6 Excluding Transaction Types<br />
You may exclude specific transaction types from the system audit trail.<br />
Transaction types to exclude can be selected from the connection group<br />
or for individual readers. Excluding some transaction types reduces the<br />
number of event records in Transactions and also conserves space in<br />
the event buffer of the <strong>SK</strong>-ACP and/or 28SA-PLUS.<br />
NOTE: If you have more than one connection group and you want<br />
to exclude one or more transactions from all of the readers, we<br />
recommend that you create an “All Readers Group”. This will<br />
allow you to send this command one time and apply the change<br />
to all readers in the system. See Section 5.28.<br />
<strong>Secura</strong> <strong>Key</strong> • 49
<strong>SK</strong>-NET<br />
<strong>Operating</strong> & <strong>Installation</strong> <strong>Guide</strong><br />
7.7 Excluding Transaction Types<br />
1. From the Tree View, right-click on a Connection Group.<br />
2. Select Properties.<br />
3. Click on the Transaction tab.<br />
4. Place a check mark next to each transaction type you want to<br />
exclude. Click Send.<br />
5. This procedure must be completed for every connection group<br />
in the location.<br />
<strong>Secura</strong> <strong>Key</strong> • 50
<strong>SK</strong>-NET<br />
<strong>Operating</strong> & <strong>Installation</strong> <strong>Guide</strong><br />
7.8 Excluding Transaction Types for One Reader<br />
1. From the Tree View, right-click on the name of a reader.<br />
2. Select Properties.<br />
3. Click on the Transactions tab.<br />
4. Click on the Edit button.<br />
5. Place a check mark next to each transaction type you want to<br />
exclude. Click Send.<br />
<strong>Secura</strong> <strong>Key</strong> • 51
<strong>SK</strong>-NET<br />
<strong>Operating</strong> & <strong>Installation</strong> <strong>Guide</strong><br />
8. REPORTS<br />
8.1 Transaction Report<br />
1. From the Transaction View, apply the appropriate Filters<br />
required to isolate the events of interest.<br />
2. Click on the Print icon.<br />
3. Choose Preview to preview the report. Choose Printer for a paper report.<br />
4. Enter the Page numbers required, or select All for a complete report.<br />
5. Click Print.<br />
To save the Transaction Report as a .pdf or .txt or HTML file.<br />
1. After filtering the report and displaying it to the screen, click<br />
on the Print icon again, then, Select File.<br />
2. Click on Save.<br />
3. Click on the down arrow for Save As Type.<br />
4. Select the File Type desired.<br />
<strong>Secura</strong> <strong>Key</strong> • 52
<strong>SK</strong>-NET<br />
<strong>Operating</strong> & <strong>Installation</strong> <strong>Guide</strong><br />
8.2 Printing a User Report<br />
1. From the User View, sort and filter the list the way you want it<br />
to appear on the report.<br />
2. Click on the selector arrow next to the printer icon.<br />
3. Choose User Report for a compact list of displayed users. Select<br />
User Detail Report for a complete profile of each user.<br />
4. Choose Printer for a paper report or Preview to see a preview<br />
of the report.<br />
5. After reviewing the report on the screen, select the printer icon<br />
and indicate the Pages desired, or All for a complete report.<br />
6. Click Print.<br />
8.3 Printing a User Information Report<br />
1. From the User screen, double-click on a user name.<br />
2. In the User Properties box, click Print.<br />
3. Choose Printer for a paper report or Screen to see a preview<br />
of the report.<br />
4. Click Print.<br />
<strong>Secura</strong> <strong>Key</strong> • 53
<strong>SK</strong>-NET<br />
<strong>Operating</strong> & <strong>Installation</strong> <strong>Guide</strong><br />
8.4 Printing a list of readers in a Location Report<br />
1. From the Tree View, click the Print icon on the toolbar.<br />
2. Choose Printer for a paper report or Screen to see a preview<br />
of the report.<br />
3. Click Print.<br />
8.5 Printing a list of readers in an Access Group Report<br />
1. From the Tree View, right-click on the name of the Access<br />
Group.<br />
2. Select Properties.<br />
3. Click on the Readers tab.<br />
4. Click the Print button.<br />
5. Choose Printer for a paper report or Screen to see a preview<br />
of the report.<br />
6. Click Print.<br />
<strong>Secura</strong> <strong>Key</strong> • 54
<strong>SK</strong>-NET<br />
<strong>Operating</strong> & <strong>Installation</strong> <strong>Guide</strong><br />
8.6 Printing a list of Users in an Access Group Report<br />
1. From the Tree View, click on the desired Access Group name<br />
and double-click on the Users icon.<br />
2. Click the Print button, select User Report or User Detail Report.<br />
3. Choose Printer for a paper report or Screen to see a preview<br />
of the report.<br />
4. Click Print.<br />
<strong>Secura</strong> <strong>Key</strong> • 55
<strong>SK</strong>-NET<br />
<strong>Operating</strong> & <strong>Installation</strong> <strong>Guide</strong><br />
9. SECURITY<br />
9.1 Changing an <strong>SK</strong>-NET Operator Password<br />
1. Click on File in the top menu bar.<br />
2. Select Operator.<br />
3. Select Change Password.<br />
4. Enter the new password twice. Click OK.<br />
<strong>Secura</strong> <strong>Key</strong> • 56
<strong>SK</strong>-NET<br />
<strong>Operating</strong> & <strong>Installation</strong> <strong>Guide</strong><br />
9.2 Assigning Operator Levels<br />
Client/Server versions of <strong>SK</strong>-NET-MLD allow you to enroll numerous<br />
operators, each with a unique password. Operators can be assigned<br />
to one of five different privilege levels:<br />
a. Guards – Able to view Transactions.<br />
b. Receptionists – Able to view User IN/OUT status.<br />
c. Card Issuer – Able to perform functions in the User<br />
screen.<br />
d. Supervisors – Able to perform functions in all screens,<br />
but not able to change system parameters or Location<br />
properties.<br />
e. Administrators – Full software privileges.<br />
1. Click on File in the top menu bar.<br />
2. Select Operator.<br />
3. Select Add (+).<br />
4. Enter the operator name, password twice and select the privilege<br />
level. Click OK.<br />
<strong>Secura</strong> <strong>Key</strong> • 57
<strong>SK</strong>-NET<br />
<strong>Operating</strong> & <strong>Installation</strong> <strong>Guide</strong><br />
9.3 System Activity Log<br />
The System Activity Log records what the operators of <strong>SK</strong>-NET have<br />
been doing in the software. It records the Operator, Date, Time, and<br />
what action was performed.<br />
1. Click on File in the top menu bar.<br />
2. Select Operator.<br />
3. Select View Activity Log.<br />
4. Scroll up or down to see operator activity.<br />
<strong>Secura</strong> <strong>Key</strong> • 58
<strong>SK</strong>-NET<br />
<strong>Operating</strong> & <strong>Installation</strong> <strong>Guide</strong><br />
9.4 Password Protection<br />
<strong>SK</strong>-NET has a second set of passwords that are exchanged behind the<br />
scenes whenever a computer running <strong>SK</strong>-NET attempts to connect to<br />
a Location. This invisible password can, and should, be changed from<br />
the default (12345).<br />
1. From the Tree View, make sure that you are Connected to the<br />
Location where you want to set a new Password (see bottom of<br />
screen).<br />
2. Right-click on the Location.<br />
3. Select Properties.<br />
4. Click on the <strong>Key</strong> icon (to the right of the word “Password”.<br />
5. Enter the new password twice. Click Save.<br />
NOTE: If you have multiple Locations, it is best to set a different<br />
password for each Location.<br />
<strong>Secura</strong> <strong>Key</strong> • 59
<strong>SK</strong>-NET<br />
<strong>Operating</strong> & <strong>Installation</strong> <strong>Guide</strong><br />
10. DIAGNOSTICS<br />
10.1 Communicating with a Location<br />
In the Tree View, a red triangle next to the Location icon<br />
(the little red building) indicates that you are connected to that<br />
Location. A lightning bolt next to a Connection Group means<br />
that the connection is active.<br />
A green check mark next to a reader icon indicates that you are logged<br />
in to the reader. Being “logged in” means that complete, real-time<br />
communication is occurring, and that all the stored transactions have<br />
been downloaded to <strong>SK</strong>-NET.<br />
Reader icons with red “X’s” through them are readers that have failed to log in.<br />
10.2 Network Messasges<br />
If you place the software in the Debug mode, you will see network<br />
messages displayed at the bottom of the screen.<br />
1. Click on the word File in the top menu bar.<br />
2. Select Preferences.<br />
3. Click on the Settings tab.<br />
4. Place a check mark next to Turn on Network Message View.<br />
<strong>Secura</strong> <strong>Key</strong> • 60
<strong>SK</strong>-NET<br />
<strong>Operating</strong> & <strong>Installation</strong> <strong>Guide</strong><br />
10.3 Self Testing from <strong>SK</strong>-NET<br />
You may initiate a self-test using <strong>SK</strong>-NET.<br />
1. From the Tree View, right-click on the name of the reader you<br />
want to test.<br />
2. Select Properties.<br />
3. Click on the Utilities tab.<br />
4. Click the Refresh button under Self-Test. Each item will display<br />
a Pass/Fail result.<br />
<strong>Secura</strong> <strong>Key</strong> • 61
<strong>SK</strong>-NET<br />
<strong>Operating</strong> & <strong>Installation</strong> <strong>Guide</strong><br />
11. TROUBLESHOOTING<br />
11.1 Cards do not work when creating a new Access Group<br />
1. Did you drag-and-drop readers into the new Access<br />
Group<br />
a. From the Tree View, click on a Connection Group.<br />
b. Drag-and-drop readers from the right side of the<br />
screen into the new Access Group.<br />
c Click on the “+” sign next to the new Access Group to<br />
view the readers in the new group.<br />
d. Perform a Card Send, as described below.<br />
2. Did you send the cards to the Location<br />
a. Click on “Send Users Full”.<br />
11.2 New Transactions are not appearing in the Transaction<br />
Screen<br />
1. Are transactions being filtered<br />
a. From the Transaction View, click on the Filter icon.<br />
b. Click on Defaults. Click OK.<br />
2. Are you logged in to the Location<br />
a. From the Tree View, open the Connection Group folder<br />
to display reader icon(s). Are there Green check marks<br />
by each reader icon<br />
b. If readers do not have Green check marks (or have red<br />
lines through them), is there a Red arrow next to the<br />
Location icon<br />
c. If there is a Red arrow, but readers are not logged in,<br />
click on the Log-In icon on the toolbar.<br />
d. If there is not a Red arrow or a Green check mark, click on the<br />
location name, click on the Connect icon on the toolbar.<br />
3. Have you excluded any transactions<br />
a. Right click on a Connection Group.<br />
b. Click on the Transactions tab.<br />
c. View Transaction Types. If there is a check mark in<br />
the box located next to a Transaction Type, it will not be<br />
sent to your Transaction database in <strong>SK</strong>-NET.<br />
<strong>Secura</strong> <strong>Key</strong> • 62
<strong>SK</strong>-NET<br />
<strong>Operating</strong> & <strong>Installation</strong> <strong>Guide</strong><br />
11.3 “Invalid Facility Code” message when using newlyadded<br />
cards<br />
1. Do the new cards have a different Facility Code than<br />
the previous ones<br />
a. Go to one of the <strong>SK</strong>-ACP panels or 28SA-Plus readers.<br />
Take a sample card with each different facility code. Press<br />
the reset button.<br />
b. Present a sample card with each Facility Code to one of<br />
the readers attached to the <strong>SK</strong>-ACP (or to the 28SA-PLUS)<br />
while the LED is flashing Red and Green.<br />
c. Repeat this process for each <strong>SK</strong>-ACP or 28SA-PLUS. For<br />
the <strong>SK</strong>-ACP, you can also send Facility codes to all panels<br />
through <strong>SK</strong>-NET, like this:<br />
d. From the Tree View, right click on the name of the reader<br />
that has the new Facility Code.<br />
e. Select Properties.<br />
f. Click on the Service tab. You should see the quantity of<br />
Facility Codes active in that panel.<br />
g. Under Facility Codes (Panel) click Edit.<br />
h. Click Close.<br />
i. Click Send To All.<br />
j. Click Close.<br />
k. After all cards are working, right click on All Readers.<br />
l. Select Backup. Select All Readers.<br />
11.4 Reader does not read-LED is Flashing Red or Green<br />
A slowly flashing Red LED indicates that the reader is in the Inactive mode.<br />
A slowly flashing Green LED indicates that the reader is in the Unlocked<br />
mode. These conditions exist when someone has activated a Door Control,<br />
from <strong>SK</strong>-NET, or when an input is shorted and programmed Remote<br />
Inactive or Remote Open. A flashing green LED also indicates the door<br />
has been unlocked by the Door Schedule. To check the door status:<br />
1. From the Tree View, right-click on the name of the reader.<br />
2. Select Properties.<br />
3. Click on the Door Controls tab.<br />
4. What is the Current Door State This will help identify why the<br />
reader is in the Inactive or Unlocked mode.<br />
5. Click on Normal if the reader shows Inactive Lock or<br />
Inactive Unlocked. This will change the Current Door State<br />
to Active Normal.<br />
6. Unlock via Door Schedule indicates the door is unlocked by<br />
the schedule. To disable the schedule click on Edit, click in the<br />
Disabled box and Send.<br />
<strong>Secura</strong> <strong>Key</strong> • 63
<strong>SK</strong>-NET<br />
<strong>Operating</strong> & <strong>Installation</strong> <strong>Guide</strong><br />
11.5 Lost Communications between PC and Readers<br />
When using more than one Connection Group, if you lose communications<br />
to a Connection Group, or fail to login to any readers in a Group, you<br />
can save time troubleshooting by first disconnecting from all the other<br />
Groups. This is accomplished by right clicking on each group and selecting<br />
Disconnect. Once you have completed the required steps to restore<br />
communicatons (see below), just highlight the location name and select<br />
Connect. This will reconnect all your groups.<br />
1. Check Com Settings<br />
a. From the Tree View, right click on the Connection Group.<br />
b. Select Properties.<br />
c. Click on the Connection Tab.<br />
d. Run the Connection Wizard.<br />
e. If the Wizard finds the connection, click OK and then<br />
Connect. If not, select your connection below.<br />
1. RS-232 direct connect, computer COM port to the <strong>SK</strong>-ACP<br />
or 28SA Plus COM port. (See Section 11.6.)<br />
2. RS-232 to RS485 converter, computer to converter to the<br />
<strong>SK</strong>-ACP or 28SA Plus reader. (See Section 11.7.)<br />
3. TCP/IP connection via LAN, WAN. Contact the IT<br />
department.<br />
4. Modem connection, must have Local Connect unchecked<br />
and modem phone number provided. Try to repower the<br />
modem and <strong>SK</strong>-ACP or 28SA Plus.<br />
2. Login Failure<br />
a. In the Tree View, look for a red arrow next to the Location<br />
icon. This indicates you are connected to the Location.<br />
b. Click on the “+” next to Connection Group. If the reader shows<br />
a green check mark indicates the reader is logged in. An icon<br />
with a red “X” indicates lost communications with that reader.<br />
If this occurs, perform a Power Reset. (See Section 11.8)<br />
<strong>Secura</strong> <strong>Key</strong> • 64
<strong>SK</strong>-NET<br />
<strong>Operating</strong> & <strong>Installation</strong> <strong>Guide</strong><br />
11.6 Using RS-232 Voltage Measurements to Check<br />
Communication Problems<br />
If you cannot connect, it will be necessary to take voltage measurements to<br />
identify whether the problem is with the <strong>SK</strong>-ACP or with the computer.<br />
RS-232 Direct Connection<br />
1. From the Tree View, right-click on a Connection Group.<br />
2. Select Properties.<br />
3. Click on the Connection tab.<br />
4. Uncheck the box next to “Gateway (RS-232)”<br />
5. Click on the Connect button.<br />
The system will fail to connect, but in the process it will open the computer<br />
COM port, making a voltage test possible.<br />
1. Voltages: Measure voltages at the gateway reader’s terminal<br />
block, communications pins 1 to 5. Connect the ground lead to<br />
pin 1 (logic ground) for all measurements.<br />
a) Pin 2 (Receive Data, RXD). The voltage should read between<br />
-5 VDC to -12 VDC. This voltage comes from the PC. If the<br />
voltage is wrong or missing, disconnect the reader from the PC,<br />
and measure the voltages at the reader (should be 0.0 VDC)<br />
and at the PC (should be between -5 VDC to -12 VDC).<br />
b) Pin 3 (Clear to Send, CTS). The voltage should read between<br />
+5 VDC to +12 VDC. This voltage comes from the PC. If the<br />
voltage is wrong or missing, disconnect the reader from the PC,<br />
and measure the voltages at the reader (should be 0.0 VDC)<br />
and at the PC (should be between +5 VDC to +12 VDC).<br />
c) Pin 4 (Request to Send, RTS). The voltage should read between<br />
-5 VDC to -12 VDC. This voltage comes from the Card Reader.<br />
If the voltage is wrong or missing, disconnect the reader from<br />
the PC, and measure the voltages at the reader (should be<br />
-9.5 VDC) and at the PC (should be 0.0 VDC).<br />
d) Pin 5 (Transmit Data, TXD). The voltage should read between<br />
-5 VDC to -12 VDC. This voltage comes from the Card Reader.<br />
If the voltage is wrong or missing, disconnect the reader from<br />
the PC, and measure the voltages at the reader (should be<br />
-9.5 VDC) and at the PC (should be 0.0 VDC).<br />
After testing voltages, return to the Connection Group/Properties/<br />
Connection box and re-check the box next to “Gateway (RS-232)”.<br />
<strong>Secura</strong> <strong>Key</strong> • 65
<strong>SK</strong>-NET<br />
<strong>Operating</strong> & <strong>Installation</strong> <strong>Guide</strong><br />
11.7 NET-CONV Converter Connection<br />
If you cannot connect and you are connected using the NET-CONV<br />
converter, test voltages as follows:<br />
1. Measure input voltage from the converter power supply. It should<br />
be between 9VDC and 16VDC.<br />
2. Measure voltage between Ground (minus side of power supply)<br />
and TD (A). It should be 0VDC.<br />
3. Measure voltage between Ground (minus side of power supply)<br />
and TD (B). It should be between 2.5 VDC and 5 VDC.<br />
If these voltages are incorrect, contact <strong>Secura</strong> <strong>Key</strong> Technical Support.<br />
11.8 Power Reset<br />
Occasionally it may become necessary to perform a power reset on a 28SA-<br />
PLUS or <strong>SK</strong>-ACP panel. (For example, after a power surge.) This procedure<br />
will reset the node address, requiring a recovery procedure in <strong>SK</strong>-NET.<br />
To perform a Power Reset:<br />
1. Disconnect power from the reader or panel (including any<br />
backup battery)<br />
2. Hold down the reset button.<br />
3. While holding the reset button, restore power. Continue holding<br />
the button for two seconds.<br />
To clone the readers:<br />
1. From the Tree View, right click on a Connection Group.<br />
2. Select New.<br />
3. Select Readers.<br />
4. Select Quick Find ( with less than 20 readers), or Search if (with<br />
more than 20 readers).<br />
5. <strong>SK</strong>-NET will find the original reader(s) as new ones.<br />
6. Click OK to bring them into the system. Do not log in at this time.<br />
7. Look under the Connection Group and you will notice that you<br />
now have duplicate reader(s) names. The old one will still have<br />
the red X through the icon, and the new one will not.<br />
8. Drag and drop the New reader(s) on to the old reader(s) with the<br />
same name. You will be asked to Replace the reader, click Yes.<br />
This will clone the original reader settings in to the New reader.<br />
9. Right click on Location and select Login. Now all the readers<br />
should have a green check next to each reader.<br />
<strong>Secura</strong> <strong>Key</strong> • 66
<strong>SK</strong>-NET<br />
<strong>Operating</strong> & <strong>Installation</strong> <strong>Guide</strong><br />
11.9 Replacing an <strong>SK</strong>-ACP or 28SA Plus<br />
NOTE: There are no changes required in <strong>SK</strong>-NET when<br />
replacing a card reader connected to the <strong>SK</strong>-ACP or when<br />
replacing the <strong>SK</strong>-029W connected to the 28SA Plus.<br />
While replacing the <strong>SK</strong>-ACP or 28SA Plus it is recommended that you<br />
note the serial number of the board/reader being replaced along with<br />
the new board/reader being used for the replacement. This will simplify<br />
the following steps used in this procedure.<br />
NOTE: DO NOT delete any readers from the Explorer/Tree<br />
View screen!<br />
After completing the replacement of the board/reader you need to<br />
start <strong>SK</strong>-NET, connect and login. Click on the + next to Connection<br />
Group and you will notice a red X through the reader(s) icon(s) which<br />
have been replaced.<br />
1. Left click on Connection Group, now it will be highlighted.<br />
2. At the top of the Explorer/Tree View screen click on Explorer.<br />
3. Select View.<br />
4. Select Details. Notice that on the right hand side of the Explorer/<br />
Tree View screen all of the readers are listed along with the Node<br />
ID, Logged In, Serial Number, Version, and Type.<br />
5. Right click on Connection Group.<br />
6. Select New, Readers, Quick Find (for less than 20 readers)<br />
or Search (for more than 20 readers).<br />
7. After <strong>SK</strong>-NET finds the new readers, click OK to add them<br />
to the system (note that under Connection Group the new<br />
readers found show the serial number as the name of the<br />
reader). Do not login.<br />
8. Look at the serial number or name of the new reader(s) and<br />
drag and drop the new one over the old one with the red X<br />
through the icon (if replacing the <strong>SK</strong>-ACP, be sure to include<br />
the “–1” or “–2” as part of the serial number).<br />
9. When asked ‘Do you wish to replace the reader’ answer YES.<br />
<strong>SK</strong>-NET now will use the data files from the old reader and<br />
program them in to the new reader including sending cards.<br />
You may be required to do a Send Users Full after replacing<br />
both readers.<br />
10. Repeat steps 8 and 9 for all readers being replaced.<br />
11. Test a card or two, the replacement is now complete.<br />
<strong>Secura</strong> <strong>Key</strong> • 67
<strong>SK</strong>-NET<br />
<strong>Operating</strong> & <strong>Installation</strong> <strong>Guide</strong><br />
12. REMOTE EYES VIDEO INTEGRATION<br />
12.1 The Remote Eyes ® DVR<br />
The Remote Eyes ® DVR, manufactured by Odyssey Technologies Inc.,<br />
integrates directly with <strong>SK</strong>-NET version 3.05 or higher. <strong>SK</strong>-NET captures<br />
all real time transactions and downloads them into the transaction<br />
database. In Remote Eyes ® , the same transaction data is actually burned<br />
into the Video Clip allowing the user to match the card information with<br />
a video clip showing the person using the card. This Video Clip and live<br />
video can be viewed directly from <strong>SK</strong>-NET along with general searches<br />
of the video archive for events such as parking lot activity.<br />
12.2 <strong>SK</strong>-NET Set-up for Remote Eyes ®<br />
1. Left click on File on the menu bar.<br />
2. Select Preferences, select the Video tab, click on the +.<br />
3. Enter Host IP Address. This is the IP address of the DVR. Port is<br />
always equal to 5025.<br />
4. User ID enter ‘admin’. Password enter ‘admin’ (default).<br />
5. Connect on Location Connect, place a check mark in the box if you<br />
want to connect to Remote Eyes whenever you connect to a location.<br />
6. To create Camera/Reader Assignments, click on the + to add a<br />
camera and name it to describe the reader it is viewing.<br />
<strong>Secura</strong> <strong>Key</strong> • 68
<strong>SK</strong>-NET<br />
<strong>Operating</strong> & <strong>Installation</strong> <strong>Guide</strong><br />
12.3 Reviewing a Video Clip<br />
There are three icons on the Transaction screen that control the Remote<br />
Eyes ® system. To launch a view of the video clip for the transaction<br />
selected, click on the first icon. The second icon launches the Remote<br />
Eyes ® application, and the third icon will display live video from the<br />
Remote Eyes ® system.<br />
Warning: <strong>SK</strong>-NET software must be open and connected to<br />
the panels for the text insertion to take place in the video system.<br />
Technical Support staff at Odyssey will assist new<br />
dealers in setting up the integration, including the<br />
<strong>SK</strong>-NET portion.<br />
Odyssey Technologies, Inc.<br />
Technical Support<br />
888-291-6379<br />
Monday – Friday<br />
9:00 to 5:00 ET<br />
<strong>Secura</strong> <strong>Key</strong> • 69
<strong>SK</strong>-NET<br />
<strong>Operating</strong> & <strong>Installation</strong> <strong>Guide</strong><br />
Appendix A - <strong>SK</strong>-NET FEATURES<br />
<strong>SK</strong>-NET is a Windows ® (XP or greater) compatible software application<br />
program designed to monitor and control a network of up to 220 <strong>Secura</strong><br />
<strong>Key</strong> ENTRACOMP ® 28SA-Plus Smart Access Control Units, or 110 <strong>SK</strong>-ACP<br />
Two Door Advanced Access Control Panels.<br />
The three main views that <strong>SK</strong>-NET uses are:<br />
<strong>SK</strong>-NET Explorer/Tree View<br />
Transactions<br />
Users<br />
<strong>SK</strong>-NET Explorer allows the user to configure the reader network and<br />
create or modify access groups and reader groups.<br />
Transactions shows reader and system activity for the all Locations.<br />
Users shows where card user data is displayed and access privileges can<br />
be entered into the system.<br />
<strong>SK</strong>-NET Explorer/Tree View shows the current configuration of all<br />
Locations, Connection Groups, Reader Groups and Access Groups in<br />
the system. It allows you to add, delete, configure, or change Locations,<br />
groups or readers. When the Explorer/Tree View screen is displayed, you<br />
may use various toolbar buttons to print a reader report, show properties<br />
of selected items, delete items, connect to or disconnect from Locations,<br />
log in to or logout from readers, control doors for a selected reader group<br />
or a reader, or change the configuration display format.<br />
The <strong>SK</strong>-NET Explorer screen is divided into two sections: The left side<br />
shows the system configuration in an indented multi-level format (similar<br />
to Windows ® Explorer). Each location, group, or reader is represented<br />
by an icon on screen. The right side of the screen shows individual icons<br />
for the currently highlighted location or group.<br />
The highest level in the Explorer Tree View configuration window is<br />
<strong>SK</strong>-NET (the entire system) which includes all locations, groups, and<br />
readers controlled from the PC being used.<br />
The second highest level is Location. A location includes all readers on<br />
a single network connected to the PC via a single COM port, TCP/IP<br />
address or a single modem location. Each Location can contain up<br />
to 128 28SA-PLUS units or 100 <strong>SK</strong>-ACP two-door panels.<br />
<strong>Secura</strong> <strong>Key</strong> • 70
<strong>SK</strong>-NET<br />
<strong>Operating</strong> & <strong>Installation</strong> <strong>Guide</strong><br />
A red triangle adjacent to the Location icon indicates that you are<br />
connected to that Location. Green check marks next to individual reader<br />
icons indicate that you are “logged in” to those readers. Being logged<br />
in means that transactions stored in the reader have been copied into<br />
the software and that you may view transactions as they occur in the<br />
Transaction screen.<br />
The third level in the system is Groups. Each Location contains four default<br />
Groups: IN and OUT Readers, Master Users and Void Users.<br />
Connection Groups define a means to access a reader gateway. They<br />
contain all readers that are visible through the reader gateway via RS-232,<br />
LAN connection or by modem. In the Multiple Location and Client/Server<br />
systems, more than one Connection Group can be created and connected<br />
simultaneously by connecting the Locations.<br />
Because readers can belong to multiple groups, you will see the same<br />
icon appearing several times in the system configuration display.<br />
To expand <strong>SK</strong>-NET, a Location, or a Group to the detail level, click on<br />
the “+” icon just to the left of the item you want to expand. The “+” icon<br />
changes to “-“ when it is expanded. If there is no “+” or “-“ icon next<br />
to a Location or Group that indicates that nothing has been assigned to<br />
that Location or Group.<br />
The Transaction View shows the latest system events as they occur, for<br />
the Location which is currently connected to <strong>SK</strong>-NET.<br />
System events include card usage, input point status changes, reader<br />
status changes, and system messages.<br />
Each event is displayed on a single line, and includes the time and date<br />
of the event, card number (for card transactions), User Name (if the<br />
name is stored in the database), Transaction Type (what happened), and<br />
Reader ID/Location (name of the reader and the Location to which the<br />
reader is connected).<br />
The Transaction Window allows you to view the entire Transaction<br />
Database, by using the navigation buttons or the scroll bar to browse<br />
through the transaction records.<br />
<strong>Secura</strong> <strong>Key</strong> • 71
<strong>SK</strong>-NET<br />
<strong>Operating</strong> & <strong>Installation</strong> <strong>Guide</strong><br />
Transaction Database options include Print Transaction Reports, Erase,<br />
Change Colors, and Zoom In.<br />
The Transaction Window normally shows data for all Locations (when<br />
filtering is not applied). Whenever <strong>SK</strong>-NET connects to a Location, all<br />
new transactions stored at the readers are automatically uploaded.<br />
The User View allows you to display or change the Card User Database.<br />
You can add new card users or edit current user records. You may use the<br />
scroll bar or navigation buttons to view the entire Card User Database.<br />
You can also print user reports, search for an individual user, or optionally,<br />
select user databases for multiple locations.<br />
The User View defaults to a List format, one line per record. If you click<br />
on Zoom, the User Detail Screen is displayed for the currently selected<br />
user. You can also select a user from the list and double-click to display<br />
the record in User Detail format. Editing or adding cards is done by<br />
displaying the User Detail screen. The Navigation buttons work in either<br />
List or User Detail format.<br />
<strong>Secura</strong> <strong>Key</strong> • 72
<strong>SK</strong>-NET<br />
<strong>Operating</strong> & <strong>Installation</strong> <strong>Guide</strong><br />
Appendix B - WORKING IN WINDOWS<br />
<strong>SK</strong>-NET uses many common functions available in Windows ® . For users<br />
who are new to Windows ® software these are the functions you will need<br />
to know to use <strong>SK</strong>-NET.<br />
ICONS and TOOL BARS:<br />
Icons are little pictures that represent functions or files in the software.<br />
Most of the operations you will perform in <strong>SK</strong>-NET begin by pointing at<br />
and clicking on an icon. Most icons in <strong>SK</strong>-NET will display a “prompt”,<br />
a word description of the icon, when you point the cursor at it.<br />
Toolbars appear at the top and on the left side of each screen in<br />
<strong>SK</strong>-NET. Toolbars contain icons that allow you to perform functions<br />
or open files in the program. The topmost toolbar will be comprised<br />
of words. Clicking on these words brings “drop-down menus” listing<br />
functions that you may select.<br />
MOUSE BUTTONS:<br />
When we direct you to “CLICK” on something, we mean that you move<br />
your cursor with the mouse to point at that item and then you tap the<br />
left button on the mouse once. This is usually done to select or highlight<br />
an item. When we tell you to “DOUBLE CLICK”, the only difference is<br />
that you tap on the left button twice in rapid succession. This is usually<br />
done to launch a program or to start a function.<br />
When we tell you to “RIGHT CLICK”, tap on the right mouse button<br />
once. This is used to bring up a menu box that pertains to the item you<br />
are pointing at.<br />
When we tell you to “DRAG-AND-DROP” you first point the cursor at the<br />
item, then hold down the left mouse button and, while holding that button<br />
down, move the cursor to the location where you want to “drop” the item<br />
you are “dragging”. When the item is in the new location, release the left<br />
mouse button to “drop” it. We use drag-and-drop in the Explorer screen<br />
to make it easy for you to add individual readers to access groups and<br />
hardware groups.<br />
EXPLORER:<br />
One of the principal screens in <strong>SK</strong>-NET is <strong>SK</strong>-NET EXPLORER. This view<br />
is modeled after the well-known Windows ® Explorer. On the left-hand<br />
side of the screen you will see all of the elements of your system in a<br />
<strong>Secura</strong> <strong>Key</strong> • 73
<strong>SK</strong>-NET<br />
<strong>Operating</strong> & <strong>Installation</strong> <strong>Guide</strong><br />
“tree” format. If an item in the tree has a plus (+) or minus (-) symbol<br />
next to it, it represents a folder. Clicking on the + symbol “opens” that<br />
folder and displays what is inside. For example, the folder called “New<br />
Connection1” may contain an icon for every reader in the system. Clicking<br />
on the + symbol next to the New Connection1 icon will display icons<br />
for each reader, underneath the New Connection1 heading.<br />
On the right-hand side of the screen you will see icons representing<br />
whichever part of the Explorer tree you have highlighted. For, example,<br />
if you CLICK on New Connection1, the right-hand side of the screen<br />
will display one icon for every reader in that Connection Group.<br />
HELP:<br />
<strong>SK</strong>-NET has extensive help, which you can access by clicking on Help<br />
on the top menu bar, or by pressing F1. Much of the information in this<br />
manual is also included in the on-line Help System.<br />
To learn more about the functions of various icons or “buttons”, click on<br />
Help or press F1, select Contents, Getting Started, then <strong>SK</strong>-NET TM Desktop.<br />
Pressing F1 in the main windows (Explorer, Transactions or User Manager)<br />
also offers context-specific help for those screens.<br />
<strong>Secura</strong> <strong>Key</strong> • 74
<strong>SK</strong>-NET<br />
<strong>Operating</strong> & <strong>Installation</strong> <strong>Guide</strong><br />
<strong>SK</strong>-NET - GLOSSARY<br />
Access Group – A set of cardholders who are valid at the same readers<br />
and have the same time zone restrictions. Groups are ideal for multidepartmental<br />
facilities with different time schedules. Section 5.14<br />
Block Of Cards – A contiguous group of cards in sequential card-number<br />
order. Section 3.5<br />
Connection Group – Connection Groups define a means to access a<br />
reader gateway. It contains all readers that are visible through the reader<br />
gateway via RS-232, LAN connection or by modem. See Appendix A.<br />
Connection Wizard – A special function where <strong>SK</strong>-NET software<br />
automatically goes through the various COM ports and baud rates on<br />
your system to make a connection. This function can be found by rightclicking<br />
a Location, selecting Properties, choosing the Connection tab,<br />
then clicking on the Connection Wizard icon. NOTE: The conncetion<br />
wizard can now search for LAN connections. Section 3.2<br />
Door Controls – A group of commands that affect the door or gate at a<br />
connected location. Door controls can be initiated in real time, using the<br />
<strong>SK</strong>-NET software. The system operator has the capability of controlling<br />
whether is a door is unlocked or locked, and whether the reader is inactive<br />
or active. Section 5.30<br />
Door Schedule – A time zone that is specifically assigned to a door,<br />
which causes the door to automatically lock and unlock according to a<br />
regular weekly time schedule. Section 5.18<br />
Hardware Password – The default password for your <strong>SK</strong>-ACP or 28SA<br />
Plus reader is “12345”. Section 9.4<br />
Holidays – The system operator can enter up to 32 holidays that will use<br />
the Holiday Schedule in the system time zones, instead of the normal<br />
schedule for the day of the week. This allows access to be restricted or<br />
different than normal on Holidays. Section 5.20<br />
“IN” / “OUT” Readers – When a room or area has readers on both<br />
sides of each door to control both entry and exit, the readers controlling<br />
entry can be assigned to an IN group, and readers controlling exit can be<br />
assigned to an OUT group. This allows the access control system to track<br />
the status of each cardholder to determine if the cardholder is IN or OUT<br />
of the area. It also allows the system to control the cardholder’s direction<br />
of movement and to prevent card passback by invoking the Anti-Passback<br />
feature, which prevents an IN or OUT reader from being used twice in<br />
succession by the same cardholder. Section 5.25<br />
<strong>Secura</strong> <strong>Key</strong> • 75
<strong>SK</strong>-NET<br />
<strong>Operating</strong> & <strong>Installation</strong> <strong>Guide</strong><br />
Inputs – These are circuits that connect external sensors or switches to an<br />
<strong>SK</strong>-ACP or 28SA-Plus. Status changes on these circuits can initiate special<br />
functions or generate messages in the transactions screen. Various input<br />
types can be defined, including Tamper, Arming (loop detector), door<br />
monitor, request-to-exit (remote open), Bell, Remote Inactive (disable<br />
reader), and User Defined. Section 5.31<br />
Limited Use Cards – A contiguous range of 4000 cards can be defined<br />
to have this feature. These cards are valid for a specific number of uses,<br />
days or weeks. After the preset limit is reached, the cards become void.<br />
Limited use cards can be defined for a single location or a single reader.<br />
Section 6.8<br />
Location – A location is a group <strong>SK</strong>-ACP panels (and connected readers)<br />
or 28SA-Plus readers networked together via RS-485 and operating as<br />
a unified system. Section 4<br />
Output (relay) – Relays are electromagnetically controlled switches<br />
located on the <strong>SK</strong>-ACP control panel. When actuated, they complete power<br />
circuits connecting external devices and their external power supplies,<br />
operating door strikes, gate actuators, and annunciators (horns, bells, or<br />
flashers). The <strong>SK</strong>-ACP has a latch relay and an auxiliary relay. The latch<br />
or access relay is actuated when a card access request is granted. The<br />
auxiliary relay can be configured to activate for various conditions such<br />
as emulating the status of an input, or for an alarm condition such as<br />
door-held, door-forced, emergency exit, error alarm, tamper alarm, or<br />
a card transaction in a specified range, etc. Section 5.33<br />
Reader Group - A set of readers created for the purpose of defining<br />
common properties for those readers. Section 5.28<br />
Real Antipassback (RAPB) – This feature can be assigned to a Time<br />
Zone, and it controls cardholder movement using designated IN or OUT<br />
readers. If a card was last used at an IN reader, it must be used at an<br />
OUT reader before it will be valid at an IN reader again. This feature<br />
was originally developed for parking garages to prevent an authorized<br />
cardholder from passing his card back to an unauthorized user after<br />
entering the lot. Section 5.9<br />
Real Antipassback Forgive – This command resets all cards to a neutral<br />
in/out status, allowing the next card use at either an IN or OUT reader. It<br />
can be invoked for all readers or for a specific reader. It can be scheduled<br />
to occur daily at a specified time (usually early in the morning) or it can<br />
be manually invoked for all cardholders, a specific cardholder number<br />
range, or for a single cardholder. Section 5.10<br />
<strong>Secura</strong> <strong>Key</strong> • 76
<strong>SK</strong>-NET<br />
<strong>Operating</strong> & <strong>Installation</strong> <strong>Guide</strong><br />
Renaming Readers – After <strong>SK</strong>-NET initially locates readers, it assigns<br />
the default name for the readers, which is usually the serial number with<br />
a dash one or dash two indicating connection to the right or left hand<br />
reader input. It is recommended that the system operator “rename” their<br />
readers with a meaningful name (such as their physical location) to better<br />
identify them when doing maintenance. Section 3.3<br />
<strong>SK</strong>-NET-DM – This version of <strong>SK</strong>-NET is primarily used for a “direct<br />
connect” from the access control system to the COM port on a single<br />
computer. Section 1.2<br />
<strong>SK</strong>-NET-MLD – This version of <strong>SK</strong>-NET is needed when there are<br />
multiple locations, and some locations are connected to the computer<br />
using a modem or a LAN adapter. Section 1.2<br />
<strong>SK</strong>-NET-MLD- CSXX – This is the Client/Server version of <strong>SK</strong>-NET,<br />
which is used when there are multiple locations, and more than one user<br />
needs to access the database simultaneously. The <strong>SK</strong>-NET database<br />
is loaded on a Server computer, and multiple Client Workstations can<br />
access the Server on the same network. Client/Server licenses can be<br />
purchased for 2, 5, 10, or 15 workstations. Section 1.2<br />
Software Password – Upon opening the <strong>SK</strong>-NET software, you will<br />
be prompted to enter a username and password. The default username<br />
when first opening the software is “admin”, and the password is “12345”.<br />
Section 3.1<br />
Timed Antipassback (TAPB) – This feature must be assigned to a Time<br />
Zone 2 to 15. After a card is used at a reader with Timed Antipassback,<br />
that card will not be valid at that reader for a predetermined amount of<br />
time. Section 5.8<br />
Time Zone – A schedule that determines which days of the week and<br />
hours of the day that a cardholder can obtain access at an associated<br />
door. Each weekday is divided into 48 half-hour segments that can be<br />
defined as Void or Valid for access by the system operator. A Holiday<br />
time schedule can also be defined for each Time Zone (see Holiday).<br />
Section 5.2<br />
Transactions – These are various system events, such as cardholder access<br />
granted/denied, alarm status changes, power failures, door lock/unlock<br />
commands, etc., which are stored in transaction history with the time<br />
and date that they occurred. Reports can be printed and saved in either<br />
.pdf or .xls format. Section 7<br />
<strong>Secura</strong> <strong>Key</strong> • 77
<strong>SK</strong>-NET<br />
<strong>Operating</strong> & <strong>Installation</strong> <strong>Guide</strong><br />
SYSTEM COMPONENTS<br />
PANELS<br />
<strong>SK</strong>-ACP-LE<br />
<strong>SK</strong>-ACP-SE<br />
<strong>SK</strong>-ACP-NE<br />
Large enclosure<br />
Small enclosure<br />
No enclosure (board only)<br />
SOFTWARE<br />
<strong>SK</strong>-NET-DM<br />
<strong>SK</strong>-NET-MLD<br />
Basic <strong>SK</strong>-NET with Disk & Manual<br />
Multiple Locations via Dial-Up Modem and TCP/IP<br />
Communications<br />
<strong>SK</strong>-NET-MLD-C/S Multiple User Workstations, Multiple Locations via Dial-Up<br />
Modem and TCP/IP Communications<br />
(2, 5, 10, 15 user licenses available)<br />
ACCESSORIES<br />
NET-CONV-P: RS232 to RS485 converter with power supply<br />
<strong>SK</strong>-MDM: External 56K modem<br />
<strong>SK</strong>-LAN-MOD: Network Adapter, plug-in<br />
<strong>SK</strong>-WLS-MOD: Wireless LAN Adapter, plug-in<br />
CBLSA:<br />
Cable kit for use with laptop computers<br />
<strong>SK</strong>-QUICKCONN: DB9 to RJ11 6’ cable - Laptop to <strong>SK</strong>-ACP<br />
<strong>SK</strong>-PLUG9: DB9 female computer connector<br />
<strong>SK</strong>-USB: USB to RS-232 converter for computers without COM ports<br />
<strong>SK</strong>-LOCK: Optional lock and keys for <strong>SK</strong>-ACP enclosure<br />
<strong>SK</strong>-ACP-PS: Power supply kit including transformer and battery<br />
<strong>SK</strong>-24VDC: 24VDC, 500 mA plug-in power supply<br />
<strong>SK</strong>-XFRMR: 16.5 VAC, 40VA plug-in transformer w/ground<br />
(Must be used with <strong>SK</strong>-DCPWR)<br />
<strong>SK</strong>-DCPWR: Filtered DC power supply board<br />
(Must be used with <strong>SK</strong>-XFRMR)<br />
DTK-XR: Surge protection for power, data and phone lines<br />
DTK-CR: Surge protection for card readers and keypads<br />
<strong>SK</strong>-BAT: 1.9 AH – 12VDC battery only<br />
<strong>SK</strong>-EZ/IDKIT1: Badge creation software, camera, cables, ribbon with<br />
4-color badge printer, 100-card capacity<br />
<strong>SK</strong>-EZ/IDKIT2: Same as above, with dual-sided printing<br />
<strong>SK</strong>-EZ/IDKIT3: Same as above, with low-volume printer – single card, hand feed.<br />
<strong>Secura</strong> <strong>Key</strong> • 78
<strong>SK</strong>-NET<br />
<strong>Operating</strong> & <strong>Installation</strong> <strong>Guide</strong><br />
NOTES:<br />
<strong>Secura</strong> <strong>Key</strong> • 79
<strong>SK</strong>-NET<br />
<strong>Operating</strong> & <strong>Installation</strong> <strong>Guide</strong><br />
NOTES:<br />
<strong>Secura</strong> <strong>Key</strong> • 80