INSTALLATION AND OPERATION MANUAL - Wood Pellet Stoves
INSTALLATION AND OPERATION MANUAL - Wood Pellet Stoves
INSTALLATION AND OPERATION MANUAL - Wood Pellet Stoves

You also want an ePaper? Increase the reach of your titles
YUMPU automatically turns print PDFs into web optimized ePapers that Google loves.
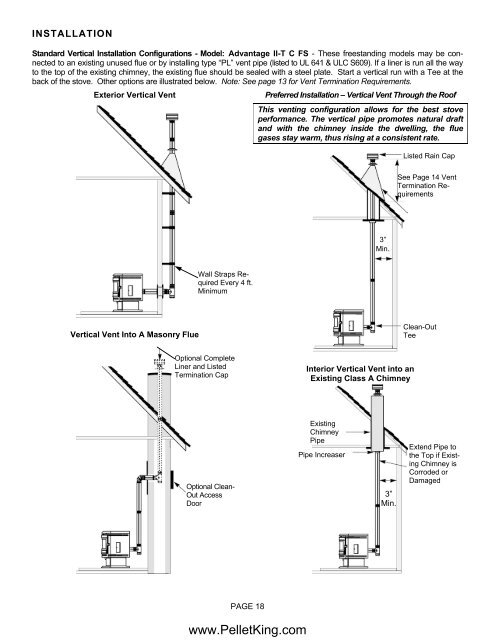
<strong>INSTALLATION</strong><br />
Standard Vertical Installation Configurations - Model: Advantage II-T C FS - These freestanding models may be connected<br />
to an existing unused flue or by installing type “PL” vent pipe (listed to UL 641 & ULC S609). If a liner is run all the way<br />
to the top of the existing chimney, the existing flue should be sealed with a steel plate. Start a vertical run with a Tee at the<br />
back of the stove. Other options are illustrated below. Note: See page 13 for Vent Termination Requirements.<br />
Exterior Vertical Vent<br />
Preferred Installation – Vertical Vent Through the Roof<br />
Vertical Vent Into A Masonry Flue<br />
Wall Straps Required<br />
Every 4 ft.<br />
Minimum<br />
Optional Complete<br />
Liner and Listed<br />
Termination Cap<br />
Optional Clean-<br />
Out Access<br />
Door<br />
PAGE 18<br />
www.<strong>Pellet</strong>King.com<br />
This venting configuration allows for the best stove<br />
performance. The vertical pipe promotes natural draft<br />
and with the chimney inside the dwelling, the flue<br />
gases stay warm, thus rising at a consistent rate.<br />
Interior Vertical Vent into an<br />
Existing Class A Chimney<br />
Existing<br />
Chimney<br />
Pipe<br />
Pipe Increaser<br />
3”<br />
Min.<br />
3”<br />
Min.<br />
Listed Rain Cap<br />
See Page 14 Vent<br />
Termination Requirements<br />
Clean-Out<br />
Tee<br />
Extend Pipe to<br />
the Top if Existing<br />
Chimney is<br />
Corroded or<br />
Damaged