H.264 Megapixel Indoor/Outdoor Dome IP Camera User Manual
H.264 Megapixel Indoor/Outdoor Dome IP Camera User Manual
H.264 Megapixel Indoor/Outdoor Dome IP Camera User Manual

Create successful ePaper yourself
Turn your PDF publications into a flip-book with our unique Google optimized e-Paper software.
SECTION 2: INSTALLATION AND SETUP<br />
14 www.digiop.com<br />
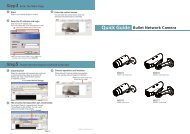
Example: Typical use of ipconfig in Windows XP<br />
d. Enter the <strong>IP</strong> Address, Subnet Mask, and Default Gateway for your PC’s Ethernet adapter into Table 1.<br />
NOTE<br />
The Ethernet adapter data you see by using ipconfig will probably be different from that shown in the example above. If<br />
you are using Windows Vista or Windows 7, the <strong>IP</strong> address is identified as the “<strong>IP</strong>v4 Address.”<br />
Table 1. PC/<strong>Camera</strong> network settings<br />
<strong>IP</strong> Address<br />
Subnet Mask<br />
Default Gateway<br />
CAUTION<br />
�<br />
Computer (PC) <strong>Camera</strong><br />
If connecting your camera to an enterprise network, consult with your network administrator for the<br />
camera <strong>IP</strong> address, subnet mask, and default gateway.<br />
Find network settings (<strong>IP</strong> addresses) that are not in use<br />
1. At your PC, find an <strong>IP</strong> address on your network that is not in use:<br />
a. Write down the EXACT <strong>IP</strong> address of your PC up to the third/last period. Using the example shown above, this<br />
expression is: 192.168.1.<br />
b. After the third period, include any number between 1 and 254 that is different from the one in your PC’s <strong>IP</strong> address,<br />
168. As a first try, let’s choose 200, which will form the <strong>IP</strong> address 192.168.1.200.