7.5 TON - 12.5 TON PACKAGE GAS SERIES CPG SERIES - Goodman
7.5 TON - 12.5 TON PACKAGE GAS SERIES CPG SERIES - Goodman
7.5 TON - 12.5 TON PACKAGE GAS SERIES CPG SERIES - Goodman

You also want an ePaper? Increase the reach of your titles
YUMPU automatically turns print PDFs into web optimized ePapers that Google loves.
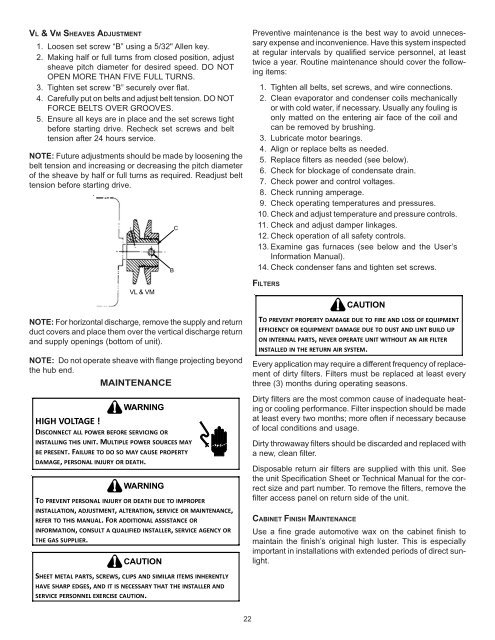
VL & VM SHEAVES ADJUSTMENT<br />
1. Loosen set screw “B” using a 5/32" Allen key.<br />
2. Making half or full turns from closed position, adjust<br />
sheave pitch diameter for desired speed. DO NOT<br />
OPEN MORE THAN FIVE FULL TURNS.<br />
3. Tighten set screw “B” securely over flat.<br />
4. Carefully put on belts and adjust belt tension. DO NOT<br />
FORCE BELTS OVER GROOVES.<br />
5. Ensure all keys are in place and the set screws tight<br />
before starting drive. Recheck set screws and belt<br />
tension after 24 hours service.<br />
NOTE: Future adjustments should be made by loosening the<br />
belt tension and increasing or decreasing the pitch diameter<br />
of the sheave by half or full turns as required. Readjust belt<br />
tension before starting drive.<br />
B<br />
C<br />
Preventive maintenance is the best way to avoid unnecessary<br />
expense and inconvenience. Have this system inspected<br />
at regular intervals by qualified service personnel, at least<br />
twice a year. Routine maintenance should cover the following<br />
items:<br />
1. Tighten all belts, set screws, and wire connections.<br />
2. Clean evaporator and condenser coils mechanically<br />
or with cold water, if necessary. Usually any fouling is<br />
only matted on the entering air face of the coil and<br />
can be removed by brushing.<br />
3. Lubricate motor bearings.<br />
4. Align or replace belts as needed.<br />
5. Replace filters as needed (see below).<br />
6. Check for blockage of condensate drain.<br />
7. Check power and control voltages.<br />
8. Check running amperage.<br />
9. Check operating temperatures and pressures.<br />
10. Check and adjust temperature and pressure controls.<br />
11. Check and adjust damper linkages.<br />
12. Check operation of all safety controls.<br />
13. Examine gas furnaces (see below and the User’s<br />
Information Manual).<br />
14. Check condenser fans and tighten set screws.<br />
VL & VM<br />
FILTERS<br />
CAUTION<br />
NOTE: For horizontal discharge, remove the supply and return<br />
duct covers and place them over the vertical discharge return<br />
and supply openings (bottom of unit).<br />
NOTE: Do not operate sheave with flange projecting beyond<br />
the hub end.<br />
MAINTENANCE<br />
HIGH VOLTAGE !<br />
WARNING<br />
DISCONNECT ALL POWER BEFORE SERVICING OR<br />
INSTALLING THIS UNIT. MULTIPLE POWER SOURCES MAY<br />
BE PRESENT. FAILURE TO DO SO MAY CAUSE PROPERTY<br />
DAMAGE, PERSONAL INJURY OR DEATH.<br />
WARNING<br />
TO PREVENT PERSONAL INJURY OR DEATH DUE TO IMPROPER<br />
INSTALLATION, ADJUSTMENT, ALTERATION, SERVICE OR MAINTENANCE,<br />
REFER TO THIS MANUAL. FOR ADDITIONAL ASSISTANCE OR<br />
INFORMATION, CONSULT A QUALIFIED INSTALLER, SERVICE AGENCY OR<br />
THE <strong>GAS</strong> SUPPLIER.<br />
CAUTION<br />
TO PREVENT PROPERTY DAMAGE DUE TO FIRE AND LOSS OF EQUIPMENT<br />
EFFICIENCY OR EQUIPMENT DAMAGE DUE TO DUST AND LINT BUILD UP<br />
ON INTERNAL PARTS, NEVER OPERATE UNIT WITHOUT AN AIR FILTER<br />
INSTALLED IN THE RETURN AIR SYSTEM.<br />
Every application may require a different frequency of replacement<br />
of dirty filters. Filters must be replaced at least every<br />
three (3) months during operating seasons.<br />
Dirty filters are the most common cause of inadequate heating<br />
or cooling performance. Filter inspection should be made<br />
at least every two months; more often if necessary because<br />
of local conditions and usage.<br />
Dirty throwaway filters should be discarded and replaced with<br />
a new, clean filter.<br />
Disposable return air filters are supplied with this unit. See<br />
the unit Specification Sheet or Technical Manual for the correct<br />
size and part number. To remove the filters, remove the<br />
filter access panel on return side of the unit.<br />
CABINET FINISH MAINTENANCE<br />
Use a fine grade automotive wax on the cabinet finish to<br />
maintain the finish’s original high luster. This is especially<br />
important in installations with extended periods of direct sunlight.<br />
SHEET METAL PARTS, SCREWS, CLIPS AND SIMILAR ITEMS INHERENTLY<br />
HAVE SHARP EDGES, AND IT IS NECESSARY THAT THE INSTALLER AND<br />
SERVICE PERSONNEL EXERCISE CAUTION.<br />
22