7.5 TON - 12.5 TON PACKAGE GAS SERIES CPG SERIES - Goodman
7.5 TON - 12.5 TON PACKAGE GAS SERIES CPG SERIES - Goodman
7.5 TON - 12.5 TON PACKAGE GAS SERIES CPG SERIES - Goodman

You also want an ePaper? Increase the reach of your titles
YUMPU automatically turns print PDFs into web optimized ePapers that Google loves.
• Curb insulation, cant strips, flashing and general<br />
roofing material are furnished by the contractor.<br />
The curbs must be supported on parallel sides by roof members.<br />
The roof members must not penetrate supply and return<br />
duct opening areas as damage to the unit might occur.<br />
NOTE: The unit and curb accessories are designed to allow<br />
vertical duct installation before unit placement. Duct<br />
installation after unit placement is not recommended.<br />
CAUTION<br />
ALL CURBS LOOK SIMILAR. TO AVOID INCORRECT CURB POSITIONING,<br />
CHECK JOB PLANS CAREFULLY AND VERIFY MARKINGS ON CURB<br />
ASSEMBLY. INSTRUCTIONS MAY VARY IN CURB STYLES AND SUPERCEDE<br />
INFORMATION SHOWN.<br />
See the manual shipped with the roof curb for assembly and<br />
installation instructions.<br />
INSULATED<br />
PANELS<br />
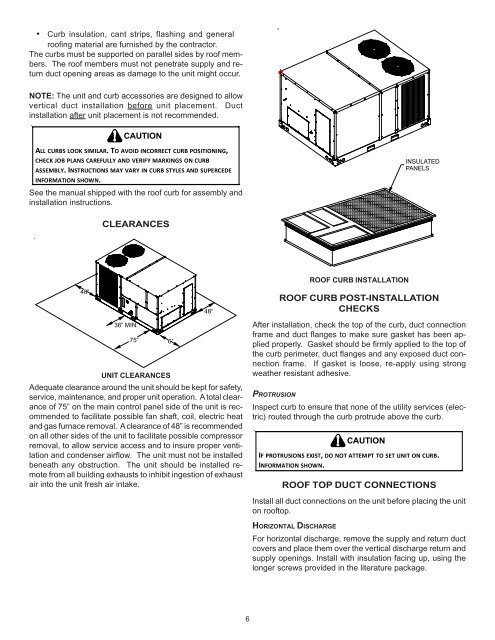
CLEARANCES<br />
48”<br />
48”<br />
ROOF CURB INSTALLATION<br />
ROOF CURB POST-INSTALLATION<br />
CHECKS<br />
36” MIN.<br />
75”<br />
UNIT CLEARANCES<br />
Adequate clearance around the unit should be kept for safety,<br />
service, maintenance, and proper unit operation. A total clearance<br />
of 75” on the main control panel side of the unit is recommended<br />
to facilitate possible fan shaft, coil, electric heat<br />
and gas furnace removal. A clearance of 48” is recommended<br />
on all other sides of the unit to facilitate possible compressor<br />
removal, to allow service access and to insure proper ventilation<br />
and condenser airflow. The unit must not be installed<br />
beneath any obstruction. The unit should be installed remote<br />
from all building exhausts to inhibit ingestion of exhaust<br />
air into the unit fresh air intake.<br />
6”<br />
After installation, check the top of the curb, duct connection<br />
frame and duct flanges to make sure gasket has been applied<br />
properly. Gasket should be firmly applied to the top of<br />
the curb perimeter, duct flanges and any exposed duct connection<br />
frame. If gasket is loose, re-apply using strong<br />
weather resistant adhesive.<br />
PROTRUSION<br />
Inspect curb to ensure that none of the utility services (electric)<br />
routed through the curb protrude above the curb.<br />
CAUTION<br />
IF PROTRUSIONS EXIST, DO NOT ATTEMPT TO SET UNIT ON CURB.<br />
INFORMATION SHOWN.<br />
ROOF TOP DUCT CONNECTIONS<br />
Install all duct connections on the unit before placing the unit<br />
on rooftop.<br />
HORIZONTAL DISCHARGE<br />
For horizontal discharge, remove the supply and return duct<br />
covers and place them over the vertical discharge return and<br />
supply openings. Install with insulation facing up, using the<br />
longer screws provided in the literature package.<br />
6