STACKING SAwhorSeS - Woodsmith Shop
STACKING SAwhorSeS - Woodsmith Shop
STACKING SAwhorSeS - Woodsmith Shop

You also want an ePaper? Increase the reach of your titles
YUMPU automatically turns print PDFs into web optimized ePapers that Google loves.
<strong>STACKING</strong><br />
sawhorses<br />
© 2010 August Home Publishing Co.
Feature<br />
Project<br />
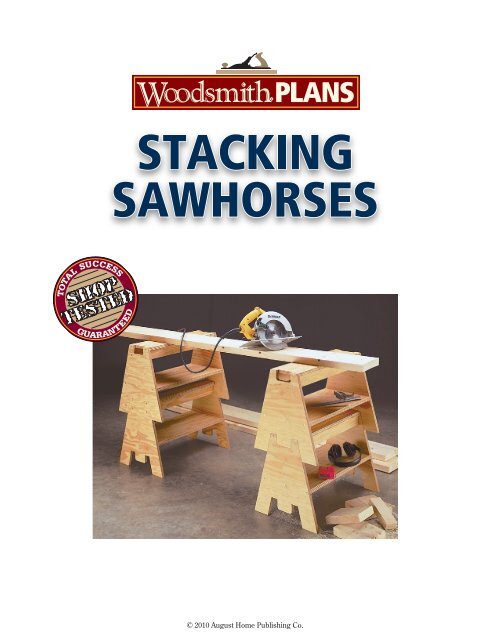
Stacking Sawhorses<br />
A simple system of interlocking tabs and notches makes this set of<br />
stacking sawhorses as sturdy as they are versatile.<br />
Aren’t they a little short That<br />
was the question I heard<br />
most often as I was building this set<br />
of sawhorses. Actually, there are<br />
two answers to that question — yes<br />
and no. Let me explain.<br />
First of all, the sawhorses are<br />
short. Each one stands in at only<br />
17" tall. (Which is why one of the<br />
guys suggested we call them saw<br />
ponies instead.)<br />
But it only takes a second to<br />
make the sawhorses “taller.” You<br />
simply stack one sawhorse on top<br />
of another. This raises the top sawhorse<br />
to a height of 30."<br />
That provides a comfortable<br />
working height for most jobs, as<br />
you can see in the photo above. But<br />
if you need a worksurface that’s not<br />
as tall (when assembling a large<br />
project, for instance), it’s just a matter<br />
of unstacking the sawhorses,<br />
refer to the photo on page 5.<br />
STORAGE. Once the job is completed,<br />
storage isn’t a problem either. You<br />
can tuck a whole stack of sawhorses<br />
in a corner (lower photo on page 2).<br />
TAB & NOTCH. But as much as I appreciate<br />
the convenience of these sawhorses,<br />
the thing that impresses me<br />
even more is how sturdy they are —<br />
even when they’re stacked together.<br />
The secret is a system of interlocking<br />
tabs and notches that prevents<br />
them from moving from side to side<br />
or from end to end (inset photo).<br />
PLYWOOD. One more great thing<br />
about these sawhorses is that you<br />
can make a set of four from a single<br />
sheet of plywood. (I used fir plywood<br />
with an ‘AC’ grade, see page 3.)<br />
1 www.<strong>Woodsmith</strong>.com © 2010 August Home Publishing Co. All Rights Reserved.
Template<br />
The key to these stacking sawhorses<br />
is the ‘M-shaped’ pieces on the ends.<br />
Altogether, there are eight of these<br />
pieces. And the tab on one piece<br />
needs to fit the notch in another like<br />
the pieces of a jigsaw puzzle.<br />
To produce a good fit, I began by<br />
making a template (photo at right).<br />
This ensures that all eight pieces are<br />
identical. And it speeds up the process<br />
of making the end pieces.<br />
LAY OUT The TEMPLATE. The template<br />
starts out as a piece of 1 ⁄ 4 " hardboard<br />
1<br />
2<br />
LAY OUT INSIDE EDGE<br />
OF “FEET” PARALLEL TO<br />
ANGLED SIDES<br />
that’s cut to the same width (15 1 ⁄ 2 ")<br />
and height (17") as the end pieces,<br />
as you can see in Figure 1.<br />
To provide a firm footing, the end<br />
pieces taper gradually from a wide<br />
base to a narrow top. So in order to<br />
duplicate this taper, you’ll need to<br />
lay out an angled line on each side<br />
of the template.<br />
The next step is to mark the<br />
location of the tab and notch. The<br />
important thing is that each one is<br />
the exact same size and shape.<br />
!/2" RAD.<br />
{ A hardboard<br />
template provides a<br />
quick way to make<br />
identical end pieces.<br />
PATTERN. An easy way to accomplish<br />
this is to make a pattern from a piece<br />
of posterboard and use it to lay out<br />
both the tab and the notch (Figure<br />
1). To accurately position the pattern<br />
on the template, draw a centerline on<br />
each one and align the marks.<br />
FEET. Now all that’s left is to lay out<br />
the two “feet” at the bottom of the<br />
template. The lines that form the<br />
inside edge of these feet are parallel<br />
to the angled sides. But before drawing<br />
these lines, you’ll need to establish<br />
the outside corner of the “ear”<br />
on each side of the tab.<br />
CUT TO SHAPE. At this point, it’s just<br />
a matter of cutting the template<br />
to shape. The goal is to make the<br />
edges of the template as smooth as<br />
possible. That’s because they’ll be<br />
used to guide a flush-trim bit when<br />
the end pieces are routed to shape.<br />
To cut the straight, angled sides<br />
of the template, I used a simple jig<br />
on the table saw, refer to page 5. It<br />
allowed me to cut right up to the<br />
layout line. But you’ll need to cut the<br />
tab and notch with a band saw (or jig<br />
saw). Just be sure to stay about 1 ⁄ 8 "<br />
to the waste side of the line and then<br />
sand up to the mark.<br />
LAY OUT END PIECES. Once the template<br />
is complete, you can use it to lay out<br />
the end pieces. It’s possible to get<br />
all eight pieces from a 17"-wide strip<br />
cut from a full sheet of plywood. But<br />
there’s not a lot of “extra” material.<br />
So I started by positioning the<br />
template 1 ⁄ 4 " in from the end to lay<br />
out the first piece (Figure 2). To lay<br />
out each remaining piece, simply<br />
turn the template end for end. Note:<br />
It’s a good idea to leave a 3 ⁄ 8 " space<br />
between layout lines. This way, you<br />
can use a jig saw to separate them<br />
without cutting into either piece.<br />
{ When it’s time to<br />
“stable” your sawhorses,<br />
they don’t<br />
take up much floor<br />
space. Just stack<br />
all four together<br />
for storage.<br />
2 www.<strong>Woodsmith</strong>.com © 2010 August Home Publishing Co. All Rights Reserved.
Construction<br />
At this point, the basic groundwork<br />
for the set of sawhorses is complete.<br />
Now it’s just a matter of cutting the<br />
end pieces to final shape and connecting<br />
them with the top, shelf, and<br />
supports (Exploded View).<br />
REMOVE WASTE. First, remove the bulk<br />
of the waste from the area inside the<br />
notch and around the tab. There’s<br />
no need to lay out these areas. Just<br />
use double-sided tape to attach the<br />
template to each end piece, and use<br />
a band saw (or jig saw) to rough out<br />
the basic shape, as in Figure 3.<br />
As you do this, make sure you<br />
don’t accidentally cut into the edge<br />
of the template. I make it a point<br />
to keep the saw at least 1 ⁄ 8 " away<br />
from the edge. This leaves a small<br />
amount of material that can be<br />
removed quickly and easily.<br />
ROUT TO SHAPE. Now you can rout<br />
the end piece to final shape with a<br />
flush-trim bit mounted in the router<br />
table (Figure 4). The idea here is to<br />
adjust the height of the bit so the<br />
bearing rides against the edge of<br />
the template. This way, the cutting<br />
edge of the bit trims the end piece<br />
perfectly flush with the template.<br />
3<br />
ATTACH<br />
TEMPLATE<br />
WITH<br />
DOUBLE-<br />
SIDED<br />
TAPE<br />
The router bit will leave the inside<br />
corners of the end piece slightly<br />
rounded. That’s okay for the notch.<br />
But the “ears” around the tab will<br />
need some additional work.<br />
FILE CORNERS. For the tab on the top<br />
sawhorse to fit all the way into the<br />
a.<br />
notch of the one below, you’ll need<br />
to clean up these corners. A few<br />
strokes with a file is all it takes to get<br />
them nice and straight (detail ‘a’).<br />
CHAMFER TAB. While you’re at it, it’s<br />
a good idea to file a chamfer on<br />
the inside edge of the tab. This will<br />
make it easier for the tab to slip into<br />
a notch when stacking sawhorses.<br />
JOINERY. After repeating this process<br />
for all of the remaining end<br />
pieces, you can concentrate on the<br />
joinery that’s used for assembly.<br />
To provide sturdy support for<br />
the top of the sawhorse, it sits in a<br />
rabbet in the top edge of each end<br />
piece. And to strengthen the shelf, it<br />
fits into a dado.<br />
AUXILIARY FENCE. But before cutting<br />
either the rabbet or dado, I attached<br />
4<br />
FLUSH-TRIM<br />
BIT<br />
3 www.<strong>Woodsmith</strong>.com © 2010 August Home Publishing Co. All Rights Reserved.
a long auxiliary fence to the rip fence<br />
on the table saw (Figure 5). It’s a<br />
scrap piece of wood that extends<br />
about 6" past the end of the rip fence.<br />
This lets you “bury” the blade when<br />
cutting the rabbet (Figure 5a). And<br />
it provides continuous support for<br />
the bottom edge of the end piece as<br />
you cut the dado (Figure 5b).<br />
TOP & SHELF. With the ends complete,<br />
the next step is to add a plywood top<br />
and shelf (Figure 6). The long edges<br />
of these pieces are beveled to match<br />
the angle of the end pieces.<br />
Ripping the bevels is easy. The<br />
trick is to get the beveled edges to<br />
fit flush with the end pieces once the<br />
sawhorse is assembled.<br />
The best way I found to do this is<br />
to first rip the pieces to rough width.<br />
Then sneak up on the final width by<br />
making a series of bevel cuts and<br />
removing a small amount of material<br />
with each pass.<br />
CUT GROOVES. In addition to the<br />
bevels, you’ll also need to cut two<br />
grooves in the top and one in the<br />
shelf. These grooves will accept the<br />
supports that are added later.<br />
RECESS. Before assembling the sawhorse,<br />
you’ll need to cut a shallow<br />
recess in each end of the top. Once<br />
the sawhorse is assembled, the<br />
recess will provide clearance so the<br />
tab can fit down in the notch.<br />
To lay out this recess accurately,<br />
it’s easiest to set the top in place, as<br />
in Figure 6a. Then, after attaching a<br />
tall fence to the miter gauge, make<br />
several passes over a dado blade to<br />
cut the recess (Figure 6b).<br />
SUPPORTS. To help strengthen the<br />
sawhorse, I added three plywood<br />
supports, as shown in Figure 7. Two<br />
of these supports fit in the grooves<br />
in the top. And there’s a single support<br />
below the shelf.<br />
These supports are ripped to final<br />
width. But it’s best to dry assemble<br />
the sawhorse before cutting them<br />
to final length.<br />
ASSEMBLY. Now you’re ready to<br />
assemble the sawhorses. The top<br />
and shelf of each one are glued and<br />
screwed to the end pieces (Figure<br />
7). And the supports are glued into<br />
the grooves and secured with screws<br />
driven into the ends (Figure 7a).<br />
5<br />
6<br />
7<br />
THIRD:<br />
LAY OUT &<br />
CUT RECESS. SEE<br />
DETAILS ‘a’ AND ‘b’<br />
a.<br />
a. b.<br />
b.<br />
a.<br />
4 www.<strong>Woodsmith</strong>.com © 2010 August Home Publishing Co. All Rights Reserved.
› With a set of four sawhorses,<br />
you’ll be able to work on any<br />
project — big or small — at<br />
a comfortable level. Stack the<br />
sawhorses, as shown on page 1,<br />
or set up a lower table like this.<br />
Taper Sled<br />
Using a template to make the end<br />
pieces for the sawhorses ensures<br />
each one is identical. But there’s a<br />
catch. To get the sawhorses to fit<br />
together tight, each side of the template<br />
(discussed on page 2) needs to<br />
be cut at the exact same angle.<br />
To accomplish this, I made a sled<br />
for the table saw. It consists of two<br />
parts: a plywood base and a wood<br />
stop, as you see in the drawing.<br />
REFERENCE EDGE. The idea here is to<br />
create a reference edge on the base<br />
that indicates the path of the saw<br />
blade. This edge is then used to<br />
position the template.<br />
To establish the reference edge,<br />
rip the base to a width of 16". Then,<br />
without moving the rip fence, align<br />
one of the layout lines on the template<br />
with this edge.<br />
ATTACH STOP. Before making a cut,<br />
you’ll need a way to keep the template<br />
from sliding. So butt the stop<br />
against the bottom edge of the<br />
template and screw it to the base.<br />
FIRST: CUT<br />
BASE 16" WIDE<br />
BASE<br />
(16" x 20" -<br />
!/2" PLY.)<br />
WASTE<br />
FOURTH: PUSH<br />
SLED AND TEMPLATE<br />
THROUGH BLADE<br />
TEMPLATE<br />
Then turn on the saw and push the<br />
sled through the blade.<br />
FLIP TEMPLATE. This takes care of the<br />
cut on one side of the template. But<br />
flipping the template over to cut the<br />
opposite side hides the layout lines.<br />
That’s the nice thing about the stop.<br />
WASTE<br />
THIRD: SCREW STOP<br />
TO BASE SO IT’S SNUG<br />
AGAINST TEMPLATE<br />
STOP<br />
(1!/2"<br />
x 12" -<br />
#/4"-THICK<br />
STOCK)<br />
SECOND: ALIGN LAYOUT<br />
LINE ON TEMPLATE WITH<br />
EDGE OF BASE<br />
It makes it easy to duplicate the<br />
angle that’s already cut.<br />
To do this, just place the bottom<br />
edge of the template against the<br />
stop. Then, after aligning the corner<br />
with the reference edge, cut the<br />
angle on the second side.<br />
5 www.<strong>Woodsmith</strong>.com © 2010 August Home Publishing Co. All Rights Reserved.