
Create successful ePaper yourself
Turn your PDF publications into a flip-book with our unique Google optimized e-Paper software.
<strong>Xenium</strong>-<strong>OS</strong><br />
<strong>V2.0</strong>
Using the <strong>Xenium</strong>-<strong>OS</strong> <strong>V2.0</strong><br />
• Navigating the <strong>Xenium</strong>-<strong>OS</strong><br />
• <strong>Xenium</strong>-<strong>OS</strong> Main Menu<br />
• <strong>Xenium</strong>-<strong>OS</strong> Launch Menu<br />
• Disk Tools<br />
• EEprom Tools<br />
• <strong>Xenium</strong>-<strong>OS</strong> Settings Menu<br />
• Using a USB Pendrive<br />
• Installers Menu
Navigating the <strong>Xenium</strong>-<strong>OS</strong><br />
The following table shows the functions of the controller’s buttons<br />
when Navigating the <strong>Xenium</strong>-<strong>OS</strong>.<br />
Basic Menu Navigation.<br />
Function<br />
Move Up<br />
Move Down<br />
Move Left<br />
Move Right<br />
Select<br />
Previous Menu<br />
Left Trigger<br />
Right Trigger<br />
Select Folder<br />
Controller<br />
D-Pad UP<br />
D-Pad Down<br />
D-Pad Left<br />
D-Pad Right<br />
A Button<br />
B Button<br />
Scroll up quickly<br />
Scroll down quickly<br />
Y Button
<strong>Xenium</strong>-<strong>OS</strong> Main Menu<br />
The <strong>Xenium</strong>-<strong>OS</strong> Main Menu as shown in the picture below allows<br />
you to select a virtual bios bank to start within the Launch Menu,<br />
use the Disk or EEprom Tools, change your <strong>Xenium</strong>’s settings,<br />
Reboot your console, enter the Recovery Mode to update or repair<br />
the <strong>Xenium</strong>-<strong>OS</strong> or Power Off your console.<br />
The selected menu item is highlighted by a blue bar and can be<br />
changed by using the directional pad on your controller or the<br />
triggers. A menu item can be selected by pressing the A button on<br />
your controller, pressing the B button will return to the previous<br />
menu.
<strong>Xenium</strong>-<strong>OS</strong> Launch Menu<br />
The <strong>Xenium</strong>-<strong>OS</strong> has a Launch Menu to control the 8 virtual banks<br />
which can be used to boot the Original Bios from TSOP, customized<br />
kernels such as Cromwell from Flash or media based kernels from<br />
HDD (not yet implemented).<br />
Adding a New Launch Item<br />
A new <strong>Xenium</strong> or one that has recently had an <strong>OS</strong> update<br />
performed will need to have the virtual bios banks configured. The<br />
screenshot below shows an unconfigured Launch Menu.<br />
By selecting the “Add A New Item” option from the Launch Menu<br />
you are presented with a dialog box to select the location of where<br />
you wish to boot the bios from. The available options include<br />
“TSOP” for the Retail Kernel, “Flash” to boot a bios from the<br />
<strong>Xenium</strong>’s Flash memory and “Hard Disk” for BFM based bioses (not<br />
yet implemented).
By selecting TSOP a virtual bank will be setup to use the original<br />
kernel of your console, the name of this bank can be changed by<br />
using the <strong>Xenium</strong>-<strong>OS</strong> onscreen keyboard.<br />
When the Flash option is selected you can select the file to use from<br />
any of your console’s HDD partitions, a USB Pendrive (Drive H:) or<br />
via a Samba share (refer to the Using Samba section of this<br />
manual). The <strong>Xenium</strong> flash space is compatible with 256k, 512k<br />
and 1Mb bioses in the following combinations:<br />
• 1 x 1Mb<br />
• 2 x 512k<br />
• 2 x 256k & 1 x 512k<br />
• 4 x 256k<br />
You can navigate the <strong>Xenium</strong>-<strong>OS</strong> file browser by using the<br />
controllers D-pad and the A button to select a drive, folder or file as<br />
shown below. The screenshot below shows the console’s hard disk<br />
partitions (C:, E:, F:, X:, Y: and Z:) along with a USB Pendrive (H:)<br />
and also a PC connected using the <strong>Xenium</strong>-<strong>OS</strong> Samba client.
Once a file has been selected the <strong>Xenium</strong>-<strong>OS</strong> will attempt to<br />
autodetect the name of the bios, you can then modify the bios<br />
name or enter a new name if the autodetection failed by using the<br />
onscreen keyboard.<br />
From within the onscreen keyboard, Uppercase, Lowercase &<br />
Symbols can be toggled by selecting the options from within the<br />
keyboard menu or alternatively you can use the LEFT TRIGGER to<br />
toggle to Uppercase and RIGHT TRIGGER to toggle Symbols.<br />
Once the bios bank has been named you are presented with a<br />
dialog box to assign a LED color to the Launch Item you are<br />
creating.<br />
The <strong>Xenium</strong>-<strong>OS</strong> allows you to change the color of the <strong>Xenium</strong>’s LED<br />
to indicate which bank has been selected, this feature is also a<br />
great way to determine whether your <strong>Xenium</strong> is enabled when<br />
using the Original Bios for XBox Live compatibility. The <strong>Xenium</strong>’s<br />
LED can also be turned off.
Once you have selected the LED color the bios the <strong>Xenium</strong>-<strong>OS</strong> will<br />
attempt to add the New Item to the Launch Menu. Should the file<br />
you have selected be too large for the <strong>Xenium</strong>’s flash space you will<br />
receive a “Error: File doesn’t fit” message otherwise the file should<br />
Cbe flashed to the <strong>Xenium</strong> and the dialog box as shown below will<br />
be displayed. Do not turn off your console whilst a Launch Item is<br />
being added.<br />
Removing a Launch Item<br />
To remove a launch item you select the “Remove An Item” option<br />
from the Launch Menu and then select the virtual bank you wish to<br />
delete.<br />
Renaming a Launch Item<br />
To rename a launch item that has already been created select the<br />
“Rename An Item” option from the Launch Menu and then select<br />
the virtual bank you wish to rename. The onscreen keyboard is<br />
then displayed and you can make the necessary changes.<br />
Setting the Default Launch Item<br />
To use the Instant Boot feature of the <strong>Xenium</strong>-<strong>OS</strong> you will need to<br />
specify a default bank from within the Launch Menu. Simply select<br />
the “Set Default Item” option from the Launch Menu and then<br />
select the virtual bank you wish to use as your default Launch Item.<br />
Instant Boot will also need to be enabled from with the <strong>Xenium</strong><br />
Settings Menu to use this feature.
Disk Tools<br />
The <strong>Xenium</strong>-<strong>OS</strong> includes a Disk Tools menu that is available from<br />
the <strong>Xenium</strong>-<strong>OS</strong> Main Menu.<br />
WARNING: Incorrect use of the Disk Tools may damage your<br />
console.<br />
The screenshot above displays the options available in the Disk<br />
Tools menu. The following is a brief description of each option:<br />
• Lock/Unlock Hard Drive – Depending on the current state<br />
of your console’s hard disk either an option to Lock or Unlock<br />
your HDD will be available.<br />
• Drive Upgrade Wizard - Upgrade your HDD within <strong>Xenium</strong>-<br />
<strong>OS</strong> by replacing your DVD-Rom with a new HDD set as Slave<br />
for the duration of the cloning process.<br />
• Copy Partition - Copy a HDD's partition to another HDD.<br />
Supports Partitions C,E,F,X,Y and Z. (Requires destination<br />
HDD to be installed as Slave in place of DVD-Rom).<br />
• Format Partition - Individually format your C,E,F,X,Y and Z<br />
partitions.
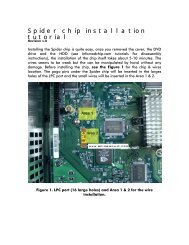
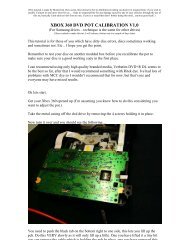
To perform the Smart Drive Upgrade and Copy Partition tasks you<br />
will need to set the destination HDD’s jumpers to Slave and install<br />
the drive in the place of the DVD-Rom as shown below (you will<br />
also require a power-splitter to provide power to second HDD).
EEprom Tools<br />
The <strong>Xenium</strong>-<strong>OS</strong> includes an EEprom Tools menu that is available<br />
from the <strong>Xenium</strong>-<strong>OS</strong> Main Menu.<br />
WARNING: Incorrect use of the EEprom Tools may damage your<br />
console.<br />
A range of EEprom editing tools can be used to change your<br />
console’s Video, Game and DVD Regions.<br />
By highlighting the Video Standard option and pressing the A<br />
button on your controller you can switch your console’s video mode<br />
between NTSC or PAL.<br />
The DVD Region setting for your console is also configurable with 9<br />
available options.<br />
To set your console’s gaming region to US/Canada, Japan or<br />
Europe/Australia highlight the Game Region option and then select<br />
the region from the menu that is presented.<br />
The facility to Backup and Restore your EEprom is available in the<br />
EEprom Tools menu. The <strong>Xenium</strong>-<strong>OS</strong> is capable of booting even<br />
with a damaged EEprom.
<strong>Xenium</strong>-<strong>OS</strong> Settings Menu<br />
The <strong>Xenium</strong>-<strong>OS</strong> Settings Menu as shown below allows you to<br />
customize the operation of your <strong>Xenium</strong>.<br />
The Settings Menu offers the following selections:<br />
• <strong>Xenium</strong> Settings – This menu allows you to configure the<br />
way your <strong>Xenium</strong> works, the Instant Boot feature is configured<br />
within this menu.<br />
• Network Settings – Select this item to change the<br />
networking settings for the <strong>Xenium</strong>-<strong>OS</strong>, you can configure<br />
your TCP/IP settings to use DHCP or a specified Static IP<br />
address.<br />
• FTP Settings – The <strong>Xenium</strong>-<strong>OS</strong> features a built-in FTP server.<br />
This server can be enabled or disabled from within the FTP<br />
Settings menu. You can also specify the username and<br />
password which your FTP client will use to connect to the<br />
<strong>Xenium</strong>’s FTP Server.<br />
• Telnet Settings – A Telnet server is one of the features of<br />
the <strong>Xenium</strong>-<strong>OS</strong>. This server can be enabled or disabled from<br />
within the Telnet Settings menu. A username and password<br />
can be specified to reflect the credentials your Telnet client will<br />
use to connect to the <strong>Xenium</strong>’s Telnet Server.
• SMB Settings - The <strong>Xenium</strong>-<strong>OS</strong> has Samba support to allow<br />
your console’s hard disk partitions to be accessible over a<br />
network with your PC, the <strong>Xenium</strong>-<strong>OS</strong> will also allow you to<br />
connect to network shares on PC or any device with Samba<br />
support. Your <strong>Xenium</strong>-<strong>OS</strong> Samba settings can be configured<br />
from within this menu.<br />
Using the <strong>Xenium</strong> Settings Menu<br />
The <strong>Xenium</strong>’s Instant Boot option enables you to automatically boot<br />
to the default bios (configured in the Launch Menu) by powering on<br />
your console with the Power button, when the console is powered<br />
on using the Eject button the <strong>Xenium</strong>-<strong>OS</strong> is loaded.<br />
Once your <strong>Xenium</strong>’s virtual bios banks have been configured within<br />
the Launch Menu you can enable Instant Boot mode by entering the<br />
<strong>Xenium</strong> Settings menu, selecting the Instant Boot option and<br />
turning the feature On or Off as shown above.
Using the Network Settings Menu<br />
The networking features of <strong>Xenium</strong>-<strong>OS</strong> require the TCP/IP protocol<br />
to be configured correctly to suit your LAN.<br />
The <strong>Xenium</strong>-<strong>OS</strong> is compatible with DHCP servers for assigning a<br />
dynamic IP address and this mode is enabled when “Using Dynamic<br />
IP” is selected, to manually specify your TCP/IP settings you can<br />
toggle to the “Using Static IP” setting and then configure the<br />
networking settings. Once you have made changes to the network<br />
settings please ensure you select the Restart Network option to<br />
enable the new settings.<br />
To confirm your Xbox's network connection we suggest you go to a<br />
D<strong>OS</strong> prompt on your PC and type:<br />
PING xxx.xxx.xxx.xxx<br />
(where xxx.xxx.xxx.xxx is the IP Address shown in the X<strong>OS</strong>2<br />
Network Settings screen. eg PING 192.168.1.100)
Using the FTP Settings Menu<br />
The FTP server that is built into the <strong>Xenium</strong>-<strong>OS</strong> allows you to<br />
connect your personal computer (or another Xbox) to your console<br />
and transfer files. This is particularly useful for transferring bios<br />
files onto your console’s hard disk when performing the initial setup<br />
of your <strong>Xenium</strong>.<br />
The <strong>Xenium</strong>-<strong>OS</strong> FTP server can be enabled or disabled by Selecting<br />
the FTP Server option from within the FTP Settings menu. By<br />
default the <strong>Xenium</strong>-<strong>OS</strong> uses the username xbox and the password<br />
xbox, should you wish to use different user credentials with your<br />
FTP client the username/password can be changed by selecting the<br />
Set FTP <strong>User</strong>name or Set FTP Password options from this menu.
Using the Telnet Settings Menu<br />
The Telnet server that is built into the <strong>Xenium</strong>-<strong>OS</strong> allows you to<br />
connect to your console by using any Telnet client.<br />
To enable or disable the Telnet server within the <strong>Xenium</strong>-<strong>OS</strong> just<br />
select the Telnet Server option from within the Telnet Settings<br />
menu and set its status. The <strong>Xenium</strong>-<strong>OS</strong> uses the username xbox<br />
and the password xbox by default, different user credentials can be<br />
specified by selecting the Set Telnet <strong>User</strong>name or Set Telnet<br />
Password options from this menu.
Using the SMB Settings Menu<br />
The Samba client and server features of the <strong>Xenium</strong>-<strong>OS</strong> allow you<br />
to configure your console as a network device.<br />
The SMB Settings menu shown above allows you to configure your<br />
console to join a network.<br />
To configure your console as a Samba client select the Set Client<br />
Share Path from the menu, using the onscreen keyboard enter the<br />
UNC path of the PC to connect your console to. The example<br />
screenshot below shows the <strong>Xenium</strong>-<strong>OS</strong> configured to network with<br />
the PC named “server”. Please ensure you enter the \\ in front of<br />
the PC name.
The <strong>Xenium</strong>-<strong>OS</strong> Samba client uses the default username of xbox<br />
and password of xbox but it can be customized by selecting the Set<br />
Client <strong>User</strong>name or Set Client Password options from this menu.<br />
You will also need to ensure that the PC you wish to connect to as a<br />
network device allows sufficient network privileges for the user<br />
specified in these Client settings.<br />
When configured correctly the network PC will be accessible from<br />
within the Launch Menu’s file browser to enable you to select a bios<br />
file located on the network PC.<br />
To configure the Samba server feature of <strong>Xenium</strong>-<strong>OS</strong> the SMB<br />
Server option within the SMB Settings Menu needs to be set to On,<br />
this setting can be changed by highlighting the menu option and<br />
pressing the controller’s A button. The default Workgroup name for<br />
your console is xbox and the default PC name is \\xbox although<br />
these settings can be changed within the Set Server Workgroup<br />
and Set Server Name menu options.<br />
Your console’s hard disk partitions are automatically shared as<br />
network resources and can be accessed using the following path<br />
\\server_name\partition (eg. \\xbox\c for drive C:) as shown in the<br />
screenshot below:<br />
The use of the Samba server feature of the <strong>Xenium</strong>-<strong>OS</strong> can be very<br />
useful for users who want to upload bios files to the console’s hard<br />
disk for the <strong>Xenium</strong>’s initial configuration procedure.
Using a USB Pendrive<br />
The <strong>Xenium</strong>-<strong>OS</strong> is compatible with FAT formatted USB Pendrives,<br />
this means that you can copy your bios files onto a Pendrive using<br />
your PC and then flash these bios files onto your <strong>Xenium</strong> by<br />
connecting your Pendrive to your Xbox.<br />
When a USB Pendrive is connected to the Xbox the drive H: will<br />
then become available in the file browser of the <strong>Xenium</strong>-<strong>OS</strong>.<br />
Installers Menu<br />
The Installers Menu is used to backup and restore your <strong>Xenium</strong>'s<br />
bios virtual bank configuration. To access this additional menu<br />
feature you will need to press and hold your LEFT THUMBSTICK<br />
BUTTON when selecting the Settings menu with the A button.<br />
If done correctly the Installers menu should be visible in the<br />
Settings Menu. You can backup your Bios banks by selecting the<br />
Save Settings to File option in the Installers menu. When<br />
navigating your console's drives and folders the A button will open<br />
the driver/folder, B button returns to the parent drive/folder and<br />
the Y button selects the drive/folder as the destination where you<br />
will save the Installers file.<br />
The installers configuration file can be loaded by selecting the<br />
Install From File option within the Installers Menu and selecting the<br />
saved file from within the <strong>Xenium</strong>-<strong>OS</strong> file browser.