Create successful ePaper yourself
Turn your PDF publications into a flip-book with our unique Google optimized e-Paper software.
¢<br />
¢<br />
4 CREATE GEOMETRY 4.1 Geometry<br />
4 CREATE GEOMETRY 4.1 Geometry<br />
100<br />
75 mm<br />
20 mm<br />
3<br />
4 3<br />
4<br />
3 4<br />
80 mm<br />
y<br />
1 2 1<br />
2<br />
1<br />
2<br />
1 2 1<br />
20<br />
80 mm<br />
z<br />
x<br />
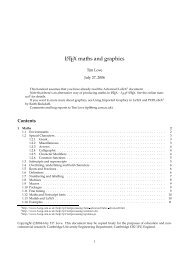
Create 4 points Create 4 points Create 4 points Create 2 points<br />
Create 1 curve<br />
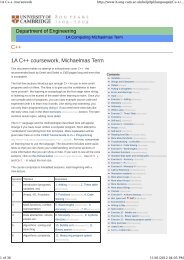
Figure 7: Example : L Bracket<br />
4<br />
3<br />
1<br />
1<br />
2<br />
Show Labels Icon<br />
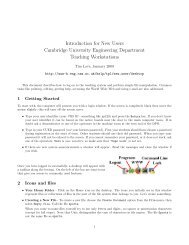
1. Create the 4 points and specify these as vertices and create a surface (Figure 8a).<br />
Create 4 curves<br />
Create 4 curves<br />
Translate<br />
Curve<br />
2. Create the 4 edges of the surface using the above 4 points. Then use the 4 edges to create the<br />
surface. This is the most tedious way to create a surface. But this is the only way to create a<br />
surface if all 4 of its edges are curved (Figure 8b).<br />
3. Create opposite edges of the surface and use these to create a surface. The 2 curves are joined<br />
using straight lines in creating the surface (Figure 8c).<br />
1<br />
4. Create one curve (say) between points 1 and 2 and then extruded it in the Y direction to create<br />
the surface (Figure 8d).<br />
5. Use a single step to directly create the surface (XYZ Method). Here point 1 is chosen as one end<br />
of the diagonal and then by specifying the diagonal vector the rectangle is created (Figure 8e).<br />
Some of these methods of creating surfaces will be illustrated later.<br />
Action : Create<br />
Object : Surface<br />
Method : Vertex<br />
Create<br />
Surface<br />
Edges<br />
Create<br />
Surface<br />
Curves<br />
Create<br />
Surface<br />
Extrude<br />
Create<br />
Surface<br />
XYZ<br />
4.1 Geometry<br />
Click on the Show labels icon from the Tool bar. This will display the point, curve numbers as<br />
they are created later.<br />
Click on the<br />
Geometry radio button.<br />
This will open the geometry form and display it on the right hand side of the screen. Only one of<br />
the forms indicated by the symbol can be open at any given time. Clicking on the label of the form<br />
which is currently open closes it. If you click on the label of another form the currently selected form<br />
is closed and the new form is opened.<br />
a<br />
b c d e<br />
Figure 8: Different Ways of creating a surface<br />
11<br />
12