You also want an ePaper? Increase the reach of your titles
YUMPU automatically turns print PDFs into web optimized ePapers that Google loves.
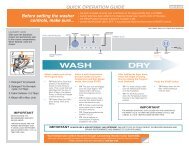
Detergent Dispenser Assembly / Water Valves<br />
Access to the Detergent Dispenser and Water Valves requires that the top of the washer be removed.<br />
Removing the Dispenser Assembly<br />
Begin by removing the top, then use two hands to pull the<br />
dispenser drawer completely out of the housing. (Below)<br />
Disconnect the dispenser hose from<br />
the detergent dispenser assembly by<br />
pulling the loop on the hose off to the<br />
side of the assembly. (Fig. 4-13) Once<br />
that is removed, the hose can be pulled<br />
straight off. Now you can lift the detergent<br />
dispenser assembly out.<br />
Loop<br />
Remove the three Phillips Head screws securing the front of the<br />
detergent dispenser assembly to the front of the Control Panel.<br />
(Fig. 4-11) Remove the two screws securing the detergent<br />
dispenser assembly to the dispenser valves. (Fig. 4-12)<br />
Disconnect the two wires from the hot valve.<br />
IMPORTANT!<br />
Be sure to reattach the hose<br />
correctly, or it will vibrate off of the<br />
bottom of the housing and the unit<br />
will leak water.<br />
SCREWS<br />
Removing the Water Valves<br />
When the Detergent Dispenser Assembly is removed, the water<br />
valves will be exposed. Make sure the water valve seals are correctly<br />
installed on the water valves before re-assembly. (Fig. 4-14)<br />
Remove the two screws that secure the valves to the back of the<br />
machine. (Fig. 4-15, next page)<br />
Accessing the Components 31