Lecture Notes on the Use of Logic Works (Version 4) - Eagle.cs ...
Lecture Notes on the Use of Logic Works (Version 4) - Eagle.cs ...
Lecture Notes on the Use of Logic Works (Version 4) - Eagle.cs ...

Create successful ePaper yourself
Turn your PDF publications into a flip-book with our unique Google optimized e-Paper software.
<str<strong>on</strong>g>Lecture</str<strong>on</strong>g> <str<strong>on</strong>g>Notes</str<strong>on</strong>g> <strong>on</strong> <strong>the</strong> <strong>Use</strong> <strong>of</strong> <strong>Logic</strong> <strong>Works</strong> (Versi<strong>on</strong> 4)<br />
By: Jas<strong>on</strong> S. Thweatt<br />
Revised and Modified by: Ahmad Tarakji-Sept 2004<br />
0. INTRODUCTION<br />
<strong>Logic</strong> <strong>Works</strong> provides <strong>the</strong> student with a great deal <strong>of</strong> flexibility in <strong>the</strong> design and simulati<strong>on</strong> <strong>of</strong> <strong>the</strong> digital<br />
circuits that he or she will implement using <strong>the</strong> chip set and trainer kit. Since <strong>the</strong> design and simulati<strong>on</strong><br />
steps are meant to verify <strong>the</strong> correct operati<strong>on</strong> <strong>of</strong> a circuit before it is implemented, and as a result, save<br />
valuable time. It is recommended that you go through this tutorial while you are seating in fr<strong>on</strong>t <strong>of</strong> <strong>the</strong><br />
computer for practice.<br />
Note: Unless menti<strong>on</strong>ed, all mouse-click are left clicks. "Double-click" and "click-and-hold" should be<br />
performed as indicated.<br />
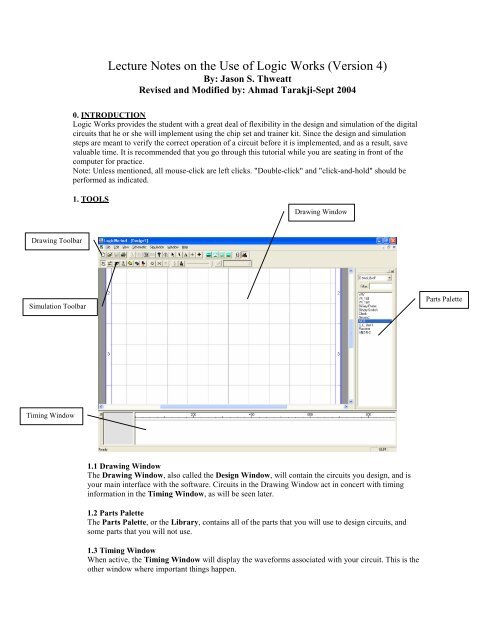
1. TOOLS<br />
Drawing Window<br />
Drawing Toolbar<br />
Simulati<strong>on</strong> Toolbar<br />
Parts Palette<br />
Timing Window<br />
1.1 Drawing Window<br />
The Drawing Window, also called <strong>the</strong> Design Window, will c<strong>on</strong>tain <strong>the</strong> circuits you design, and is<br />
your main interface with <strong>the</strong> s<strong>of</strong>tware. Circuits in <strong>the</strong> Drawing Window act in c<strong>on</strong>cert with timing<br />
informati<strong>on</strong> in <strong>the</strong> Timing Window, as will be seen later.<br />
1.2 Parts Palette<br />
The Parts Palette, or <strong>the</strong> Library, c<strong>on</strong>tains all <strong>of</strong> <strong>the</strong> parts that you will use to design circuits, and<br />
some parts that you will not use.<br />
1.3 Timing Window<br />
When active, <strong>the</strong> Timing Window will display <strong>the</strong> waveforms associated with your circuit. This is <strong>the</strong><br />
o<strong>the</strong>r window where important things happen.
1.4 Drawing Toolbar<br />
The Drawing Toolbar is used to c<strong>on</strong>trol <strong>the</strong> Cursor and modify <strong>the</strong> status <strong>of</strong> <strong>the</strong> Drawing Window.<br />
The opti<strong>on</strong>s <strong>of</strong> <strong>the</strong> Drawing Toolbar can turn <strong>the</strong> Cursor into a magnifying glass, a logic probe, a<br />
precisi<strong>on</strong> deleti<strong>on</strong> tool, a labeling tool, and a wiring tool. It can also be used to cut, copy, paste, and<br />
obtain informati<strong>on</strong> about selected parts.<br />
1.5 Simulati<strong>on</strong> Toolbar<br />
The Simulati<strong>on</strong> Toolbar is used to c<strong>on</strong>trol <strong>the</strong> Timing Window. The Simulator can be used to c<strong>on</strong>trol<br />
<strong>the</strong> rate at which simulati<strong>on</strong>s are generated, or to step through simulati<strong>on</strong>s in incremental time steps.<br />
The Simulator opti<strong>on</strong>s can be accessed through <strong>the</strong> Simulati<strong>on</strong> menu <strong>of</strong> <strong>the</strong> Command Toolbar.<br />
2. BASIC DESIGN<br />
2.1 Part Placement<br />
To place a part in <strong>the</strong> Design Window, double-click <strong>on</strong> <strong>the</strong> desired part name in <strong>the</strong> library in <strong>the</strong> Part<br />
Palette. A shadowed versi<strong>on</strong> <strong>of</strong> <strong>the</strong> part will appear at <strong>the</strong> cursor. Place <strong>the</strong> part at <strong>the</strong> desired locati<strong>on</strong><br />
in <strong>the</strong> Drawing Window and click. The part selected will remain active at <strong>the</strong> mouse cursor for<br />
placement until it is deactivated. If you want to select a new part, double-click <strong>on</strong> that part name and<br />
repeat <strong>the</strong> previous steps. If you just want to deactivate <strong>the</strong> part without selecting a new <strong>on</strong>e, press <strong>the</strong><br />
space bar or <strong>the</strong> Escape key.<br />
Under <strong>the</strong> Schematic menu <strong>of</strong> <strong>the</strong> Command Toolbar you will find <strong>the</strong> Orientati<strong>on</strong> Functi<strong>on</strong>. When<br />
<strong>the</strong> Orientati<strong>on</strong> command is selected, <strong>the</strong> user may select from am<strong>on</strong>g <strong>the</strong> eight part orientati<strong>on</strong>s<br />
<strong>of</strong>fered <strong>on</strong> <strong>the</strong> graphic menu. Once an orientati<strong>on</strong> is selected, all parts inserted into <strong>the</strong> diagram<br />
<strong>the</strong>reafter will appear having that orientati<strong>on</strong>. If you want to orient <strong>the</strong> device that you’re placing <strong>on</strong>ly<br />
without affecting <strong>the</strong> default orientati<strong>on</strong> <strong>of</strong> <strong>the</strong> next parts you can use <strong>the</strong> arrows <strong>on</strong> <strong>the</strong> keyboard after<br />
double-clicking <strong>the</strong> part you want to place.<br />
2.2 Wiring<br />
To make c<strong>on</strong>necti<strong>on</strong>s between logic devices, click and hold at <strong>the</strong> end <strong>of</strong><br />
an input or output pin <strong>of</strong> <strong>on</strong>e <strong>of</strong> <strong>the</strong> devices, or at an existing node <strong>of</strong> <strong>the</strong><br />
wire network. A node is created in a network at any point where a wire<br />
branches to form multiple c<strong>on</strong>necti<strong>on</strong>s. Move <strong>the</strong> cursor to <strong>the</strong> point where<br />
you want <strong>the</strong> wire to end. This can be ano<strong>the</strong>r pin, ano<strong>the</strong>r wire, or an<br />
empty locati<strong>on</strong>. Be careful, because this method <strong>of</strong> wiring can produce undesired nodes at points where<br />
wires cross.<br />
Ano<strong>the</strong>r method <strong>of</strong> wiring involves <strong>the</strong> use <strong>of</strong> <strong>the</strong> wiring drawing tool <strong>on</strong> <strong>the</strong> Drawing Toolbar. To<br />
make sure a c<strong>on</strong>necti<strong>on</strong> was successful, click <strong>on</strong> <strong>the</strong> wire. The wire including <strong>the</strong> pins it’s c<strong>on</strong>nected to<br />
will be highlighted in yellow.<br />
Ano<strong>the</strong>r way <strong>of</strong> c<strong>on</strong>necting between two pins is by using <strong>the</strong> Text Cursor to<br />
give <strong>the</strong> same name to both pins. If you have several pins to be c<strong>on</strong>nected<br />
just give <strong>the</strong>m <strong>the</strong> same name and <strong>Logic</strong><strong>Works</strong> will make sure that <strong>the</strong>y are<br />
all c<strong>on</strong>nected toge<strong>the</strong>r. To check if <strong>the</strong> c<strong>on</strong>necti<strong>on</strong> was successful, doubleclick<br />
<strong>on</strong> <strong>on</strong>e <strong>of</strong> <strong>the</strong> c<strong>on</strong>nected pins, all <strong>the</strong> pins including <strong>the</strong> <strong>on</strong>e you double-clicked will be<br />
highlighted in yellow.<br />
The details <strong>of</strong> using <strong>the</strong> Text Cursor are in secti<strong>on</strong> 3.3.4 later in this tutorial.<br />
2.3 Editing<br />
To move a part or a wire, click <strong>on</strong> it and drag it to <strong>the</strong> desired locati<strong>on</strong>. Selected parts will appear<br />
highlighted in black, and wires will appear highlighted in yellow. Be careful when moving parts,<br />
because wires attached to moving parts will “stretch,” and unwanted nodes may be created.<br />
To move a large number <strong>of</strong> parts, click and hold <strong>the</strong> mouse butt<strong>on</strong> at an empty locati<strong>on</strong> and drag <strong>the</strong><br />
mouse until all <strong>of</strong> <strong>the</strong> parts you wish to move are c<strong>on</strong>tained (at least in part) in <strong>the</strong> window that has<br />
been created.<br />
When you release <strong>the</strong> mouse, all parts that can be moved will appear highlighted. Click and hold <strong>the</strong><br />
mouse <strong>on</strong> any <strong>of</strong> <strong>the</strong> highlighted parts, and <strong>the</strong>y will all move toge<strong>the</strong>r. Again, be careful, because<br />
wires may cross when you move parts.
To delete a part or wire, click <strong>on</strong> it and press <strong>the</strong> delete key. To delete a large number <strong>of</strong> parts, select<br />
<strong>the</strong>m all as before (click and hold, <strong>the</strong>n drag) and press <strong>the</strong> delete key.<br />
If you get in trouble, <strong>the</strong> Undo command in <strong>the</strong> Edit menu has a very good memory.<br />
3. THE DRAWING TOOLBAR<br />
As menti<strong>on</strong>ed earlier, The Drawing Toolbar is used primarily to change <strong>the</strong> functi<strong>on</strong> <strong>of</strong> <strong>the</strong> cursor. It<br />
allows you to change attributes such as part placement and wire type, make correcti<strong>on</strong>s in circuits, insert<br />
text, change <strong>the</strong> view <strong>of</strong> <strong>the</strong> design window, and perform logic probes <strong>of</strong> your circuit.<br />
The Drawing Toolbar is most easily thought <strong>of</strong> as having five parts: File Management, Part Movement<br />
and Modificati<strong>on</strong>, Cursor Modificati<strong>on</strong>, Drawing Window Modificati<strong>on</strong>, and Part Type.<br />
3.1 File Management<br />
The first four butt<strong>on</strong>s <strong>of</strong> <strong>the</strong> Drawing Toolbar are used for file management. Starting from <strong>the</strong> left,<br />
<strong>the</strong>se four butt<strong>on</strong>s are used to Create new files, Open an existing document, Save <strong>the</strong> active<br />
document, and Print <strong>the</strong> active document. Each <strong>of</strong> <strong>the</strong>se commands, as well as <strong>the</strong> remainder <strong>of</strong> <strong>the</strong><br />
file management commands, can be found in <strong>the</strong> File menu <strong>of</strong> <strong>the</strong> Command Toolbar.<br />
3.2 Part Modificati<strong>on</strong><br />
The next five butt<strong>on</strong>s <strong>of</strong> <strong>the</strong> Drawing Toolbar are used for part movement and modificati<strong>on</strong>.<br />
C<strong>on</strong>tinuing from <strong>the</strong> Print butt<strong>on</strong>, <strong>the</strong>se butt<strong>on</strong>s are used to Cut parts which have been selected <strong>on</strong> <strong>the</strong><br />
Drawing Window, Copy selected parts to <strong>the</strong> Clipboard, Insert <strong>the</strong> c<strong>on</strong>tents <strong>of</strong> <strong>the</strong> Clipboard into <strong>the</strong><br />
Drawing Window, Duplicate <strong>the</strong> selected parts and make <strong>the</strong>m available for placement using <strong>the</strong><br />
cursor, and Get and Set Informati<strong>on</strong> about <strong>the</strong> selected part. In <strong>the</strong> case <strong>of</strong> <strong>the</strong> last command, <strong>on</strong>ly <strong>on</strong>e<br />
part can be selected at a time.<br />
3.3 Cursor Modificati<strong>on</strong><br />
The next six butt<strong>on</strong>s <strong>of</strong> <strong>the</strong> Drawing Toolbar are used for Cursor Modificati<strong>on</strong>. These functi<strong>on</strong>s are<br />
probably <strong>the</strong> most useful <strong>of</strong> those <strong>on</strong> <strong>the</strong> Drawing Toolbar. You will find some more useful than<br />
o<strong>the</strong>rs, but each <strong>on</strong>e will be covered in greater detail here.<br />
3.3.1 Signal Probe<br />
The Probe tool has two uses. First, when <strong>the</strong> cursor is touched to a pin and held (click and hold),<br />
that pin’s logic level is displayed.<br />
Sec<strong>on</strong>d, if you enter a logic value while probing a pin, <strong>the</strong> pin will take <strong>on</strong> that value. Be careful<br />
when setting values, as logic c<strong>on</strong>flicts can occur which are not immediately detectable. You will<br />
probably not find it that useful.<br />
3.3.2 Pointer<br />
This is <strong>the</strong> default cursor selecti<strong>on</strong>. When enabled, <strong>the</strong> cursor will functi<strong>on</strong> in all <strong>of</strong> <strong>the</strong> ways<br />
previously described.<br />
3.3.3 Zap<br />
In several cases, you will want to delete <strong>on</strong>e part <strong>of</strong> a wire without deleting <strong>the</strong> whole mesh, or<br />
you may want to delete <strong>on</strong>e object in a particularly tight space. The Zap cursor allows you more<br />
flexibility in deleting objects. When enabled, clicking <strong>on</strong> an object with <strong>the</strong> zap cursor will delete<br />
<strong>on</strong>ly <strong>the</strong> part <strong>of</strong> an object that appears at <strong>the</strong> tip <strong>of</strong> <strong>the</strong> cursor. This is very useful for removing<br />
errant parts <strong>of</strong> wires.<br />
3.3.4 Text<br />
Using <strong>the</strong> Text cursor, you can insert text into schemati<strong>cs</strong>, i.e. titles, chip descripti<strong>on</strong>s or wire and<br />
pin labels. Clicking <strong>on</strong> <strong>the</strong> text butt<strong>on</strong> changes <strong>the</strong> cursor into a pencil. When <strong>the</strong> pencil tip is<br />
inserted in a random locati<strong>on</strong>, a text box appears at that locati<strong>on</strong>, and miscellaneous text can be<br />
inserted. Type in <strong>the</strong> desired text, and click <strong>the</strong> text cursor elsewhere <strong>on</strong>ce you are finished. To<br />
edit text, click <strong>the</strong> text cursor in <strong>the</strong> vicinity <strong>of</strong> existing text.
When <strong>the</strong> pencil tip points at a pin, wire, or part, you can name that object. When labeling a pin,<br />
click <strong>the</strong> pencil tip <strong>on</strong> <strong>the</strong> pin, and a box will open. Type <strong>the</strong> desired text in <strong>the</strong> box, and click <strong>the</strong><br />
mouse or hit Return.<br />
When labeling a gate, click <strong>the</strong> pencil tip <strong>on</strong> <strong>the</strong> gate, type <strong>the</strong> desired name into <strong>the</strong> box which<br />
opens, and click <strong>the</strong> mouse or hit Return.<br />
When naming a signal, click <strong>the</strong> pencil <strong>on</strong> <strong>the</strong> end <strong>of</strong> a pin or <strong>on</strong> <strong>the</strong> wire which will carry <strong>the</strong><br />
signal. Type <strong>the</strong> signal name, and click <strong>the</strong> mouse or hit Return. If <strong>the</strong> Add Automatically opti<strong>on</strong><br />
is selected in <strong>the</strong> Simulati<strong>on</strong> menu, <strong>the</strong> signal name will also appear in <strong>the</strong> Timing Window.<br />
As menti<strong>on</strong>ed in <strong>the</strong> “2.2 Wiring” secti<strong>on</strong>, if you give 2 pins or more <strong>the</strong> same name <strong>the</strong>se pins<br />
will be treated like c<strong>on</strong>nected with a wire, and <strong>the</strong> same signal will go through all <strong>of</strong> <strong>the</strong>m.<br />
3.3.5 Wiring<br />
Two palette tools are available for wiring: normal wire, which can be placed using <strong>the</strong> Normal<br />
cross, and bus wire, which can be placed using <strong>the</strong> Bold cross. Bus wire is not used frequently in<br />
digital applicati<strong>on</strong>s, but be aware that any wire c<strong>on</strong>nected directly to a bus becomes a bus, even if<br />
<strong>the</strong> normal wire cursor is selected. Unlike wiring d<strong>on</strong>e with <strong>the</strong> normal cursor, wiring d<strong>on</strong>e with<br />
<strong>the</strong> wiring cursor does not have to begin at a pin.<br />
3.4 Drawing Window Modificati<strong>on</strong><br />
The next four butt<strong>on</strong>s <strong>of</strong> <strong>the</strong> Drawing Toolbar affect what is displayed <strong>on</strong> <strong>the</strong> Drawing Window.<br />
C<strong>on</strong>tinuing from <strong>the</strong> Bus Wire butt<strong>on</strong>, <strong>the</strong> next four butt<strong>on</strong>s cause <strong>the</strong> design page to Zoom Out,<br />
cause <strong>the</strong> design page to Zoom In, Fit <strong>the</strong> design page to <strong>the</strong> Drawing Window, and display <strong>the</strong> parts<br />
in <strong>the</strong> design page at Normal Size.<br />
Also you can use The Magnificati<strong>on</strong> command under <strong>the</strong> View menu, The Magnificati<strong>on</strong> command<br />
will present a Magnificati<strong>on</strong> Cursor that is centered and magnified view <strong>of</strong> <strong>the</strong> locati<strong>on</strong> that is clicked.<br />
There is no Reduce cursor, but reducti<strong>on</strong> can be d<strong>on</strong>e using <strong>the</strong> Reduce to Fit command under <strong>the</strong><br />
View menu, or through Drawing Toolbar butt<strong>on</strong>s.<br />
3.5 Part Type<br />
The last two butt<strong>on</strong>s c<strong>on</strong>trol <strong>the</strong> body <strong>of</strong> parts that are used in circuit design. The first butt<strong>on</strong> opens <strong>the</strong><br />
PROM / RAM / PLA Wizard. You may not use this butt<strong>on</strong> in this course.<br />
The sec<strong>on</strong>d butt<strong>on</strong> opens and closes <strong>the</strong> Parts Palette.<br />
4. LIBRARIES<br />
In most circuit design, <strong>the</strong>re are <strong>on</strong>ly a few libraries with which you will need to<br />
c<strong>on</strong>cern yourselves. You can get <strong>the</strong>se libraries from <strong>the</strong> Parts Palette.<br />
4.1 Simulati<strong>on</strong> Gates.CLF<br />
This library c<strong>on</strong>tains individual logic gates: AND, OR, NOT, NAND, NOR,<br />
XOR, and XNOR. Depending <strong>on</strong> <strong>the</strong> type <strong>of</strong> gate, different numbers <strong>of</strong> inputs are<br />
available. You will notice that several <strong>of</strong> <strong>the</strong> gates have inverted inputs available,<br />
but from <strong>the</strong> standpoint <strong>of</strong> determining chip costs and gate delays, it is not a good<br />
design practice to use those gates, assuming that you use primitive gates to design circuits in <strong>the</strong> first<br />
place. Unless menti<strong>on</strong>ed o<strong>the</strong>rwise in <strong>the</strong> homework problem, d<strong>on</strong>’t use <strong>the</strong> inverted input gates.<br />
4.2 Simulati<strong>on</strong> IO.CLF<br />
These parts represent individual input/output devices. Of <strong>the</strong> devices which are <strong>on</strong>ly found in this<br />
library, three sets <strong>of</strong> devices may be <strong>of</strong> use to designers.<br />
4.2.1 Seven-Segment Displays<br />
There are multiple seven-segment displays in <strong>the</strong> I/O Library. Of those, <strong>the</strong> <strong>on</strong>es called 7-Seg Disp<br />
Inv -(Color) operate like this: when a logic zero is applied to <strong>on</strong>e <strong>of</strong> its pins, <strong>the</strong> corresp<strong>on</strong>ding<br />
segment becomes lit, and when a logic <strong>on</strong>e is applied, <strong>the</strong> corresp<strong>on</strong>ding segment stays unlit. Be<br />
sure to keep this in mind when you perform a design using a seven-segment display. The o<strong>the</strong>r<br />
seven-segment displays in this library have segments which light <strong>on</strong> logic <strong>on</strong>e; <strong>the</strong>se are not <strong>the</strong><br />
devices you should use.
4.2.2 LEDs<br />
To correctly wire <strong>the</strong> LEDs, ground <strong>the</strong> pin which is c<strong>on</strong>nected to <strong>the</strong> bubble, and c<strong>on</strong>nect <strong>the</strong><br />
o<strong>the</strong>r pin to <strong>the</strong> output device which you are using to drive <strong>the</strong> LED. When properly grounded,<br />
LEDs will light <strong>on</strong> logic <strong>on</strong>e.<br />
4.2.3 Pushbutt<strong>on</strong>s and Switches<br />
In additi<strong>on</strong> to <strong>the</strong> Binary Switch (which will be discussed later), <strong>the</strong> I/O Library c<strong>on</strong>tains a Single-<br />
Pole<br />
Double-Throw (SPDT) pushbutt<strong>on</strong>, a SPDT switch, and a Single-Pole Single-Throw (SPST)<br />
switch. An<br />
SPST switch is <strong>on</strong>e which is ei<strong>the</strong>r open or closed. A SPDT switch can take <strong>on</strong> two different logic<br />
levels, depending <strong>on</strong> what c<strong>on</strong>necti<strong>on</strong>s are made to <strong>the</strong> switch inputs. A SPDT pushbutt<strong>on</strong> is like a<br />
SPDT switch, except it normally takes <strong>on</strong> <strong>on</strong>e value, and <strong>on</strong>ly goes to its o<strong>the</strong>r value when<br />
momentary c<strong>on</strong>tact is made.<br />
For double throw switches, make sure that both inputs are c<strong>on</strong>nected to circuit elements which can<br />
take <strong>on</strong> known values.<br />
4.3 7400DEVS.CLF<br />
These parts represent devices in <strong>the</strong> 7400 series <strong>of</strong> integrated circuits.<br />
4.4 DEMOLIB.CLF<br />
This library c<strong>on</strong>tains miscellaneous parts, <strong>of</strong> which five in particular are very useful.<br />
4.4.1 +5V, Ground<br />
Just as you should never keep an input pin floating when wiring a chip, it is a good design practice<br />
to wire input pins high or low if you know that <strong>the</strong>y will always have a certain logic value. These<br />
two signals can be used to provide c<strong>on</strong>stant logic levels <strong>of</strong> 0 or 1 to <strong>the</strong> various pins <strong>of</strong> your<br />
circuit. In <strong>Logic</strong> <strong>Works</strong>, 7400 devices do not have power or ground pins, but <strong>the</strong>re are times when<br />
you will want to keep reset pins, enable pins, clear pins, or input pins at logic 1 or logic 0.<br />
4.4.2 Binary Switches<br />
Binary Switches can place a logic 1 or logic 0 <strong>on</strong> a given pin. Their inputs are already c<strong>on</strong>nected<br />
to logic 1 and logic 0. The designer has <strong>on</strong>ly to wire <strong>the</strong> output <strong>of</strong> <strong>the</strong> switch to an input pin or<br />
named signal, and toggle <strong>the</strong> value by clicking <strong>on</strong> <strong>the</strong> switch. If <strong>the</strong> switch does not toggle, make<br />
sure that <strong>the</strong> simulati<strong>on</strong> is active by pressing <strong>the</strong> Reset and Run butt<strong>on</strong>s <strong>on</strong> <strong>the</strong> Simulati<strong>on</strong><br />
Toolbar.<br />
Note that since clicking <strong>on</strong> <strong>the</strong> Binary switch will switch it <strong>on</strong> and <strong>of</strong>f, you must press <strong>on</strong> <strong>the</strong><br />
SHIFT key while clicking <strong>on</strong> <strong>the</strong> switch if you want to select it to move it or delete it.<br />
4.4.3 Binary Probes<br />
When debugging a physical circuit, it is a good practice to use a wire and an LED to observe <strong>the</strong><br />
logic levels within <strong>the</strong> circuit. C<strong>on</strong>nect <strong>on</strong>e end <strong>of</strong> <strong>the</strong> wire to <strong>the</strong> LED, and use <strong>the</strong> o<strong>the</strong>r end to<br />
probe <strong>the</strong> output. Binary probes work <strong>the</strong> same way in <strong>Logic</strong> <strong>Works</strong>. They are better than <strong>the</strong><br />
Probe <strong>on</strong> <strong>the</strong> Palette in that <strong>on</strong>ce <strong>the</strong>y are placed, <strong>the</strong>y remain in <strong>the</strong> circuit, and are updated<br />
whenever <strong>the</strong> circuit changes.<br />
Multiple probes can be places at different locati<strong>on</strong>s in a circuit, allowing you to troubleshoot many<br />
locati<strong>on</strong>s at <strong>on</strong>ce. The values displayed <strong>on</strong> <strong>the</strong> probes follow <strong>the</strong> rules <strong>of</strong> Boolean algebra, but<br />
c<strong>on</strong>diti<strong>on</strong>s may exist such that <strong>the</strong> probe displays a n<strong>on</strong>-numeric c<strong>on</strong>diti<strong>on</strong>.<br />
• (X) D<strong>on</strong>’t know/D<strong>on</strong>’t care c<strong>on</strong>diti<strong>on</strong>: An output is at an unknown state.<br />
• (Z) High impedance/No input c<strong>on</strong>diti<strong>on</strong>: The probe is not c<strong>on</strong>nected to an input.<br />
• (C) C<strong>on</strong>flict c<strong>on</strong>diti<strong>on</strong>: An output is being forced to c<strong>on</strong>flicting logic levels.<br />
In general, <strong>the</strong>se c<strong>on</strong>diti<strong>on</strong>s are not desirable, and you should check your circuit for errors should<br />
<strong>on</strong>e occurs.
4.4.4 Clocks<br />
You can use <strong>the</strong> clock to drive your circuit. This circuit is a synchr<strong>on</strong>ous circuit. You may change<br />
<strong>the</strong> frequency and <strong>the</strong> period. To change <strong>the</strong> timing parameters <strong>of</strong> <strong>the</strong> sec<strong>on</strong>d clock, select it by<br />
clicking <strong>on</strong> it. Then choose <strong>the</strong> Simulati<strong>on</strong> Parameters opti<strong>on</strong> under <strong>the</strong> Simulati<strong>on</strong> menu bar. A<br />
window will appear allowing you to modify <strong>the</strong> clock parameters. Give <strong>the</strong> clock high and low<br />
times <strong>of</strong> x nanosec<strong>on</strong>ds.<br />
5. SIMULATION AND TIMING<br />
5.1 The Simulati<strong>on</strong> Toolbar<br />
The Simulati<strong>on</strong> Toolbar is your interface with <strong>the</strong> Simulator and <strong>the</strong> Timing Window. Its features<br />
give you c<strong>on</strong>trol <strong>of</strong> <strong>the</strong> speed and status <strong>of</strong> <strong>the</strong> simulati<strong>on</strong>, <strong>the</strong> status <strong>of</strong> <strong>the</strong> various signals <strong>of</strong> <strong>the</strong><br />
circuit, and <strong>the</strong> size <strong>of</strong> <strong>the</strong> Timing Window. The Simulati<strong>on</strong> Toolbar is best thought <strong>of</strong> as having three<br />
parts: Signal Status, Window Status, and Simulator Status<br />
5.1.1 Signal Status<br />
The first seven butt<strong>on</strong>s c<strong>on</strong>trol <strong>the</strong> status <strong>of</strong> signals, and to a degree, <strong>the</strong>ir appearance in <strong>the</strong><br />
Timing Window. Starting <strong>on</strong> <strong>the</strong> left, <strong>the</strong>se butt<strong>on</strong>s functi<strong>on</strong> as follows:<br />
5.1.1.1 Toggle<br />
The first butt<strong>on</strong> Toggles <strong>the</strong> presence and absence <strong>of</strong> <strong>the</strong> Timing Window.<br />
5.1.1.2 Add Signals<br />
The sec<strong>on</strong>d butt<strong>on</strong> Adds Selected Signals to <strong>the</strong> Timing window if <strong>the</strong> Add Automatically<br />
opti<strong>on</strong> <strong>of</strong> <strong>the</strong> Simulati<strong>on</strong> menu is not already selected.<br />
5.1.1.3 Triggers<br />
This butt<strong>on</strong> opens <strong>the</strong> trigger opti<strong>on</strong> menu. There you can<br />
specify <strong>the</strong> acti<strong>on</strong> to stop simulati<strong>on</strong> at a specific timing<br />
c<strong>on</strong>diti<strong>on</strong> that you provide.<br />
5.1.1.4 Simulati<strong>on</strong> Parameters<br />
This butt<strong>on</strong> can be used to carry out <strong>the</strong> same functi<strong>on</strong>s as those which can be performed<br />
using <strong>the</strong> Simulati<strong>on</strong> Parameters command under <strong>the</strong> Simulati<strong>on</strong> menu. In this window you<br />
can change <strong>the</strong> delay for <strong>the</strong> device.<br />
5.1.1.5 Stick Signals<br />
This butt<strong>on</strong> can be used to Stick Signals at a given logic level. A stuck signal is <strong>on</strong>e which<br />
remains at <strong>on</strong>e logic level despite changes which might be affecting.<br />
5.1.1.6 Reset Simulator<br />
This butt<strong>on</strong> Resets <strong>the</strong> Simulator. The Timing Window is cleared <strong>of</strong> all waveforms, and<br />
regardless <strong>of</strong> <strong>the</strong> current time indicated in <strong>the</strong> Simulati<strong>on</strong> Time Window, <strong>the</strong> next time step<br />
taken will be time zero.<br />
5.1.1.7 Clear Unknowns<br />
This butt<strong>on</strong> tries to clear all signals which have unknown values. Sometimes this is not<br />
possible, as a part may have undriven inputs, which by definiti<strong>on</strong> provide Z inputs to <strong>the</strong> part.<br />
5.1.2 Timing Window C<strong>on</strong>trol<br />
The next three butt<strong>on</strong>s c<strong>on</strong>trol <strong>the</strong> scale <strong>of</strong> <strong>the</strong> Timing Window. These butt<strong>on</strong>s Zoom In <strong>on</strong> <strong>the</strong><br />
timing scale (<strong>the</strong> Timing Window c<strong>on</strong>tains less time), Zoom Out <strong>on</strong> <strong>the</strong> timing scale (<strong>the</strong> Timing<br />
Window c<strong>on</strong>tains more time), and set <strong>the</strong> timing scale to its Normal (Default) Size.<br />
5.1.3 Simulator Speed<br />
The Simulator Speed c<strong>on</strong>trol c<strong>on</strong>sists <strong>of</strong> three butt<strong>on</strong>s, a slidebar, and a counter. Starting <strong>on</strong> <strong>the</strong><br />
left, <strong>the</strong>se c<strong>on</strong>trols have <strong>the</strong> following functi<strong>on</strong>s:
5.1.3.1 Single Step<br />
The Single Step butt<strong>on</strong> can be used to a single step in <strong>the</strong> simulati<strong>on</strong> <strong>of</strong> a circuit. A step is<br />
defined as <strong>the</strong> shortest amount <strong>of</strong> time which is required to observe a change in <strong>the</strong><br />
simulati<strong>on</strong>. As a result, a step can be <strong>of</strong> any size, and usually reflects <strong>the</strong> time length <strong>of</strong> <strong>the</strong><br />
quickest changing variable, or <strong>of</strong> <strong>the</strong> shortest delay path.<br />
5.1.3.2 Stop Simulator<br />
When <strong>the</strong> simulator is running, <strong>the</strong> Stop Simulator butt<strong>on</strong> stops <strong>the</strong> progress <strong>of</strong> <strong>the</strong><br />
simulati<strong>on</strong>. It does NOT reset <strong>the</strong> simulati<strong>on</strong>; while stopped, <strong>the</strong> simulati<strong>on</strong> can be resumed<br />
by pressing <strong>the</strong> Run butt<strong>on</strong> or by selecting a Simulati<strong>on</strong> Speed <strong>on</strong> <strong>the</strong> slidebar. While stopped,<br />
<strong>the</strong> simulati<strong>on</strong> can also be advanced in single steps.<br />
5.1.3.3 Simulati<strong>on</strong> Speed<br />
The sliding toolbar can be used to Change <strong>the</strong> Speed <strong>of</strong> simulati<strong>on</strong>. This is most visibly<br />
reflected in <strong>the</strong> speed <strong>of</strong> <strong>the</strong> waveforms in <strong>the</strong> Timing Window. The simulati<strong>on</strong> speed can be<br />
changed during simulati<strong>on</strong>, or it can be set while <strong>the</strong> Simulator is stopped. When <strong>the</strong> indicator<br />
is slid all <strong>the</strong> way to <strong>the</strong> left, <strong>the</strong> Simulator is stopped.<br />
5.1.3.4 Run Simulator<br />
Pressing <strong>the</strong> Run butt<strong>on</strong> causes <strong>the</strong> Simulator to run at its highest speed. This is true whe<strong>the</strong>r<br />
or not <strong>the</strong> Simulator is already running.<br />
5.1.3.5 Simulati<strong>on</strong> Counter<br />
This window shows <strong>the</strong> Current Time Step, i.e., <strong>the</strong> amount <strong>of</strong> simulati<strong>on</strong> time which has<br />
passed since <strong>the</strong> last reset. The time shown in this window reflects <strong>the</strong> time shown in <strong>the</strong><br />
timing window, and <strong>the</strong> simulator speed selected <strong>on</strong> <strong>the</strong> sliding toolbar.<br />
5.2 The Timing Window<br />
When active, <strong>the</strong> Timing Window will display all changes in all named signals. Events that cause<br />
signals to change include toggling binary switches, clock pulses, and timing file inputs. These types <strong>of</strong><br />
changes can be characterized as static (manual) or dynamic (automatic).<br />
5.2.1 Manual Simulati<strong>on</strong><br />
Switches and probes can be used in <strong>the</strong> manner described above to achieve a degree <strong>of</strong> manual<br />
simulati<strong>on</strong>.<br />
Since <strong>Logic</strong> <strong>Works</strong> is an event-driven simulator, a change in any input signal causes all named<br />
signals to be updated. As a result, a change in any <strong>of</strong> <strong>the</strong> signal values, say, through <strong>the</strong> toggling <strong>of</strong><br />
a switch, will cause all <strong>of</strong> <strong>the</strong> observable values to change. These changes manifest <strong>the</strong>mselves<br />
primarily in two ways. Ei<strong>the</strong>r all <strong>of</strong> <strong>the</strong> binary probes in our circuit will be updated, or <strong>the</strong><br />
waveforms in your timing window will be updated.<br />
5.2.2 Grouping<br />
Whenever you name any signal in your circuit, it will be added to <strong>the</strong> timing window if <strong>the</strong> Add<br />
Automatically opti<strong>on</strong> is selected in <strong>the</strong> Simulati<strong>on</strong> menu (3.3.4), or you can added manually<br />
using <strong>the</strong> Add Signal butt<strong>on</strong> (5.1.1.2). Sometimes, you may have big number <strong>of</strong> signals and you<br />
can’t see <strong>the</strong>m all at <strong>on</strong>ce. Or, maybe examining <strong>the</strong> signals transiti<strong>on</strong> from 0 to 1 back to 0 is not<br />
<strong>of</strong> big help.<br />
For example, if you implement a counter to count a<br />
sequence from 0 to 7, which requires 3 binary bits, it might<br />
be a little inc<strong>on</strong>venient to see <strong>the</strong> three signals changing like<br />
000, 001, 010,….110, 111. It would be much nicer if we can see <strong>the</strong> transiti<strong>on</strong><br />
in readable digits like 0, 1, 2, …,7. <strong>Logic</strong><strong>Works</strong> allows us to do just that. In <strong>the</strong><br />
timing window select <strong>the</strong> signals that you want to see as digits by holding <strong>on</strong><br />
<strong>the</strong> SHIFT key and clicking <strong>on</strong> <strong>the</strong>m. Right-click <strong>on</strong> any <strong>on</strong>e <strong>of</strong> <strong>the</strong> signals.<br />
Select <strong>the</strong> ‘Group’ command from <strong>the</strong> pop-up menu. The signals will collapse
into <strong>on</strong>e single signal showing <strong>the</strong>ir combined value in<br />
hexadecimal. If <strong>the</strong> signals represent a counter, <strong>the</strong>y have<br />
to be organized in <strong>the</strong> timing window from bottom to top<br />
starting with <strong>the</strong> Least Significant Bit to <strong>the</strong> Most Significant Bit<br />
respectively. To change <strong>the</strong> order <strong>of</strong> <strong>the</strong> signals inside a group,<br />
right-click <strong>on</strong> <strong>the</strong> group name and select <strong>the</strong> “Get Info…”<br />
command. A dialog box will show with <strong>the</strong> order <strong>of</strong> <strong>the</strong> signals in<br />
<strong>the</strong> group. You can change <strong>the</strong> order by promoting or demoting<br />
signals. You can also change <strong>the</strong> name <strong>of</strong> <strong>the</strong> group.<br />
The same pop-up menu can be used to Ungroup <strong>the</strong> signals.<br />
5.3 Delays<br />
Unless modeled o<strong>the</strong>rwise, devices in <strong>Logic</strong> <strong>Works</strong> are treated as<br />
nearly ideal devices, having a propagati<strong>on</strong> delay <strong>of</strong> <strong>on</strong>e<br />
nanosec<strong>on</strong>d between <strong>the</strong> input and <strong>the</strong> output. Such is not <strong>the</strong> case<br />
in real life; according to most datasheets, a typical device such as<br />
a 7400 chip, or a dual-input NAND gate, has a worst-case delay<br />
<strong>of</strong> 22 nanosec<strong>on</strong>ds between a change in <strong>the</strong> input and <strong>the</strong><br />
corresp<strong>on</strong>ding output. There are times when you will be asked to<br />
model this delay in your simulati<strong>on</strong>s, in order to meet certain<br />
timing or frequency criteria.<br />
Fortunately, <strong>Logic</strong> <strong>Works</strong> gives you a way to do this. To change <strong>the</strong> delay in <strong>on</strong>e or more gates, hold<br />
down <strong>the</strong> C<strong>on</strong>trol key, and click <strong>on</strong> all <strong>of</strong> <strong>the</strong> devices for which you want to change <strong>the</strong> delay. Then,<br />
under <strong>the</strong> Simulati<strong>on</strong> menu, select <strong>the</strong> Simulati<strong>on</strong> Parameters opti<strong>on</strong>. A window will appear,<br />
showing <strong>the</strong> current shortest and l<strong>on</strong>gest delays for <strong>the</strong> selected gate or gates. For all parts, this defaults<br />
to <strong>on</strong>e nanosec<strong>on</strong>d. To change <strong>the</strong> delay, simply type in <strong>the</strong> delay that you want <strong>the</strong> selected gate or<br />
gates to have. The delay that you type in will be applied to all gates which you select in <strong>the</strong> Design<br />
window, so be sure that all <strong>of</strong> <strong>the</strong> gates which you select have <strong>the</strong> same time delay.<br />
To change <strong>the</strong> delay in a chip (i.e., a 7400 device), you must first unlock <strong>the</strong> subcircuit c<strong>on</strong>taining <strong>the</strong><br />
gates. Right-click <strong>on</strong> <strong>the</strong> device and select Device Info. A window c<strong>on</strong>taining various informati<strong>on</strong> <strong>on</strong><br />
<strong>the</strong> selected device will appear. The dialog box labeled Lock Opening Subcircuit should be checked.<br />
Click <strong>on</strong> <strong>the</strong> box to remove <strong>the</strong> check. Now, you can edit <strong>the</strong> parameters <strong>of</strong> <strong>the</strong> gates inside <strong>the</strong> chip as<br />
if <strong>the</strong>y were individual gates. To do this, double click <strong>on</strong> <strong>the</strong> chip you wish to edit. A Design Window<br />
c<strong>on</strong>taining a gate and pin layout <strong>of</strong> <strong>the</strong> IC will appear. As before, select <strong>the</strong> gates whose timing<br />
parameters you wish to edit, and follow <strong>the</strong> instructi<strong>on</strong>s for changing <strong>the</strong> gate delay.<br />
To save time when changing <strong>the</strong> chip delays in a large circuit, lay out <strong>the</strong> entire circuit by placing all <strong>of</strong><br />
<strong>the</strong> chips that your circuit requires into <strong>the</strong> Design Window. You need not wire <strong>the</strong> circuit in order to<br />
implement <strong>the</strong> propagati<strong>on</strong> delays. For each type <strong>of</strong> chip in <strong>the</strong> circuit, select <strong>on</strong>e and perform <strong>the</strong><br />
procedure for changing <strong>the</strong> delays <strong>of</strong> <strong>the</strong> gates <strong>on</strong> that chip. When you do this, all <strong>of</strong> <strong>the</strong> chips <strong>of</strong> that<br />
type which are already in <strong>the</strong> design window will have <strong>the</strong> same delay. Note that this procedure will<br />
not work for gates taken from <strong>the</strong> Simulati<strong>on</strong> Gates.CLF library. Instead, you will have to follow <strong>the</strong><br />
procedure given for changing <strong>the</strong> delay in multiple primitive logic gates.
Example:<br />
Let’s have an example circuit using <strong>the</strong> <strong>Logic</strong><strong>Works</strong>. We’re going to implement <strong>the</strong> XOR gate using <strong>the</strong><br />
basic AND, OR, and NOT gates.<br />
We know that <strong>the</strong> XOR functi<strong>on</strong> is: X ⊕ Y = X’Y + X Y’<br />
So what are <strong>the</strong> required gates<br />
1- 2 invertors to get X’ and Y’<br />
2- Two 2-input AND gates, <strong>on</strong>e for X’.Y and <strong>the</strong> o<strong>the</strong>r for X . Y’<br />
3- One 2-input OR gate that gets <strong>the</strong> output <strong>of</strong> <strong>the</strong> AND gates as its input and its output represents <strong>the</strong><br />
functi<strong>on</strong> XOR.<br />
These gates can be found under <strong>the</strong> “Simulati<strong>on</strong> Gates.clf” library.<br />
After wiring <strong>the</strong> circuit we need a way to test if it’s working. We may use two binary switches to simulate<br />
<strong>the</strong> signals X and Y. We add a binary probe to <strong>the</strong> output <strong>of</strong> <strong>the</strong> OR gate to see <strong>the</strong> output depending <strong>on</strong> <strong>the</strong><br />
input from <strong>the</strong> binary switches. These switches and <strong>the</strong> probe can be found under <strong>the</strong> “Demolib.clf” library.<br />
The final design <strong>of</strong> <strong>the</strong> circuit might look something similar to this (<strong>the</strong> layout <strong>of</strong> <strong>the</strong> gates doesn’t matter as<br />
l<strong>on</strong>g as <strong>the</strong> wiring is correct):<br />
To test <strong>the</strong> circuit, try to click <strong>on</strong> <strong>the</strong> switches and observe <strong>the</strong> output <strong>on</strong> <strong>the</strong> probe. Try all <strong>the</strong> possible<br />
combinati<strong>on</strong> <strong>of</strong> X and Y. The output must match <strong>the</strong> truth table <strong>of</strong> <strong>the</strong> XOR functi<strong>on</strong>:<br />
X Y X XOR Y<br />
0 0 0<br />
0 1 1<br />
1 0 1<br />
1 1 0
Lab1:<br />
Objective: To practice working <strong>on</strong> and be familiar with <strong>Logic</strong><strong>Works</strong>4. You will learn how to use <strong>the</strong> clock<br />
and <strong>the</strong> trigger functi<strong>on</strong>, and how to read and interpret <strong>the</strong> timing window.<br />
Problem: You are to modify <strong>the</strong> previous example at <strong>the</strong> end <strong>of</strong> <strong>the</strong> tutorial so it works automatically, not<br />
depending <strong>on</strong> <strong>the</strong> input from <strong>the</strong> binary switches.<br />
Procedure:<br />
1- Delete <strong>the</strong> binary switches used in <strong>the</strong> example and replace <strong>the</strong>m with 2 clock devices. The clock is in<br />
under <strong>the</strong> Demolib.clf library.<br />
2- Change <strong>the</strong> clocks period by going to <strong>the</strong> Simulati<strong>on</strong> Params under <strong>the</strong> Simulati<strong>on</strong> menu (refer to<br />
secti<strong>on</strong> 4.4.4.) Set <strong>the</strong> period <strong>of</strong> <strong>the</strong> first clock (X) to a 100 ns for both high and low, and <strong>the</strong> period <strong>of</strong><br />
<strong>the</strong> sec<strong>on</strong>d clock (Y) to 45 ns for both high and low.<br />
3- If you haven’t d<strong>on</strong>e that already, name <strong>the</strong> first signal (X) and <strong>the</strong> sec<strong>on</strong>d (Y). Be careful when you<br />
name <strong>the</strong> signal you put <strong>the</strong> text cursor <strong>on</strong> <strong>the</strong> red wire, not <strong>the</strong> out pin <strong>of</strong> <strong>the</strong> clock. Once you’ve d<strong>on</strong>e<br />
that, you will see <strong>the</strong> name <strong>of</strong> <strong>the</strong> signals in <strong>the</strong> timing window if it’s open (secti<strong>on</strong> 5.1.1.1) and if <strong>the</strong><br />
opti<strong>on</strong> Add Automatically under <strong>the</strong> Simulati<strong>on</strong> menu. Name <strong>the</strong> output <strong>of</strong> <strong>the</strong> OR gate as (X xor Y).<br />
Again, it should appear in <strong>the</strong> timing window.<br />
4- Arrange your signals in <strong>the</strong> timing window so it shows X, Y, X xor Y respectively from top to bottom.<br />
Right-click <strong>on</strong> <strong>the</strong> signal name in <strong>the</strong> timing window and use To Top or To Bottom opti<strong>on</strong>s to arrange<br />
<strong>the</strong>m, or drag and drop.<br />
5- Now that everything is in place, you may try to run <strong>the</strong> simulati<strong>on</strong> by pressing <strong>on</strong> <strong>the</strong> Run Simulator<br />
key in <strong>the</strong> simulati<strong>on</strong> toolbar (secti<strong>on</strong> 5.1.3). The simulati<strong>on</strong> will run very fast as you can see in <strong>the</strong><br />
Counter and <strong>the</strong> Timing Window. You may slow it down using <strong>the</strong> slidebar.<br />
6- Stop <strong>the</strong> simulator and reset <strong>the</strong> simulator (secti<strong>on</strong> 5.1.1.6).<br />
7- Since <strong>the</strong> simulati<strong>on</strong> is repeated over and over again, it is enough to examine a porti<strong>on</strong> <strong>of</strong> <strong>the</strong> time that<br />
covers all <strong>the</strong> possibilities <strong>of</strong> <strong>the</strong> output and <strong>the</strong>n stop <strong>the</strong> simulati<strong>on</strong>. We can do that using <strong>the</strong><br />
Triggers functi<strong>on</strong> (secti<strong>on</strong> 5.1.1.3). Click <strong>on</strong> <strong>the</strong> Triggers butt<strong>on</strong> <strong>on</strong> <strong>the</strong> simulati<strong>on</strong> toolbar, <strong>the</strong><br />
simulati<strong>on</strong> Trigger window shows up.<br />
8- In <strong>the</strong> Acti<strong>on</strong>s secti<strong>on</strong> check beside <strong>the</strong> Stop opti<strong>on</strong>. In <strong>the</strong> Timing C<strong>on</strong>diti<strong>on</strong> secti<strong>on</strong> choose “=” and<br />
type 200 in <strong>the</strong> time box. Click OK. This means that if you reset <strong>the</strong> simulator and start from time t=0<br />
<strong>the</strong> simulati<strong>on</strong> will run until t = 200 ns and <strong>the</strong>n stops.
9- Run <strong>the</strong> simulator again by clicking <strong>on</strong> <strong>the</strong> Run Simulator butt<strong>on</strong>. It will stop automatically at<br />
t = 200 ns in <strong>the</strong> timing window (if you can’t see everything from 0 to 200 in <strong>the</strong> timing window, use<br />
<strong>the</strong> zoom out butt<strong>on</strong>.)<br />
10- Check <strong>the</strong> signals in <strong>the</strong> timing window for X, Y, X xor Y respectively. X and Y will take different<br />
values over <strong>the</strong> time (0 in black and 1 in red) check <strong>the</strong> two signals and check <strong>the</strong> output signal and see<br />
if it makes sense.<br />
11- Once you are d<strong>on</strong>e and every thing is working fine, print <strong>the</strong> circuit using <strong>the</strong> print butt<strong>on</strong> or under <strong>the</strong><br />
File menu. D<strong>on</strong>’t forget to use <strong>the</strong> text tool to write your name and student ID <strong>on</strong> <strong>the</strong> side <strong>of</strong> <strong>the</strong> circuit.<br />
12- Print <strong>the</strong> Timing Window using <strong>the</strong> Print Timing command under <strong>the</strong> Simulati<strong>on</strong> menu. D<strong>on</strong>’t show<br />
executi<strong>on</strong> for more than 200 ns (<strong>on</strong>e Run click); <strong>on</strong>ly time from 0 to 200 should be <strong>on</strong> <strong>the</strong> Timing<br />
Window when you print it.<br />
This Lab is d<strong>on</strong>e.