

1967 Chevy Sedan-Impala - Classic Auto Air
1967 Chevy Sedan-Impala - Classic Auto Air
1967 Chevy Sedan-Impala - Classic Auto Air

You also want an ePaper? Increase the reach of your titles
YUMPU automatically turns print PDFs into web optimized ePapers that Google loves.
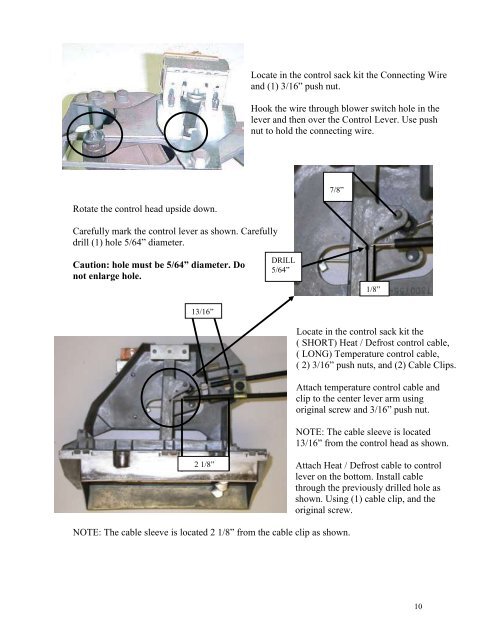
Locate in the control sack kit the Connecting Wire<br />
and (1) 3/16” push nut.<br />
Hook the wire through blower switch hole in the<br />
lever and then over the Control Lever. Use push<br />
nut to hold the connecting wire.<br />
7/8”<br />
Rotate the control head upside down.<br />
Carefully mark the control lever as shown. Carefully<br />
drill (1) hole 5/64” diameter.<br />
Caution: hole must be 5/64” diameter. Do<br />
not enlarge hole.<br />
DRILL<br />
5/64”<br />
1/8”<br />
13/16”<br />
Locate in the control sack kit the<br />
( SHORT) Heat / Defrost control cable,<br />
( LONG) Temperature control cable,<br />
( 2) 3/16” push nuts, and (2) Cable Clips.<br />
Attach temperature control cable and<br />
clip to the center lever arm using<br />
original screw and 3/16” push nut.<br />
NOTE: The cable sleeve is located<br />
13/16” from the control head as shown.<br />
2 1/8”<br />
Attach Heat / Defrost cable to control<br />
lever on the bottom. Install cable<br />
through the previously drilled hole as<br />
shown. Using (1) cable clip, and the<br />
original screw.<br />
NOTE: The cable sleeve is located 2 1/8” from the cable clip as shown.<br />
10


