

1967 Chevy Sedan-Impala - Classic Auto Air
1967 Chevy Sedan-Impala - Classic Auto Air
1967 Chevy Sedan-Impala - Classic Auto Air

You also want an ePaper? Increase the reach of your titles
YUMPU automatically turns print PDFs into web optimized ePapers that Google loves.
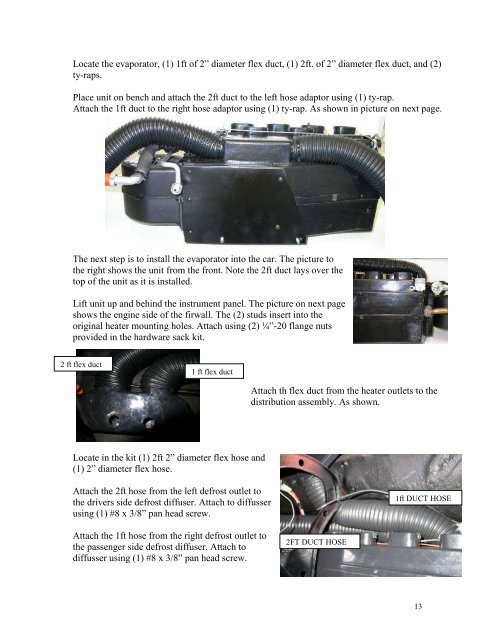
Locate the evaporator, (1) 1ft of 2” diameter flex duct, (1) 2ft. of 2” diameter flex duct, and (2)<br />
ty-raps.<br />
Place unit on bench and attach the 2ft duct to the left hose adaptor using (1) ty-rap.<br />
Attach the 1ft duct to the right hose adaptor using (1) ty-rap. As shown in picture on next page.<br />
The next step is to install the evaporator into the car. The picture to<br />
the right shows the unit from the front. Note the 2ft duct lays over the<br />
top of the unit as it is installed.<br />
Lift unit up and behind the instrument panel. The picture on next page<br />
shows the engine side of the firwall. The (2) studs insert into the<br />
original heater mounting holes. Attach using (2) ¼”-20 flange nuts<br />
provided in the hardware sack kit.<br />
2 ft flex duct<br />
1 ft flex duct<br />
Attach th flex duct from the heater outlets to the<br />
distribution assembly. As shown.<br />
Locate in the kit (1) 2ft 2” diameter flex hose and<br />
(1) 2” diameter flex hose.<br />
Attach the 2ft hose from the left defrost outlet to<br />
the drivers side defrost diffuser. Attach to diffusser<br />
using (1) #8 x 3/8” pan head screw.<br />
1ft DUCT HOSE<br />
Attach the 1ft hose from the right defrost outlet to<br />
the passenger side defrost diffuser. Attach to<br />
diffusser using (1) #8 x 3/8” pan head screw.<br />
2FT DUCT HOSE<br />
13


