

1967 Chevy Sedan-Impala - Classic Auto Air
1967 Chevy Sedan-Impala - Classic Auto Air
1967 Chevy Sedan-Impala - Classic Auto Air

You also want an ePaper? Increase the reach of your titles
YUMPU automatically turns print PDFs into web optimized ePapers that Google loves.
IMPORTANT<br />
CAUTION: WATER VALVE MUST BE INSTALLED PER<br />
THE INSTRUCTIONS.<br />
<strong>Classic</strong> <strong>Auto</strong> <strong>Air</strong> has done extensive testing on the correct method to install the water valve in order to get a<br />
repeatable and progressive temperature control.<br />
Locate the bottom connection from the evaporator/heater unit off of the firewall and attach a 6” piece of<br />
5/8” dia. heater hose with the supplied hose clamp. Next attach the inlet side of the water valve using<br />
another supplied hose clamp, (make sure the arrow on the water valve points toward the engine) Attach a<br />
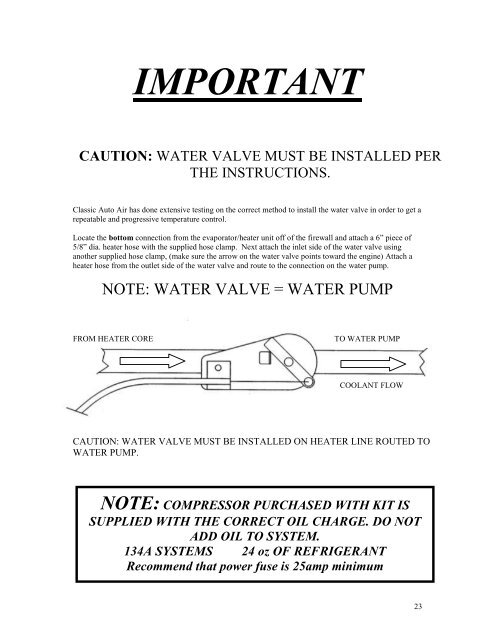
heater hose from the outlet side of the water valve and route to the connection on the water pump.<br />
NOTE: WATER VALVE = WATER PUMP<br />
FROM HEATER CORE<br />
TO WATER PUMP<br />
COOLANT FLOW<br />
CAUTION: WATER VALVE MUST BE INSTALLED ON HEATER LINE ROUTED TO<br />
WATER PUMP.<br />
NOTE: COMPRESSOR PURCHASED WITH KIT IS<br />
SUPPLIED WITH THE CORRECT OIL CHARGE. DO NOT<br />
ADD OIL TO SYSTEM.<br />
134A SYSTEMS 24 oz OF REFRIGERANT<br />
Recommend that power fuse is 25amp minimum<br />
23


