

1967 Chevy Sedan-Impala - Classic Auto Air
1967 Chevy Sedan-Impala - Classic Auto Air
1967 Chevy Sedan-Impala - Classic Auto Air

You also want an ePaper? Increase the reach of your titles
YUMPU automatically turns print PDFs into web optimized ePapers that Google loves.
Locate the Water Valve and (3) worm gear clamps.<br />
Attach the Temperature cable to the water valve using the<br />
cable clip supplied on the water valve.<br />
Supply line from the engine is attached to the left heater<br />
hookup tube. Cut 6” off end of the return line and install<br />
the water valve using (3) worn gear clamps as shown<br />
above.<br />
Note: It is recommended that you replace heater hoses<br />
from the engine to the hookup tubes.<br />
Installation of the interior components is complete. We will now install the<br />
under hood portion of the system.<br />
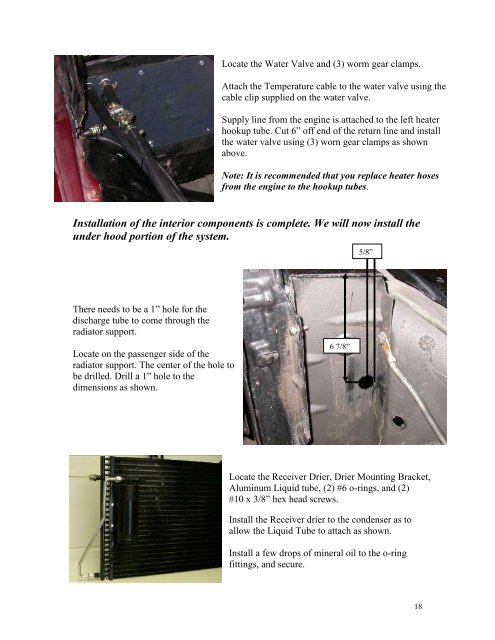
5/8”<br />
There needs to be a 1” hole for the<br />
discharge tube to come through the<br />
radiator support.<br />
Locate on the passenger side of the<br />
radiator support. The center of the hole to<br />
be drilled. Drill a 1” hole to the<br />
dimensions as shown.<br />
6 7/8”<br />
Locate the Receiver Drier, Drier Mounting Bracket,<br />
Aluminum Liquid tube, (2) #6 o-rings, and (2)<br />
#10 x 3/8” hex head screws.<br />
Install the Receiver drier to the condenser as to<br />
allow the Liquid Tube to attach as shown.<br />
Install a few drops of mineral oil to the o-ring<br />
fittings, and secure.<br />
18


