Google SketchUp Design Project: Grades 1 - 5
Google SketchUp Design Project: Grades 1 - 5
Google SketchUp Design Project: Grades 1 - 5

Create successful ePaper yourself
Turn your PDF publications into a flip-book with our unique Google optimized e-Paper software.
<strong>Google</strong> <strong>SketchUp</strong><br />
<strong>Design</strong> <strong>Project</strong>:<br />
<strong>Grades</strong> 1 - 5<br />
The first thing kids this age like to do in <strong>SketchUp</strong> is make a basic<br />
house and try out different colors and materials. They also love making<br />
windows and doors, and trying out the translucent colors. This is the<br />
perfect project to get them started using <strong>SketchUp</strong> and get their creative<br />
juices flowing - by using just a few basic tools kids can quickly design<br />
a fun, colorful house. (And it won’t take long for them to start designing<br />
much more complex ones!)<br />
If you need some basic information on downloading <strong>Google</strong> <strong>SketchUp</strong>, or about its user interface and basic tools,<br />
please see our printable “Intro to <strong>SketchUp</strong>” PDF.<br />
The PC version is at www.3dvinci.net/<strong>SketchUp</strong>_Intro_PC.pdf.<br />
The Mac version is at www.3dvinci.net/<strong>SketchUp</strong>_Intro_Mac.pdf.<br />
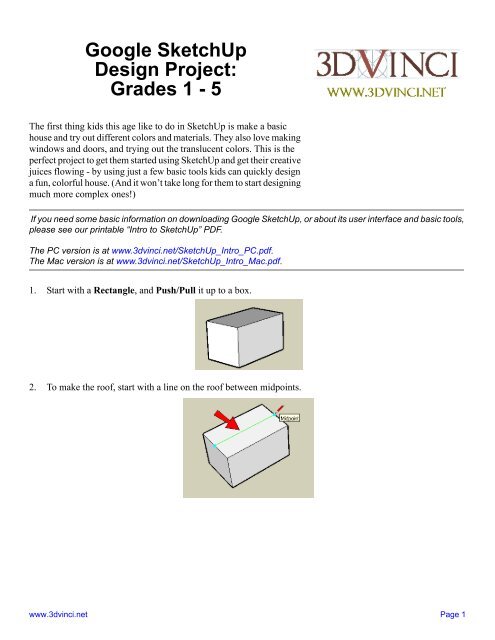
1. Start with a Rectangle, and Push/Pull it up to a box.<br />
2. To make the roof, start with a line on the roof between midpoints.<br />
www.3dvinci.net Page 1
<strong>Google</strong> <strong>SketchUp</strong> Teacher Guide <strong>Google</strong> <strong>SketchUp</strong> <strong>Design</strong> <strong>Project</strong>: <strong>Grades</strong> 1 - 5<br />
3. Use Move on this line, pulling it up (in the blue direction) to make the roof.<br />
4. Add a rectangle on the front face, to make a door.<br />
5. To make a more interesting door, add an arc at the top (use the Arc tool).<br />
www.www.3dvinci.net Page 2
<strong>Google</strong> <strong>SketchUp</strong> Teacher Guide <strong>Google</strong> <strong>SketchUp</strong> <strong>Design</strong> <strong>Project</strong>: <strong>Grades</strong> 1 - 5<br />
6. Use the Eraser tool to erase the top edge of the rectangle, so the door is one face.<br />
7. To remove the door face, right-click on it and choose Erase.<br />
Now you can see into the house.<br />
www.www.3dvinci.net Page 3
<strong>Google</strong> <strong>SketchUp</strong> Teacher Guide <strong>Google</strong> <strong>SketchUp</strong> <strong>Design</strong> <strong>Project</strong>: <strong>Grades</strong> 1 - 5<br />
8. To make a window, add a rectangle on the side.<br />
9. Of course, windows don't have to be rectangles! Use Line and make some strange shape for a window. Be sure<br />
that you see “On Face” while making lines, or the lines might end up sticking out of the house.<br />
10. Be sure to end the window shape where you started. If your lines are correct, the edges around the window<br />
will be thin.<br />
www.www.3dvinci.net Page 4
<strong>Google</strong> <strong>SketchUp</strong> Teacher Guide <strong>Google</strong> <strong>SketchUp</strong> <strong>Design</strong> <strong>Project</strong>: <strong>Grades</strong> 1 - 5<br />
11. Now we can color our house, starting with the roof. Click the Paint Bucket tool to open the Materials<br />
window (Colors on the Mac). Open the “Roofing” folder and click one of the swatches (I'm using the red<br />
metal roof).<br />
12. Then click the roof face (don't forget to paint both sides of the roof).<br />
13. For the walls, I'm using tan bricks from the “Bricks and Cladding” folder.<br />
www.www.3dvinci.net Page 5
<strong>Google</strong> <strong>SketchUp</strong> Teacher Guide <strong>Google</strong> <strong>SketchUp</strong> <strong>Design</strong> <strong>Project</strong>: <strong>Grades</strong> 1 - 5<br />
Here are the painted sides of the house:<br />
14. For the windows, you can use colors in the “Translucent” folder.<br />
15. These windows are so plain - let’s make them more interesting. Add some vertical stripes to this window:<br />
www.www.3dvinci.net Page 6
<strong>Google</strong> <strong>SketchUp</strong> Teacher Guide <strong>Google</strong> <strong>SketchUp</strong> <strong>Design</strong> <strong>Project</strong>: <strong>Grades</strong> 1 - 5<br />
16. Then paint the stripes using different translucent colors.<br />
17. If you don't want people to see straight into your house, you probably want to replace that door. Just use Line<br />
to redraw any of its edges, and the face comes back.<br />
18. To dress up the door, you can add a circle for a window. I painted my door with cherry wood from the “Wood”<br />
folder.<br />
www.www.3dvinci.net Page 7
<strong>Google</strong> <strong>SketchUp</strong> Teacher Guide <strong>Google</strong> <strong>SketchUp</strong> <strong>Design</strong> <strong>Project</strong>: <strong>Grades</strong> 1 - 5<br />
19. To personalize the house, you can add text using the 3D Text tool.<br />
3D Text requires that you enter a specific font and size, so you might have to try a few times to get the exact<br />
text you want. It also comes into the model as a component, so if you want to change it, you need to edit the<br />
component first (or explode the component).<br />
If you like this project, please check out 3DVinci's ModelMetricks Basics Series<br />
(http://www.3dvinci.net/ccp0-prodshow/MBB_PDF.html). These books will show you how to create basic objects<br />
such as houses and buildings, and provide a great introduction into groups and components.<br />
And if you want to receive three ready-to-use projects like these each month, sign up for our <strong>SketchUp</strong> <strong>Project</strong>s<br />
of the Month subscription (http://www.3dvinci.net/ccp0-prodshow/POM.html).<br />
www.www.3dvinci.net Page 8
<strong>Google</strong> <strong>SketchUp</strong> Teacher Guide <strong>Google</strong> <strong>SketchUp</strong> <strong>Design</strong> <strong>Project</strong>: <strong>Grades</strong> 1 - 5<br />
All of the models in the Teacher Guide can be downloaded from <strong>Google</strong>’s 3D Warehouse:<br />
http://sketchup.google.com/3dwarehouse.<br />
• Click this link to see the entire Warehouse collection of models used in the Teacher Guide.<br />
• Click this link to locate this exact house model in the Warehouse.<br />
If you’re reading this as a printed PDF and can’t click on the links, here’s how to find the Teacher Guide models:<br />
1. Open the 3D Warehouse.<br />
2. In the Search field, type “3dvinci teacher guide” and click Collections. Then press Enter or click the Search<br />
button.<br />
3. Open this link:<br />
4. In the collection, find the model you want, and open or download it.<br />
www.www.3dvinci.net Page 9
<strong>Google</strong> <strong>SketchUp</strong><br />
<strong>Design</strong> <strong>Project</strong>:<br />
<strong>Grades</strong> 6 - 9<br />
This age group can make relatively complex designs, so it’s important<br />
that they learn good design practices. One of the most important<br />
features of <strong>SketchUp</strong> is components, which are essential to use when<br />
you have objects that repeat. Components provide flexibility; they<br />
enable you to make quick changes to multiple objects at once, plus they<br />
keep the file size from getting out of control.<br />
If you need some basic information on downloading <strong>Google</strong> <strong>SketchUp</strong>, or about its user interface and basic tools,<br />
please see our printable “Intro to <strong>SketchUp</strong>” PDF.<br />
The PC version is at www.3dvinci.net/<strong>SketchUp</strong>_Intro_PC.pdf.<br />
The Mac version is at www.3dvinci.net/<strong>SketchUp</strong>_Intro_Mac.pdf.<br />
1. Start with a tall building, and use Arc to make a half-circle on top like this (make sure the arc is drawn in the<br />
blue direction).<br />
2. Pull the arc shape to the other side of the roof.<br />
www.3dvinci.net Page 10
<strong>Google</strong> <strong>SketchUp</strong> Teacher Guide <strong>Google</strong> <strong>SketchUp</strong> <strong>Design</strong> <strong>Project</strong>: <strong>Grades</strong> 6 - 9<br />
3. Then use Move on this edge, to make two sections of the tall wall. The lower half is vertical, the upper half<br />
is slightly sloped.<br />
4. Paint the faces, and draw two concentric circles in this corner, to make the first window. (Remember to click<br />
the Paint Bucket tool to get the available colors and materials. Glass material is found in the folder called<br />
“Translucent.)<br />
This window needs to be made into a component since we’ll use it repeatedly. As a component, the window<br />
will be much easier to select - it acts as one object. (Components also have the advantage of being “unsticky”<br />
- it’s much easier to move and rotate components without affecting objects they touch.)<br />
www.3dvinci.net Page 11
<strong>Google</strong> <strong>SketchUp</strong> Teacher Guide <strong>Google</strong> <strong>SketchUp</strong> <strong>Design</strong> <strong>Project</strong>: <strong>Grades</strong> 6 - 9<br />
5. Select both faces of this window, and right-click on either of the faces. Choose Make Component.<br />
6. Give the component any name you want. Since it’s a window, you want it to Cut opening, and also check<br />
Replace selection with component.<br />
7. To add more windows, use the Move tool and press Ctrl / Option. After you place the first copy, type “3x” to<br />
make three copies. You can keep entering different numbers to get more or fewer windows. If you enter a<br />
value without the “x” you can change the spacing, which is also useful!<br />
www.3dvinci.net Page 12
<strong>Google</strong> <strong>SketchUp</strong> Teacher Guide <strong>Google</strong> <strong>SketchUp</strong> <strong>Design</strong> <strong>Project</strong>: <strong>Grades</strong> 6 - 9<br />
8. To make more rows in this wall, do the same thing: Select all of the windows in the first row, and make two<br />
or more copies of them, straight up.<br />
9. Copy some or all of the windows up to the sloped face. Even though the original windows make cutouts on<br />
the vertical wall, the new windows also cut the sloped wall.<br />
www.3dvinci.net Page 13
<strong>Google</strong> <strong>SketchUp</strong> Teacher Guide <strong>Google</strong> <strong>SketchUp</strong> <strong>Design</strong> <strong>Project</strong>: <strong>Grades</strong> 6 - 9<br />
10. Another way to bring in a component is from the Components window (Window / Components). Click the<br />
house icon to see what’s in your model so far. Click the thumbnail of the window, which is then attached to<br />
your cursor.<br />
11. Place the window on this wall - it also cuts this face.<br />
www.3dvinci.net Page 14
<strong>Google</strong> <strong>SketchUp</strong> Teacher Guide <strong>Google</strong> <strong>SketchUp</strong> <strong>Design</strong> <strong>Project</strong>: <strong>Grades</strong> 6 - 9<br />
12. Here’s another way to make copies. Copy that window you just added to the top, and place the copy at the<br />
bottom, near the front.<br />
13. Enter “6/” (with a slash symbol), and you get seven copies including the first and last windows.<br />
www.3dvinci.net Page 15
<strong>Google</strong> <strong>SketchUp</strong> Teacher Guide <strong>Google</strong> <strong>SketchUp</strong> <strong>Design</strong> <strong>Project</strong>: <strong>Grades</strong> 6 - 9<br />
14. Here’s the great feature of components: you change one, and you change them all. But you need to “open” a<br />
component before you can make any changes to it. The easiest way to edit a component is to activate Select<br />
and double-click it. Do this for any window - they’re all the same. You’ll see the one you’re editing outlined<br />
in a dashed box, and everything else is faded.<br />
15. Use Push/Pull to make the outer circle into a window frame, and add some more colors.<br />
16. When you’re done, close the component by activating Select and clicking outside the component.<br />
www.3dvinci.net Page 16
<strong>Google</strong> <strong>SketchUp</strong> Teacher Guide <strong>Google</strong> <strong>SketchUp</strong> <strong>Design</strong> <strong>Project</strong>: <strong>Grades</strong> 6 - 9<br />
17. What if you want some of the windows to be different? For instance, I want all the windows on the sloped face<br />
to have a shade cover. Select the components you want to make different (all the ones on the sloped face), and<br />
right-click on one of them. Choose Make Unique.<br />
18. Now edit one of the “unique” windows. For my cover, I added two lines to the front face, and colored the top<br />
part the same as I painted the roof.<br />
19. To make the cover, use Push/Pull but press the Ctrl / Option key. This way you’ll be adding a new part,<br />
instead of pulling out an existing face.<br />
www.3dvinci.net Page 17
<strong>Google</strong> <strong>SketchUp</strong> Teacher Guide <strong>Google</strong> <strong>SketchUp</strong> <strong>Design</strong> <strong>Project</strong>: <strong>Grades</strong> 6 - 9<br />
When you’re done, you should have something like this:<br />
If you like this project, please check out 3DVinci's ModelMetricks Intermediate Series<br />
(http://www.3dvinci.net/ccp0-prodshow/MIB_PDF.html). For this age group, once students have the basic tools<br />
mastered, they can enjoy projects like puzzles, 3D Text, working with digital images, and integrating models into<br />
<strong>Google</strong> Earth.<br />
And if you want to receive three ready-to-use projects like these each month, sign up for our <strong>SketchUp</strong> <strong>Project</strong>s<br />
of the Month subscription (http://www.3dvinci.net/ccp0-prodshow/POM.html).<br />
www.3dvinci.net Page 18
<strong>Google</strong> <strong>SketchUp</strong> Teacher Guide <strong>Google</strong> <strong>SketchUp</strong> <strong>Design</strong> <strong>Project</strong>: <strong>Grades</strong> 6 - 9<br />
All of the models in the Teacher Guide can be downloaded from <strong>Google</strong>’s 3D Warehouse:<br />
http://sketchup.google.com/3dwarehouse.<br />
• Click this link to see the entire Warehouse collection of models used in the Teacher Guide.<br />
• Click this link to locate this exact tower model in the Warehouse.<br />
If you’re reading this as a printed PDF and can’t click on the links, here’s how to find the Teacher Guide models:<br />
1. Open the 3D Warehouse.<br />
2. In the Search field, type “3dvinci teacher guide” and click Collections. Then press Enter or click the Search<br />
button.<br />
3. Open this link:<br />
4. In the collection, find the model you want, and open or download it.<br />
www.3dvinci.net Page 19
<strong>Google</strong> <strong>SketchUp</strong><br />
<strong>Design</strong> <strong>Project</strong>:<br />
<strong>Grades</strong> 10 - 12<br />
This advanced design project uses many of <strong>SketchUp</strong>’s drawing tools,<br />
and involves paying some attention to the exact sizes of what you’re<br />
drawing. You’ll also make good use of components. The final result: a<br />
dream bedroom, complete with furniture and a swimming pool.<br />
Once you understand how this room is built and furnished, the concept<br />
can be applied to anything - a dream classroom, dream rec room, dream<br />
bathroom, dream gym, etc. It’s a very fun project; kids really get to<br />
exercise their creativity designing and furnishing spaces they’d like to<br />
live in!<br />
If you need some basic information on downloading <strong>Google</strong> <strong>SketchUp</strong>, or about its user interface and basic tools,<br />
please see our printable “Intro to <strong>SketchUp</strong>” PDF.<br />
The PC version is at www.3dvinci.net/<strong>SketchUp</strong>_Intro_PC.pdf.<br />
The Mac version is at www.3dvinci.net/<strong>SketchUp</strong>_Intro_Mac.pdf.<br />
1. This bedroom will be pretty big, so leave the person in the file as a basis for size. Make a rectangle for the<br />
basic room shape, but don’t click to finish it yet.<br />
2. Many of <strong>SketchUp</strong>’s tools can use exact numbers. While you’re using the Rectangle tool, look at the<br />
Dimensions box below the <strong>SketchUp</strong> window. You’ll see the length and width of the rectangle change while<br />
you move the mouse. Make this rectangle about 30 feet wide and 40 feet long. (If you want the numbers to be<br />
exact, you can type them in and press Enter. Be sure to include the apostrophe foot symbol, and separate the<br />
two numbers with a comma.)<br />
www.3dvinci.net Page 20
<strong>Google</strong> <strong>SketchUp</strong> Teacher Guide <strong>Google</strong> <strong>SketchUp</strong> <strong>Design</strong> <strong>Project</strong>: <strong>Grades</strong> 10 - 12<br />
3. The bedroom will be a loft (it has two levels), so pull the rectangle up about 20 feet. Erase edges so that the<br />
ceiling and two walls disappear, enabling you to see inside.<br />
4. About half of the lower level will be filled with a swimming pool (because no bedroom is complete without<br />
one). Use Rectangle to make the shape. To make the outline, you can make another rectangle, or use the<br />
Offset tool.<br />
www.3dvinci.net Page 21
<strong>Google</strong> <strong>SketchUp</strong> Teacher Guide <strong>Google</strong> <strong>SketchUp</strong> <strong>Design</strong> <strong>Project</strong>: <strong>Grades</strong> 10 - 12<br />
5. Pull up the pool walls, and pull up the floor to make the water line. When you use Push/Pull for this, keep the<br />
Ctrl / Option key pressed. This means that the bedroom floor will stay intact, instead of being “sucked up”<br />
with the pool objects. (Try it first without the Ctrl / Option key to see the difference). If the water doesn’t seem<br />
deep enough, pull the bedroom floor down (without the Ctrl / Option key).<br />
Yes, it looks weird to have a pool sticking out below the floor. But at the end, you can place a large square of<br />
grass or concrete around the room, which will hide the bottom of the pool.<br />
6. There is a “Water” folder for materials, which contains one translucent water material. Use this for the face<br />
of the water line, and you can see through to the bottom of the pool.<br />
www.3dvinci.net Page 22
<strong>Google</strong> <strong>SketchUp</strong> Teacher Guide <strong>Google</strong> <strong>SketchUp</strong> <strong>Design</strong> <strong>Project</strong>: <strong>Grades</strong> 10 - 12<br />
7. Now we can make the loft floor. It will be a simple rectangle which extends as far as the pool below. Start with<br />
a line along one wall like this:<br />
8. Make the floor long enough to hang a little over the pool (Line 2). When you make Line 3, start drawing in<br />
the direction you want the line to go (green, in my example). Press Shift to “lock” the direction, and click the<br />
first point of Line 1. This sets the exact length of Line 3.<br />
9. Complete the last line to finish the loft floor.<br />
www.3dvinci.net Page 23
<strong>Google</strong> <strong>SketchUp</strong> Teacher Guide <strong>Google</strong> <strong>SketchUp</strong> <strong>Design</strong> <strong>Project</strong>: <strong>Grades</strong> 10 - 12<br />
10. Now we need steps to get up to the loft. Steps are MUCH easier when you use components. Start with a small<br />
rectangle along the wall, for the first step. (If you’re using exact numbers, it should be about 12” x 2”.)<br />
11. Select this small face plus its edges and make it a component.<br />
www.3dvinci.net Page 24
<strong>Google</strong> <strong>SketchUp</strong> Teacher Guide <strong>Google</strong> <strong>SketchUp</strong> <strong>Design</strong> <strong>Project</strong>: <strong>Grades</strong> 10 - 12<br />
12. Edit the component, and pull the step out about 4 feet.<br />
13. Close the component, and then make one copy at the top of the loft floor.<br />
14. To make all the steps in between, enter “9/” or whatever number works for you.<br />
www.3dvinci.net Page 25
<strong>Google</strong> <strong>SketchUp</strong> Teacher Guide <strong>Google</strong> <strong>SketchUp</strong> <strong>Design</strong> <strong>Project</strong>: <strong>Grades</strong> 10 - 12<br />
15. Components are also great for making railings. Edit any step, and draw a vertical (blue) line in the lower<br />
corner, about 3 feet high.<br />
16. Then add a line connecting one vertical line to the next.<br />
www.3dvinci.net Page 26
<strong>Google</strong> <strong>SketchUp</strong> Teacher Guide <strong>Google</strong> <strong>SketchUp</strong> <strong>Design</strong> <strong>Project</strong>: <strong>Grades</strong> 10 - 12<br />
17. At the base of the vertical line, make a small circle.<br />
18. Select both of the lines you made before.<br />
www.3dvinci.net Page 27
<strong>Google</strong> <strong>SketchUp</strong> Teacher Guide <strong>Google</strong> <strong>SketchUp</strong> <strong>Design</strong> <strong>Project</strong>: <strong>Grades</strong> 10 - 12<br />
19. Activate Follow Me (Tools / Follow Me) and click the circle. The circle is pushed along the vertical and<br />
diagonal lines, creating a railing at every step.<br />
20. We want to go up the steps without hitting our heads on the floor above, so cut a hole out of the loft floor.<br />
www.3dvinci.net Page 28
<strong>Google</strong> <strong>SketchUp</strong> Teacher Guide <strong>Google</strong> <strong>SketchUp</strong> <strong>Design</strong> <strong>Project</strong>: <strong>Grades</strong> 10 - 12<br />
21. If you’re too lazy to go down the steps to take a dip, you’ll want a diving board on the loft level. Make a block<br />
like this (remember to press Ctrl / Option when you use Push/Pull) and paint the top the color you want to use<br />
for the board.<br />
22. Start the board by pulling up a little like this (with Ctrl / Option):<br />
www.3dvinci.net Page 29
<strong>Google</strong> <strong>SketchUp</strong> Teacher Guide <strong>Google</strong> <strong>SketchUp</strong> <strong>Design</strong> <strong>Project</strong>: <strong>Grades</strong> 10 - 12<br />
23. And pull the board out, making sure it hangs over the pool.<br />
24. If you don’t want to roll out of bed and fall into the pool, use components and Follow Me to make a railing.<br />
www.3dvinci.net Page 30
<strong>Google</strong> <strong>SketchUp</strong> Teacher Guide <strong>Google</strong> <strong>SketchUp</strong> <strong>Design</strong> <strong>Project</strong>: <strong>Grades</strong> 10 - 12<br />
25. For the rest of the furniture, we’ll use some models provided by <strong>Google</strong>. In the Components window, click the<br />
drop-down arrow next to the house icon, and choose Architecture.<br />
26. The “Architecture” collection contains other collections of objects like windows, plumbing, lighting, and<br />
games. Clicking the thumbnail of a collection will open the collection within the Components window.<br />
Clicking the collection name will open the collection in your Internet browser. When you open a collection<br />
and find a model you want to bring into your room, click the model’s thumbnail, and the model can be dragged<br />
right into the model.<br />
The collections you open this way contain basic, generic, models that have the correct dimensions and are<br />
modeled properly. To find other models, you can use the Search field in the Components window. But keep<br />
in mind that some models in the 3D Warehouse don’t have the correct scale, and the quality is not guaranteed.<br />
www.3dvinci.net Page 31
<strong>Google</strong> <strong>SketchUp</strong> Teacher Guide <strong>Google</strong> <strong>SketchUp</strong> <strong>Design</strong> <strong>Project</strong>: <strong>Grades</strong> 10 - 12<br />
27. Fill both levels of the bedroom however you want. For example, the “Architecture” collection contains<br />
collections for beds and dressers.<br />
28. If you want to change any of these components, just edit them. For example, I changed the colors of the bed<br />
and tables.<br />
www.3dvinci.net Page 32
<strong>Google</strong> <strong>SketchUp</strong> Teacher Guide <strong>Google</strong> <strong>SketchUp</strong> <strong>Design</strong> <strong>Project</strong>: <strong>Grades</strong> 10 - 12<br />
29. When you drag in a component from the Components window, the active tool is Move so that you can place<br />
the component and slide it around. If you place your cursor over one of the red “plus” signs, you can also<br />
Rotate your component, like the dresser below:<br />
This is how my bedroom furniture looks:<br />
www.3dvinci.net Page 33
<strong>Google</strong> <strong>SketchUp</strong> Teacher Guide <strong>Google</strong> <strong>SketchUp</strong> <strong>Design</strong> <strong>Project</strong>: <strong>Grades</strong> 10 - 12<br />
30. Here’s what I put downstairs, including a fridge from the “Appliances” collection, a flat-screen TV from<br />
“Electronics,” and a pool table from “Games.”<br />
31. And don’t forget steps to get up to the pool.<br />
www.3dvinci.net Page 34
<strong>Google</strong> <strong>SketchUp</strong> Teacher Guide <strong>Google</strong> <strong>SketchUp</strong> <strong>Design</strong> <strong>Project</strong>: <strong>Grades</strong> 10 - 12<br />
32. Finish up by adding some windows.<br />
33. If you want to hide the bottom of the pool, add a large patch of grass on the ground (the material is in the<br />
“Vegetation” folder.<br />
www.3dvinci.net Page 35