Replacing the 1231 Probe Filters.pdf - Novatech Controls
Replacing the 1231 Probe Filters.pdf - Novatech Controls
Replacing the 1231 Probe Filters.pdf - Novatech Controls

Create successful ePaper yourself
Turn your PDF publications into a flip-book with our unique Google optimized e-Paper software.
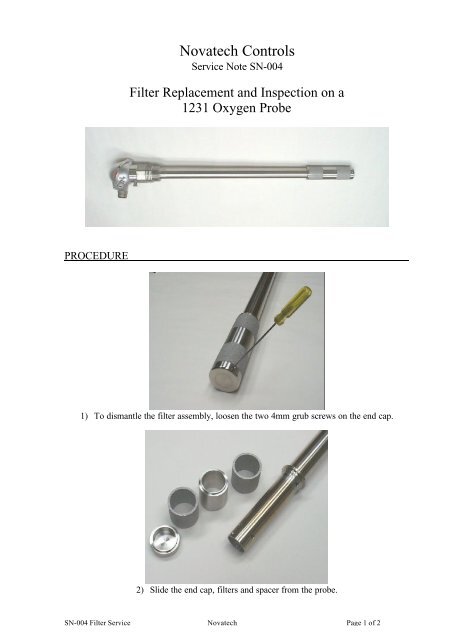
<strong>Novatech</strong> <strong>Controls</strong><br />
Service Note SN-004<br />
Filter Replacement and Inspection on a<br />
<strong>1231</strong> Oxygen <strong>Probe</strong><br />
PROCEDURE<br />
1) To dismantle <strong>the</strong> filter assembly, loosen <strong>the</strong> two 4mm grub screws on <strong>the</strong> end cap.<br />
2) Slide <strong>the</strong> end cap, filters and spacer from <strong>the</strong> probe.<br />
SN-004 Filter Service <strong>Novatech</strong> Page 1 of 2
3) Use clean compressed air to dislodge any particulate that may have accumulated inside <strong>the</strong><br />
filter assembly. If particulate build up is excessive <strong>the</strong>n consider using <strong>the</strong> 15 micron<br />
filters. The finer filters will considerably dampen <strong>the</strong> response time of <strong>the</strong> probe.<br />
4) Clean <strong>the</strong> steel surfaces of <strong>the</strong> filter retainer, spacer and filter collar, especially where <strong>the</strong><br />
filters make contact with <strong>the</strong> retainer, spacer and collar.<br />
5) Reassemble <strong>the</strong> filter assembly. The grub screws on <strong>the</strong> filter retainer should engage <strong>the</strong><br />
grub screw locking holes at <strong>the</strong> end of <strong>the</strong> outer sheath.<br />
SN-004 Filter Service <strong>Novatech</strong> Page 2 of 2