Gas Calibration Check for a 1231 Oxygen Probe.pdf
Gas Calibration Check for a 1231 Oxygen Probe.pdf
Gas Calibration Check for a 1231 Oxygen Probe.pdf

You also want an ePaper? Increase the reach of your titles
YUMPU automatically turns print PDFs into web optimized ePapers that Google loves.
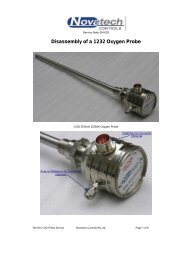
<strong>Gas</strong> <strong>Calibration</strong> <strong>Check</strong> <strong>for</strong> a Model <strong>1231</strong><br />
Heated <strong>Oxygen</strong> <strong>Probe</strong><br />
Background<br />
The sensor that is used in all Novatech probes is extremely predictable, stable and reliable.<br />
For this reason, the calibration of a Novatech oxygen system does not require the use of<br />
calibration gases.<br />
However, all Novatech oxygen probes have a built in gas connection that does allow the<br />
accuracy of the probe to be checked. This technical note describes the way to do this, and<br />
gives some typical results.<br />
Dust filter<br />
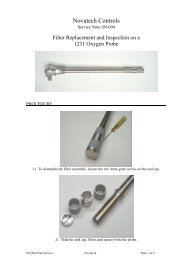
The <strong>1231</strong> oxygen probe can be supplied with or without a sintered dust filters. The filter not<br />
only stops dust build up in the probe when the probe is used in dusty processes, but also<br />
provides a partial gas barrier when a gas calibration check is being per<strong>for</strong>med. This allows<br />
the process gas to be more easily kept away from the oxygen sensor during the gas<br />
calibration checking procedure.<br />
Equipment required<br />
Certified gas supply bottle (generally between 2 and 8% oxygen in nitrogen)<br />
Pressure regulator<br />
Needle valve<br />
Flow meter (0.5 to 5 l/m)<br />
The procedure<br />
<strong>Gas</strong> calibration check while the probe is in the process<br />
Setting the probe offset<br />
1. Make sure that the reference air supply is connected to the probe and is operating<br />
normally (≈50 cc/m)<br />
2. Set the “Damping Factor” on the analyser to 0 or “No Damping”<br />
3. Set the lower line display to be showing the probe EMF (mV) and probe Impedance in<br />
Set-up step 33<br />
4. Note the mV reading on the analyser<br />
5. Connect a supply of clean fresh air** to the “CAL” port of the probe from the regulator,<br />
needle valve and flow meter<br />
6. Adjust the needle valve until about 0.5 l/m is flowing into the probe. If the connecting<br />
pipe is less than 5m, the mV reading should move towards 0mV within 5 seconds,<br />
and stabilise within 10 to 15 seconds. Note the mV reading.<br />
7. As soon as the reading is stable and noted, change the flow rate to 1 l/m<br />
8. Wait <strong>for</strong> a stable reading, and note the mV reading<br />
9. Repeat this <strong>for</strong> flow rates of 2, 3, 4 and 5 l/m and then close the needle valve<br />
10. <strong>Check</strong> the results, and pick the average mV reading, disregarding sudden variations<br />
at low and high flow levels
11. Enter this reading into the “<strong>Probe</strong> Offset” of the analyser<br />
** If the air is from an instrument air supply or a gas bottle (compressed supply), add 0.4mV to<br />
the reading be<strong>for</strong>e entering it into “<strong>Probe</strong> Offset”. This will compensate <strong>for</strong> the ambient<br />
humidity in the atmosphere.<br />
If a diaphragm or aquarium pump is used to supply the CAL port, enter the mV reading as<br />
read from the lower line of the analyser. The analyser monitors and compensates <strong>for</strong> the<br />
ambient relative humidity.<br />
Certified calibration gas check<br />
12. Disconnect the air supply and connect the gas supply to the “CAL” port of the probe<br />
through the gas regulator, needle valve and the flow meter<br />
13. Close the needle valve and set the gas regulator to about 50 kPa<br />
14. Turn on the needle valve until about 0.5 l/m is flowing into the probe. The oxygen<br />
reading should move towards the certified oxygen concentration within
What to do if the oxygen reading does not match the certified<br />
gas %<br />
<strong>Check</strong> the setting of the reference voltages in the analyser<br />
<strong>Check</strong> that the calibration gas pipe work connections are not leaking<br />
Confirm that the readings were taken within 1 minute, especially at high flow rates<br />
Confirm the accuracy of the gas bottle<br />
READING LOW<br />
If the probe appears to be reading low this can be caused by a build up of hydrocarbons at<br />
the sensor running at 720°C and consuming the oxygen that should be measured due to<br />
combustion. A solution to this is to pump air into the calibration port to accelerate the burning<br />
process to consume and eliminate the hydrocarbons.<br />
Having an excessive flow of reference air can also cause a low reading; this causes a cooling<br />
affect on the zirconia sensor. Reference airflow should be approximately 50cc/min.<br />
READING HIGH<br />
If the probe appears to be reading high then the reference air should be checked, remove the<br />
cap on the probe and pull the hypodermic from the four bore insulator, place the hypodermic<br />
in a glass of water to observe air flow.<br />
If the process operates under a negative pressure then check that the 1/8-inch plug screwed<br />
into the calibration port on the probe is not leaking.<br />
If the problem persists then replace or return the probe to Novatech.