MaxLoad 3.6 Release Feature Summary - TOPS - Packaging Software
MaxLoad 3.6 Release Feature Summary - TOPS - Packaging Software
MaxLoad 3.6 Release Feature Summary - TOPS - Packaging Software

Create successful ePaper yourself
Turn your PDF publications into a flip-book with our unique Google optimized e-Paper software.
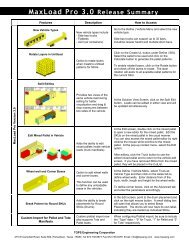
<strong>MaxLoad</strong> Pro <strong>3.6</strong> <strong>Release</strong> <strong>Summary</strong> Page | 1<br />
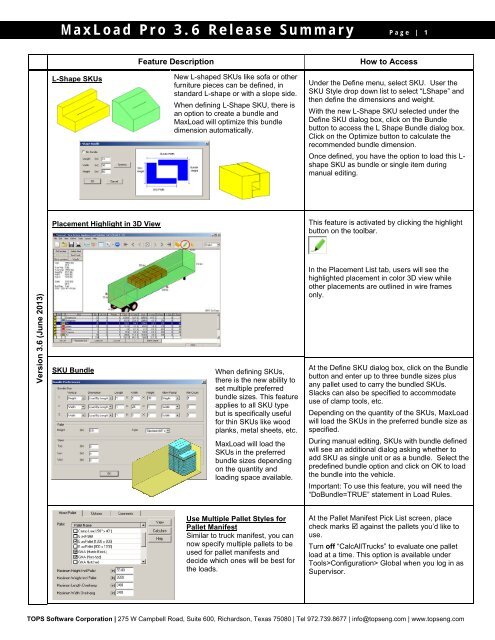
L-Shape SKUs<br />
<strong>Feature</strong> Description<br />
New L-shaped SKUs like sofa or other<br />
furniture pieces can be defined, in<br />
standard L-shape or with a slope side.<br />
When defining L-Shape SKU, there is<br />
an option to create a bundle and<br />
<strong>MaxLoad</strong> will optimize this bundle<br />
dimension automatically.<br />
How to Access<br />
Under the Define menu, select SKU. User the<br />
SKU Style drop down list to select “LShape” and<br />
then define the dimensions and weight.<br />
With the new L-Shape SKU selected under the<br />
Define SKU dialog box, click on the Bundle<br />
button to access the L Shape Bundle dialog box.<br />
Click on the Optimize button to calculate the<br />
recommended bundle dimension.<br />
Once defined, you have the option to load this L-<br />
shape SKU as bundle or single item during<br />
manual editing.<br />
Placement Highlight in 3D View<br />
This feature is activated by clicking the highlight<br />
button on the toolbar.<br />
Version <strong>3.6</strong> (June 2013)<br />
SKU Bundle<br />
When defining SKUs,<br />
there is the new ability to<br />
set multiple preferred<br />
bundle sizes. This feature<br />
applies to all SKU type<br />
but is specifically useful<br />
for thin SKUs like wood<br />
planks, metal sheets, etc.<br />
<strong>MaxLoad</strong> will load the<br />
SKUs in the preferred<br />
bundle sizes depending<br />
on the quantity and<br />
loading space available.<br />
In the Placement List tab, users will see the<br />
highlighted placement in color 3D view while<br />
other placements are outlined in wire frames<br />
only.<br />
At the Define SKU dialog box, click on the Bundle<br />
button and enter up to three bundle sizes plus<br />
any pallet used to carry the bundled SKUs.<br />
Slacks can also be specified to accommodate<br />
use of clamp tools, etc.<br />
Depending on the quantity of the SKUs, <strong>MaxLoad</strong><br />
will load the SKUs in the preferred bundle size as<br />
specified.<br />
During manual editing, SKUs with bundle defined<br />
will see an additional dialog asking whether to<br />
add SKU as single unit or as a bundle. Select the<br />
predefined bundle option and click on OK to load<br />
the bundle into the vehicle.<br />
Important: To use this feature, you will need the<br />
“DoBundle=TRUE” statement in Load Rules.<br />
Use Multiple Pallet Styles for<br />
Pallet Manifest<br />
Similar to truck manifest, you can<br />
now specify multiple pallets to be<br />
used for pallet manifests and<br />
decide which ones will be best for<br />
the loads.<br />
At the Pallet Manifest Pick List screen, place<br />
check marks against the pallets you’d like to<br />
use.<br />
Turn off “CalcAllTrucks” to evaluate one pallet<br />
load at a time. This option is available under<br />
Tools>Configuration> Global when you log in as<br />
Supervisor.<br />
<strong>TOPS</strong> <strong>Software</strong> Corporation | 275 W Campbell Road, Suite 600, Richardson, Texas 75080 | Tel 972.739.8677 | info@topseng.com | www.topseng.com
<strong>MaxLoad</strong> Pro <strong>3.6</strong> <strong>Release</strong> <strong>Summary</strong> Page | 2<br />
Support Priorities within Stops<br />
<strong>Feature</strong> Description<br />
Allow Multiple Pallet Styles in<br />
Truck Manifest<br />
When placing SKUs on mixed<br />
pallets in a truck manifest,<br />
multiple pallet styles can be<br />
specified.<br />
The preferred pallet style to be<br />
used is determined by the<br />
“Loading Priority” in the Pallet<br />
Definition setup screen.<br />
Air Bag / Dunnage<br />
When enabled, this option highlights<br />
spaces in between SKU placements<br />
meeting the specified criteria.<br />
How to Access<br />
Go to the Mixed Pallet tab in the truck manifest<br />
picklist screen and place check marks against<br />
the pallets you’d like to use. Before calculation,<br />
make sure to tell <strong>MaxLoad</strong> the preferred pallet<br />
style to use.<br />
Go to Define>Pallet to set the Loading Priority for<br />
the pallet style. <strong>MaxLoad</strong> will use the style with a<br />
higher priority unless the SKU cannot fit on the<br />
preferred pallet.<br />
Add both stop off and priority to the manifest list<br />
and in the options tab, make sure to enable “Stop<br />
& Priority”.<br />
<strong>MaxLoad</strong> will load according to priorities for each<br />
stop.<br />
Note: When Stop & Priority is enabled, you can<br />
use the Maximum Priority Overlap to control the<br />
overlap between the stop offs.<br />
At the Solutions view, click on the Air Bag /<br />
Dunnage tab at the bottom. Enter the minimum<br />
dimensions in the pop-up dialog box for <strong>MaxLoad</strong><br />
to highlight the available space among<br />
placements.<br />
The space will be highlighted in the 3D graphics<br />
view with dimensions and locations provided in<br />
the table. Use this information to determine if<br />
dunnage materials will be needed to protect and<br />
secure the load during transport.<br />
Color Stop Off Report<br />
SKUs within the same stop will share<br />
the same color in the Load Manifest.<br />
The <strong>Summary</strong> report will list SKUs by<br />
stops.<br />
To view reports, go to File and select Multi<br />
Preview. Click against the reports you’d like to<br />
view and print.<br />
To view individual report, go to File and select<br />
Print Preview.<br />
Select “<strong>Summary</strong>” for the report which list SKUs<br />
per stop off.<br />
Adjust Weight Distribution<br />
At the Solution View screen, click on the Weight<br />
button to open a side view of the vehicle load.<br />
Use the move buttons ( || ) to move<br />
the entire load towards front or back of the truck.<br />
The weight at King Pin and Trailer Axle will be<br />
adjusted accordingly.<br />
<strong>TOPS</strong> <strong>Software</strong> Corporation | 275 W Campbell Road, Suite 600, Richardson, Texas 75080 | Tel 972.739.8677 | info@topseng.com | www.topseng.com
<strong>MaxLoad</strong> Pro <strong>3.6</strong> <strong>Release</strong> <strong>Summary</strong> Page | 3<br />
<strong>Feature</strong> Description<br />
Weight Limit<br />
With Weight Limit defined, <strong>MaxLoad</strong><br />
will try to load the order within these<br />
limits. Violations will be highlighted in<br />
red so users can edit the load<br />
manually to comply with weight<br />
restrictions.<br />
COG Deviation – not implemented.<br />
How to Access<br />
Go to the new Weight tab and specify “Weight<br />
Limit”. Select the Region from the drop down list<br />
for predefined weight limits for the region.<br />
To define weight limits for each region, e.g. state,<br />
click on the Edit Regions button. At the Region<br />
dialog, click on New, enter the name of the<br />
region, enter the corresponding weight limits and<br />
click on Save. Click on the Close button to return<br />
to the Manifest Pick List screen.<br />
Custom Reports and New Reports<br />
The custom report allows users to specify the data to be included in the<br />
graphical load report and load summaries.<br />
Go to Print Preview and then Customized<br />
Reports. Select Graphical Report or <strong>Summary</strong><br />
Report to specify the data to be included.<br />
Data specified in the Graphical report will appear<br />
in the Manifest report while data specified in the<br />
<strong>Summary</strong> Report can be added to the Load List<br />
or Placement List.<br />
New reports including Load by Layer (for pallet<br />
manifest only), Load by Placement Edge and<br />
customized load summary and graphics reports.<br />
More Powerful Load Rules<br />
To optimize specific loads, you can<br />
use special load rules in <strong>MaxLoad</strong>.<br />
For example, these rules can specify<br />
use of location codes, to allow SKU<br />
overhang or use bridged space,<br />
using bundles, minimize end gap for<br />
the container and much more.<br />
You can set different load rules for<br />
different scenarios or customers to<br />
optimize their loading needs.<br />
Click the Algorithms button under the Options tab<br />
to access the Algorithm Options dialog. Select<br />
from the drop list the predefined set of Loading<br />
rules to use.<br />
For more information on load rule settings and<br />
how to define them, please contact <strong>TOPS</strong> Help<br />
Desk.<br />
Easier Way to Add, Update and Edit SKUs<br />
Above the SKU List is a new input area to easily add or update SKUs to the<br />
Manifest List. You can also quickly access SKU edit screen without going<br />
through the Define menu.<br />
Type in the SKU name or select it from the SKU<br />
list, enter quantity and other information, then<br />
click the Add button to add the SKU to the<br />
manifest.<br />
You can now access the Define SKU dialog box<br />
via the right click menu from the SKU List as well<br />
as from the Edit button in the Properties dialog at<br />
the 3D Solution view (right click the SKU and<br />
select Properties).<br />
<strong>TOPS</strong> <strong>Software</strong> Corporation | 275 W Campbell Road, Suite 600, Richardson, Texas 75080 | Tel 972.739.8677 | info@topseng.com | www.topseng.com
<strong>MaxLoad</strong> Pro <strong>3.6</strong> <strong>Release</strong> <strong>Summary</strong> Page | 4<br />
<strong>Feature</strong> Description<br />
Advanced Data Filter<br />
A new file filter allows users to view a<br />
list of manifests meeting specified<br />
criteria: manifest name, user name,<br />
customer name and manifest dates.<br />
How to Access<br />
At the File Open dialog, click on the Filter button<br />
to access the Options dialog box. Check against<br />
the filter options (Manifest, User, Customer, Date)<br />
available and enter the data in the relevant fields.<br />
For Name (manifest) and Customer, you can<br />
enter partial names. For User, click the drop<br />
down arrow and select from the list.<br />
Export Load Diagram<br />
Export the 3D load diagram<br />
to a graphics file.<br />
At the Solution View or Edit screen, point to the<br />
load and click the right mouse button. Select<br />
Export and then the file format.<br />
You will be prompted for a location to save the<br />
file.<br />
<strong>TOPS</strong> <strong>Software</strong> Corporation | 275 W Campbell Road, Suite 600, Richardson, Texas 75080 | Tel 972.739.8677 | info@topseng.com | www.topseng.com