TOPSePAC User's Guide - TOPS - Packaging Software
TOPSePAC User's Guide - TOPS - Packaging Software
TOPSePAC User's Guide - TOPS - Packaging Software

Create successful ePaper yourself
Turn your PDF publications into a flip-book with our unique Google optimized e-Paper software.
<strong><strong>TOPS</strong>ePAC</strong>User’s <strong>Guide</strong>Web-based Package Design & Palletizatin<strong>TOPS</strong> Engineering Corporation TEL: 972-739-8677275 W. Campbell Road, Suite 600 FAX: 972-739-9478Richardson, Texas 75080 USAinfo@topseng.comTech Support: tech@topseng.comWeb Site: www.topseng.com
Table of ContentsSection I: Introduction to <strong><strong>TOPS</strong>ePAC</strong> .............................................................................1General Information.....................................................................................................1Login................................................................................................................................2Control Panel ...................................................................................................................2Create a New Design Sequence .......................................................................................3Section II – Using <strong><strong>TOPS</strong>ePAC</strong> ..........................................................................................4Example 1: Case Sizing Optimization .............................................................................4Sequence Selection ......................................................................................................4Bottle Definition ..........................................................................................................4Shipcase Definition......................................................................................................5Adding Dividers (optional)..........................................................................................6Analysis View..................................................................................................................7Solution View Pane .........................................................................................................7Solution List Pane............................................................................................................7Example 2: Shipcase onto Pallet......................................................................................9Sequence Selection ......................................................................................................9Shipcase Definition......................................................................................................9Unitload Definition ....................................................................................................10Analysis View................................................................................................................11Solution View Pane .......................................................................................................12Solution List Pane..........................................................................................................12Example 3: Bottles to Shrink Wrap to Pallet.................................................................13Sequence Selection ....................................................................................................13Can Definition............................................................................................................13Shipcase Definition....................................................................................................14Unitload Definition ....................................................................................................15Analysis View................................................................................................................16Saving the Solution........................................................................................................17Generating Reports ........................................................................................................18Printing Reports .........................................................................................................19Section III: <strong><strong>TOPS</strong>ePAC</strong> Menu Functions ......................................................................20File Menu.......................................................................................................................20New............................................................................................................................20Open...........................................................................................................................20Save............................................................................................................................21Save As ......................................................................................................................21Print Preview..............................................................................................................21Edit Menu ......................................................................................................................21Sequence Design........................................................................................................21(Primary Pack) Parameters ........................................................................................21
Shipcase Parameters ..................................................................................................25Unitload Parameters...................................................................................................27Layer Parameters .......................................................................................................28View Menu.....................................................................................................................30Shipcase Solutions .....................................................................................................30Unitload Solutions .....................................................................................................30Tools Menu ....................................................................................................................31Stacking Strength.......................................................................................................31Define Menu ..................................................................................................................31Pallet ..........................................................................................................................31Session Menu.................................................................................................................32Logout........................................................................................................................32Section IV: References.....................................................................................................33Stacking Strength...........................................................................................................33The McKee Formula..................................................................................................33Edge Crush Test.........................................................................................................34Ring Crush Test .........................................................................................................34Calculate Stacking Strength.......................................................................................35Function Buttons........................................................................................................36Stacking Strength Results ..........................................................................................37Function Buttons........................................................................................................39Pallet Patterns ................................................................................................................40Box Styles ......................................................................................................................42Divider Styles ................................................................................................................44
Section I: Introduction to <strong><strong>TOPS</strong>ePAC</strong><strong><strong>TOPS</strong>ePAC</strong> is a web-based application for creating optimal case sizing and pallet patterns.This User <strong>Guide</strong> is divided into the following sections:• Section I – Introduction to <strong><strong>TOPS</strong>ePAC</strong> provides general information on theapplication and describes its main functionalities .• Section II – Describes how to create different design sequences using<strong><strong>TOPS</strong>ePAC</strong> and how to create reports for printing and sharing.• Section III – Describes the menu functions within <strong><strong>TOPS</strong>ePAC</strong>.• Section IV – A reference section describing Stacking Strength and providingillustrations of pallet patterns, box styles and divider styles.General Information1. Each user account allows only one user at a time.2. All data and analyses created with <strong><strong>TOPS</strong>ePAC</strong> will be saved in a secured serverlocated at <strong>TOPS</strong>, not in your personal computer. This allows users to create / savedata without taking-up space on the desktop.3. The <strong><strong>TOPS</strong>ePAC</strong> session will automatically time out if inactive for 30 minutes.4. To exit <strong><strong>TOPS</strong>ePAC</strong>, go to “Session” on the Menu Bar and logout. Do not just closethe Internet browser. A waiting period of 30 minutes is required before logging backinto the application if you do not logout properly.5. <strong><strong>TOPS</strong>ePAC</strong> is a web application and its performance (response time) depends onnetwork traffic. Please make sure an existing page has finished loading beforeproceeding to the next step.If problems are encountered, clicking the refresh button of the browser can usuallycure the problem. It is also good practice to take note of the browser status bar forany message.6. Throughout <strong><strong>TOPS</strong>ePAC</strong> the term “unitload” refers to pallet loads.7. When needed, help information is available by clicking on the Help button. Whenhelp is active, a will appear over the fields with help information. Bring the mousecursor over the to read the help text or graphics (e.g. pallet patterns). To disableapplication Help, click on the Help button again to hide the help icons.8. For assistance with use of the application, please contact <strong>TOPS</strong> Engineering at 972-739-8677 Monday through Friday, 7:30 AM to 5:30 PM Central Time or email us attech@topseng.com.<strong><strong>TOPS</strong>ePAC</strong>: Web Based Application for Package Design and Palletization 1
LoginA user account is required to log in and should have been provided to you. To log in:1. Type the URL http://www.topsepac.com at the address line of your internet browser.2. Enter the user name in the Username field.3. Enter the password in the Password field.4. Click on the Login button.Control PanelAfter logging into <strong><strong>TOPS</strong>ePAC</strong>, the Control Panel appears. This is the working area whereselection of the stages to be used in the analysis and the definition of the dimensions of eachstage will be made.The main elements in the Control Panel are: Menu Bar, Package Design Sequences, UOM(unit of measure) selection and shortcut to Stacking Strength Analysis.Menu BarPackageDesignSequencesStackingStrengthAnalysis• Menu Bar – The Menu Bar on the top of the screen provides access to allavailable functions within <strong><strong>TOPS</strong>ePAC</strong>.• Package Design Sequences – Allow selection of one of the three pre-definedpackage design sequences within <strong><strong>TOPS</strong>ePAC</strong>.• Stacking Strength – Allows quick access to perform stacking analysis.Please refer to Section III for more information on the different functions available undereach menu.<strong><strong>TOPS</strong>ePAC</strong>: Web Based Application for Package Design and Palletization 2
Create a New Design Sequence1. To start a new analysis, select from one of the three design sequences by clicking onthe corresponding radio button located to the left of the sequence.• The first sequence is used to create a 2-step analysis by placing primary packsinto a secondary pack and then onto a pallet. It provides optimization on the casesize and pallet load levels.Primary PackCartonCanTubBottleMike CartonFilm BagSecondary PackShipcaseTrayShrink WrapPalletPalletSlip sheetNo Pallet• The middle sequence is used for pallet optimization.Primary PackShipcaseTrayDrumBucketBottleBagPalletPalletSlip sheetNo Pallet• The last sequence is for determining case sizing.Primary PackCartonCanTubBottleMike CartonFilm BagSecondary PackShipcaseTrayShrink Wrap2. At each step, use the drop down button to select from the list of available options.3. Select the measurement unit between English and Metric.4. Click the corresponding Start button on the selected sequence to start the design.<strong><strong>TOPS</strong>ePAC</strong>: Web Based Application for Package Design and Palletization 3
Section II – Using <strong><strong>TOPS</strong>ePAC</strong>This section provide step-by-step examples on how to use each of the design sequences.Example 1: Case Sizing OptimizationIn this example, we will determine the different options of placing primary packs (bottles)inside shipping cartons. We will have <strong><strong>TOPS</strong>ePAC</strong> helps us determine the best way to packmultiple bottles inside a shipcase.Sequence Selection1. Click the radio button against the third design sequence.2. Click the drop down list for the primary pack and select “Bottle”.3. Click the drop down lost for the secondary pack to select “Shipcase” if not alreadyselected.4. Change Units of measure to “Metric”.5. Click on the Start button.Bottle DefinitionThe variables in the primary pack definition screen vary according to the type of primarypack selected. Please refer to section III for the definition screens for each primary packsupported within <strong><strong>TOPS</strong>ePAC</strong>. The followings are the parameters for bottles:• Body Shape – Select from the drop down list shapes among Round, Rectangularor Oval.<strong><strong>TOPS</strong>ePAC</strong>: Web Based Application for Package Design and Palletization 4
• Bottle Dimensions and Weight – These include Body Diameter, Neck Diameter,Height, Neck Height and Shoulder Height for the bottle. Enter each dimensionand use the [Tab] key to navigate between the fields.• Allow Vert – Check off the dimension that is allowed vertical when placed insidethe secondary pack. Check off the “Height” option only if the bottles are to bepacked upright only inside the shipcase.• Bulge – Enter the additional space that each primary pack will take up whenpacked inside the shipcase. This is usually zero.• Weight – Enter the net and gross weight of the primary pack. The net and grossweights can be left as zeros but the gross weight will be need if stacking analysiswill be performed.After all bottle parameters have been defined, click on the Next button to go to the next stepin the Design Sequence – Shipcase.Shipcase DefinitionAt the New Shipcase Definition screen, <strong><strong>TOPS</strong>ePAC</strong> will determine what shipcase size to usebased on these information:• Style – Select the shipcase style from the drop down list. Refer to Section IV –Box Styles for illustrations of the different predefined box styles.• Select “New” Case in order for the program to calculate the dimension of theshipcase. When “Fixed” is selected, the user is to provide the dimension of theshipcase to carry the products.<strong><strong>TOPS</strong>ePAC</strong>: Web Based Application for Package Design and Palletization 5
• Dividers – Clicking the Dividers button opens the dialog box to add dividersand/or pads in the shipcase.• Shipcase Quantities – Use a “Range” or “Exact Values” to specify the quantityof primary packs to pack. In this example, we are using a range from 6 to 12bottles. To use exact values, check off the “Values” box and enter the desiredquantities in the adjacent boxes.• Allow Vert – Check off the dimension for the Shipcase that is allowed verticalwhen placed onto the pallet.• Material – Corresponds to the material thickness of the shipcase. This value willbe added to the inside dimension (if used) of the shipcase to get the overallshipcase size used for calculation.• Dimensions – Specify whether the dimensions used are “Outside” or “Inside”dimension of the shipcase• Max Weight – Defines the weight limit to be carried by the shipcase.• Slack and Bulge – Specifies any slack or bulge along each dimension of theshipcase. This can be used to accommodate space taken up by packing materials.• Optional Sizing Limits – These provide additional criteria to limit the solutionsto certain configurations only. For example, by setting “Maximum along Depth”to 1 will limit solutions (bottles inside shipcase) to only 1 layer high.• Allowed Patterns – Specifies what patterns will be allowed for the solution. Forexample, by removing “Staggered” pattern, you will only get solutions withbottles in block(s) but never staggered.After specifying all parameters, click on the Next button to view the solutions.Adding Dividers (optional)When available, you can click on the “Dividers” button to add dividers/pads inside ashipcase.• Style – Click on the drop down list to select the divider style.• Board – Select from the drop down list the board grade to be used for the divider.• Material – Check off “Caliper” and enter the thickness if the divider is ofcardboard rather than corrugated paper. Check off “Flute” and select the type offlute from the drop down list. The material provided will be used in calculatingstacking strength.<strong><strong>TOPS</strong>ePAC</strong>: Web Based Application for Package Design and Palletization 6
• Pads – Check off any applicable options for pads and divider height.Note: If “Pads on Top” is selected, you might not see the divider which will becovered by the pad.Analysis View<strong><strong>TOPS</strong>ePAC</strong> displays solutions in the Analysis View, as pictured below. Use the AnalysisView to study the different solutions and select the one that best meets your requirements.Solution View PaneClick and hold the leftmouse button along thedividing line and drag themouse to size the two panes.Solution List Pane• Solution View Pane – The top pane displays a 3D view of the selected shipcasesolution, depicting how the bottles are loaded into the shipcase.• Solution List Pane – The bottom half of the application lists all possiblesolutions generated for the analysis, along with statistics for each solution.Solution View PaneThe Solution View Pane displays a 3-D graphic of the selected solution. It is linked to theSolution List pane. For example, if Solution 1 is selected in the Solution List, the SolutionView displays a graphic that corresponds to Solution 1. If Solution 3 is selected in theSolution List, the Solution View displays a graphic for Solution 3, and so on.Solution List PaneThe Solution List Pane displays a list of all solutions generated for the analysis. A scroll baron the right allows you to move up and down the list. For each solution, 5 items appear incolumns across the pane. The solutions are ranked by the quantity / shipcase.<strong><strong>TOPS</strong>ePAC</strong>: Web Based Application for Package Design and Palletization 7
• Pattern – Displays an overhead view of the pattern. In this case, the arrangementof bottles inside the shipcase.• Solution – Identifies the solution number (Solution 1, 2, 3, etc.).• Case Weight – The total weight of the shipcase, this includes the weights ofbottles and the carton.• Bottles/Case – Provides the quantity of primary pack per shipcase.• Arngmnt – Gives the arrangement of the product inside the carton. Note thatthese are all one layer arrangement since we have restricted the “maximum(sizing) along depth” to be 1 in the New Shipcase Definition screen.More statistics, e.g. RSC board area, area and cubic efficiency are available in the report for the analysisand is described on page 18.<strong><strong>TOPS</strong>ePAC</strong>: Web Based Application for Package Design and Palletization 8
Example 2: Shipcase onto PalletIn this example, we will determine the optimal pallet pattern for a fixed shipcase.Sequence Selection1. Click the radio button against the second design sequence.2. Click the drop down list to select “Shipcase” and “Pallet”.3. Change Units of measure to “Metric”.4. Click on the Start button.Shipcase DefinitionAt the Shipcase Definition screen, enter the dimension and weight of the shipcase to beplaced on the pallet:• Style – Select the shipcase style from the drop down list. Refer to Section IV –Box Styles for illustrations of the different predefined box styles. In thisexample, please select the FEFCO 201 (RSC) as illustrated above.• Dimensions – Enter the dimensions of the shipcase in the selected unit ofmeasure.• Allow Vert – Check off the dimension for the Shipcase that is allowed verticalwhen placed onto the pallet.• Flute – Select from the drop down list the flute used for the shipcase. The flutevalue (material thickness of the shipcase) will be added to the inside dimension (ifused) provided to get the overall shipcase size used for calculation.• Dimensions – Specify whether the dimensions used are “Outside” or “Inside”dimension of the shipcase.• Bulge – Specifies any bulge along each dimension of the shipcase. This can beused to accommodate space taken up by packing materials.<strong><strong>TOPS</strong>ePAC</strong>: Web Based Application for Package Design and Palletization 9
• Gross Weight – This is the overall weight of the shipcase and its contents.• Dividers – Click on the Dividers button to add dividers and/or pads to theshipcase. Adding dividers will affect the stacking results of the unitloads.After specifying all parameters, click in the Next button to define the pallet parameters.Unitload DefinitionAt the Unitload Definition screen, select the pallet to be used together with any other relatedparameters like maximum unitload height or any overhangs on the pallet.Pallet NamePallet Dimensionsand overhangAllowed PatternsClamp OptionsCorner Posts• Pallet Name – Select from the drop list the type of pallet to be used. <strong><strong>TOPS</strong>ePAC</strong>comes predefined with some commonly used pallets. You can also define newpallets under the Define > Pallet menu. Please see page 31 for more details.• Max Height – Enter the maximum height for the unitload. This includes theheight of the pallet and controls how high the shipcases can stack on the pallet.• Max Weight – Enter the maximum allowable weight for the unitload.• Max Length Overhang – Input the maximum amount of overhang allowed alongthe length of the pallet.• Max Width Overhang – Input the maximum amount of overhang allowed alongthe width of the pallet.• Pallet Dimensions – Displays the dimension of the selected pallet. Note thatthese are display fields and cannot be edited. To change the dimension of thepallet, you’ll need to use the Define > Pallet function.• Allowed Patterns – Check off the pallet patterns allowed for the unitload. Checkall if you want to see all possible pallet patterns. Illustrations of different palletpatterns can be found in Section IV.• Clampable Width/Length – Check off the dimensions (width or length) that areclampable during loading or unloading. Leave the two options unchecked if noclamping is allowed on the unitload.<strong><strong>TOPS</strong>ePAC</strong>: Web Based Application for Package Design and Palletization 10
• Use Corner Posts – To use corner posts for the unitload, check off this optionand enter length and thickness of the corner posts to be used.After specifying all parameters, click in the Next button to view the solutions.Analysis View<strong><strong>TOPS</strong>ePAC</strong> displays solutions in the Analysis View, as pictured below. Use the AnalysisView to study the different solutions and select the one that best meets your requirements.Solution View PaneSolution List Pane• Solution View Pane – The top pane displays a 3D view of the selected unitloadsolution, depicting how the shipcases are stacked on the pallet.Note that there might be thumbnails to the right of the solution, showing“Alternate Patterns” for the current solution. Clicking on the thumbnail willupdate the current view of the solution.• Solution List Pane – The bottom half of the application lists all possible unitloadsolutions generated for the analysis, along with statistics for each solution.<strong><strong>TOPS</strong>ePAC</strong>: Web Based Application for Package Design and Palletization 11
Solution View PaneThe Solution View Pane displays a 3-D graphic of the selected solution. It is linked to theSolution List pane. For example, if Solution 1 is selected in the Solution List, the SolutionView displays a graphic that corresponds to Solution 1. If Solution 3 is selected in theSolution List, the Solution View displays a graphic for Solution 3, and so on.Solution List PaneThe Solution List Pane displays a list of all solutions generated for the analysis. A scroll baron the right allows you to move up and down the list. For each solution, 9 items appear incolumns across the pane. The solutions are ranked by cubic efficiency (Cubic Eff).• Pattern – Displays an overhead view of the unitload pattern.• Solution – Identifies the solution number (Solution 1, 2, 3, etc.).• Dim Vert – Indicates which dimension of the shipcase is stacked vertical.• UL Wgt – The total weight of the unitload including shipcases and pallet.• Ptrn Type – The pallet pattern used to configure the unitload.• Cases/Layer – The number of shipcases in each layer of the unitload.• Cases/UL – The total number of shipcases in the unitload.• Area Eff – The percentage of the pallet area that is used in the configuration.<strong><strong>TOPS</strong>ePAC</strong> calculates this value based on how much pallet area is covered by theshipcases.• Cubic Eff – The percentage of cubic space that is used in the configuration.<strong><strong>TOPS</strong>ePAC</strong> calculates this value based on how much space is being used versusthe space you're trying to fill.More statistics, e.g. RSC board area, area and cubic efficiency, total cube are available in the report forthe analysis and is described on page 18.<strong><strong>TOPS</strong>ePAC</strong>: Web Based Application for Package Design and Palletization 12
Example 3: Bottles to Shrink Wrap to PalletIn the example, 6 cans will be shrink wrapped and then placed onto a pallet to determine themost optimal pallet pattern.Sequence Selection1. Click the radio button against the first design sequence.2. Click the drop down list to select “Can” for primary, “Shrinkwrap” for secondary and then“Pallet”.3. Change Units of measure to “Metric”4. Click on the Start button.Can DefinitionThe variables in the primary pack definition screen vary according to the type of primarypack selected. Please refer to section III for the definition screen for each primary packsupported within <strong><strong>TOPS</strong>ePAC</strong>.• Diameter – Enter the diameter of the can to be packed.• Height – Enter the height of the can to be packed.• Allow Vert – Check off the dimension that is allowed vertical when placed insidethe secondary pack, shrinkwarp in this case. Check the “Height” option onlysince the cans will be packed upright.• Bulge – Enter the additional space that each primary pack will take up whenpacked inside the shipcase. This is usually zero.• Weights – Enter the weights for the can. They are be left at zeros or entered forgross weight only.After all can parameters have been defined, click on the Next button to go to the next step inthe Design Sequence – Shipcase (Shrinkwrap).<strong><strong>TOPS</strong>ePAC</strong>: Web Based Application for Package Design and Palletization 13
Shipcase DefinitionAt the New Shipcase Definition screen, <strong><strong>TOPS</strong>ePAC</strong> will determine what shipcase size to usebased on these information:• Style – Select the shipcase style from the drop down list. “Shrink Wrap” is preselectedsince it was specified in the Package Design Sequence.Select “New” Case instead of “Fixed”.• New – <strong><strong>TOPS</strong>ePAC</strong> will determine the size of the secondary pack.• Fixed – You will provide the dimension of the secondary pack for use inthe analysis.• Shipcase Quantities – Use a “Range” or “Exact Values” to specify the quantityof primary packs to pack. In this example, we are creating a 6-pack, so check offthe “Values” option and enter 6 in the first box and keep the remaining boxes aszeros.• Allow Vert – Check off the dimension for the secondary pack (shrinkwrapped 6-pack) that is allowed vertical when placed onto the pallet.• Material – Enter the caliper/thickness of the shrinkwrap to be used. In thisexample, enter 0.01mm. If you are using a corrugated box, select the flute typefrom the drop down list.• Dimensions – Specify whether the dimensions used are “Outside” or “Inside”dimension for the secondary pack.• Max Weight – Defines the weight limit to be carried by the shipcase/shrinkwap.• Round to nearest 1/16 – Uncheck this box in order to get the most accuratedimensions. Enabling this option will lead to overstatement of the measurements.<strong><strong>TOPS</strong>ePAC</strong>: Web Based Application for Package Design and Palletization 14
• Slack and Bulge – Specifies any slack or bulge along each dimension of theshipcase. This can be used to accommodate space taken up by packing materials.• Optional Sizing Limits – These provide additional criteria to limit the solutionsto certain configurations only. For example, by setting “Maximum along Depth”to 1 will limit solutions to only 1 layer high for the 6-pack.The default value for “Length to Width Ratio” is 4.5 – with this value, the canarrangement of 1x6 will not be displayed. To see the 1x6 solution, change thisvalue to 10.• Allowed Patterns – Specifies what patterns will be allowed for the solution. Forexample, by removing “Staggered” pattern, you will only get solutions withbottles in block(s) but never staggered.After all shipcase parameters have been defined, click on the Next button to go to the nextstep in the Design Sequence – Unitload.Unitload DefinitionAt the Unitload Definition screen, you will provide details with regards to the unitload to becreated:• Pallet Name – Select the pallet from the drop down list.• Max Height – Enter the maximum height for the unitload. This includes theheight of the pallet and controls how high the shipcases can stack on the pallet.• Max Weight – Enter the maximum allowable weight for the unitload.• Max Length Overhang – Input the maximum amount of overhang allowed alongthe length of the pallet.• Max Width Overhang – Input the maximum amount of overhang allowed alongthe width of the pallet.<strong><strong>TOPS</strong>ePAC</strong>: Web Based Application for Package Design and Palletization 15
• Pallet Dimensions – Displays the dimension of the selected pallet. Note thatthese are display fields and cannot be edited. To change the dimension of thepallet, you’ll need to use the Define > Pallet function.• Allowed Patterns – Check off the pallet patterns allowed for the unitload. Checkall if you want to see all possible pallet patterns. Illustrations of different palletpatterns can be found in Section IV.• Clampable Width/Length – Check off the dimensions (width or length) that areclampable during loading or unloading. Leave the two options unchecked if noclamping is allowed on the unitload.• Use Corner Posts – To use corner posts for the unitload, check off this optionand enter length and thickness of the corner posts to be used.After completing the unitload parameters, click on the Next button, <strong><strong>TOPS</strong>ePAC</strong> will use thedefined parameters to generate all possible solutions for the load analysis.Analysis ViewThe first analysis <strong><strong>TOPS</strong>ePAC</strong> displays will be the solution for secondary package, i.e. how toshrink wrap the 6 cans.• Solution View Pane – The top pane on the left displays a 3D view of how thecans can be packed, its dimension together with the resultant unitload.• Solution List Pane – There are only two solutions, the 3x2x1 and 6x1x1arrangements. The total number of cans per unitload is the same for bothsolution.<strong><strong>TOPS</strong>ePAC</strong>: Web Based Application for Package Design and Palletization 16
Select the first solution by highlighting it and then click on the Next button. <strong><strong>TOPS</strong>ePAC</strong> willthen display the unitload solutions where you can pick the pallet pattern.• Solution View Pane – The top pane displays a 3D view the pallet pattern for theselected secondary 6-pack of cans.• Solution List Pane – The illustration above lists 3 different pattern pallets (B=biblock,C=column stack, D=diagonal), all yielding the same load and cubicefficiency.Saving the SolutionOnce you have picked the solution, you can save it to the database.Note: Be aware that this Save function works differently from the normal save function inthe Windows environment. <strong><strong>TOPS</strong>ePAC</strong> does not save an analysis as a file on yourhard drive, rather, it saves the analysis as a record to the database on the <strong><strong>TOPS</strong>ePAC</strong>server. To save a copy on you local machine, you can save the analysis report in PDFin you PC (will be described later on page 19.To save the analysis:1. At the <strong><strong>TOPS</strong>ePAC</strong> Menu Bar, select File | Save As.2. The Save Analysis Dialog Box appears as below.<strong><strong>TOPS</strong>ePAC</strong>: Web Based Application for Package Design and Palletization 17
3. Enter the Analysis Name to be used and click on Save.4. <strong><strong>TOPS</strong>ePAC</strong> saves the analysis to the database and confirms with a successfulmessage.Generating ReportsTo view the report for each analysis, go to File | Print Preview on the Menu Bar. The reportis divided into four areas where you can specify the data to be included in each section.Depending on the type of design sequence performed, the following information areavailable for the report:Primary Pack Shipcase Unitload Statistics3D view 3D view 3D view Includes dimension (inside and outside),Front view Front view Front view net and gross weight, cube, verticalPlan view Plan view Plan view dimension, area and cubic efficiency,Side view Side view Side view cases/layer, layers/load, RSC area andcount.Bottle: 3D/Front/Plan/Side views Shipcase: 3D/Front/Plan/Side views Unitload: 3D/Front/Plan/Side viewsIf you select “none”, thedata in the adjacent panewill take up the entireSelect the data to be displayed using the drop down list and click on OK to display the report.<strong><strong>TOPS</strong>ePAC</strong>: Web Based Application for Package Design and Palletization 18
Printing ReportsAt the Print Preview screens, click the “Print” button at the top of the page. At the WindowsPrint dialog box as shown here, select the printer from the list. Click Print to print the report.If you have Adobe Acrobat or other third-party PDF writer installed on your computer, youcan select and create a PDF file to be saved on your local machine.<strong><strong>TOPS</strong>ePAC</strong>: Web Based Application for Package Design and Palletization 19
Section III: <strong><strong>TOPS</strong>ePAC</strong> Menu FunctionsFile MenuNewReturn to the Control Panel to select a new package design sequence to begin a new analysis.OpenDisplay the Open Analysis dialog box to open an existing analysis. Each user can only seeanalyses created by the login user.• Open – To open an analysis, double click the selected analysis from the list orclick the Open button after highlighting the analysis in the list.• Remove – The user can remove the highlighted analysis from the database byclicking the Remove button.<strong><strong>TOPS</strong>ePAC</strong>: Web Based Application for Package Design and Palletization 20
SaveSave the current analysis to the <strong><strong>TOPS</strong>ePAC</strong> database. If this is a new analysis, the SaveAnalysis dialog box will appear.Enter a name in the Item Description field and click the Save button. If this is an existinganalysis, it will be updated and saved under the same analysis name. In either case, aconfirmation message saying the analysis has been successfully saved will appear.Save AsDisplay the “Save Analysis” dialog box to save an analysis record to the database. Enter aname in the Item Description field and click the Save button.Print PreviewProvide a report preview of the current analysis.Edit MenuCarton / Can / Tub / Bottle / Milk Carton / Film Bag ParametersShipCase / Tray / ShrinkWrap ParametersSequence DesignReturn back to the main screen of <strong><strong>TOPS</strong>ePAC</strong> and select a new Package Design Sequence.(Primary Pack) ParametersDepending on the design sequence selected and the type of primary units (if selected as partof the sequence), the second function menu under the Edit Menu can be:• None Parameters – This is grey-out (not available) when the opened analysis doesnot contain primary packs in the sequence.<strong><strong>TOPS</strong>ePAC</strong>: Web Based Application for Package Design and Palletization 21
• Carton Definition – Open the Carton Definition dialog box if carton is selected asprimary units.o Style – Select from the drop list the box style of the carton.o Length, Width and Height – Enter the length, width and height for the carton.o Allow Vert – Check the boxes against the dimensions (length, width orheight) this carton is allowed vertical when placed inside the shipcase.o Bulge – Enter the amount of bulge allowed along each dimension of thecarton.o Caliper – Enter the thickness of the paper used for the carton.o Dimensions – Select from the drop list if the dimensions entered are ofOutside or Inside measure.o Net Weight – Enter the net weight of the carton.o Gross Weight – Enter the total weight of the carton including its contents.• Can Definition – Open the Can Definition dialog box if can is selected as primarypack.o Diameter – Enter the diameter of the can.o Height – Enter the height of the can.o Allow Vert – Check the boxes against the dimensions (diameter or height) thiscan is allowed vertical when placed inside the shipcase.o Bulge – Enter the amount of bulge allowed along each dimension of the can.o Net Weight – Enter the net weight of the can.o Gross Weight – Enter the total weight of the can including its contents.<strong><strong>TOPS</strong>ePAC</strong>: Web Based Application for Package Design and Palletization 22
• Tub Definition – Open the Tub Definition dialog box if tub is selected.o Body Shape – Select the shape of the tub from the drop list.o Top Diameter – Enter the top diameter of the rounded tub.o Bottom Diameter – Enter the bottom diameter of the rounded tub.o Height – Enter the height of the tub.o Pitch – Enter the distance between adjacent tubs when nested together.o Allow Vert – Check the boxes against the dimensions (diameter or height) thistub is allowed vertical when placed inside the shipcase.o Bulge – Enter the amount of bulge allowed along each dimension of the tub.o Net Weight – Enter the net weight of the tub.o Gross Weight – Enter the total weight of the tub including its contents.• Bottle Definition – Open the Can Definition dialog box if bottle is selected.o Body Shape – Select from the drop list if the bottle is of round, rectangular oroval shape.o Dimensions• Round - Enter Body Diameter, Neck Diameter, Height, Neck Height andShoulder Height• Rectangular – Enter Body Length, Body Width, Neck Diameter, Height,Neck Height and Shoulder Height• Oval – Enter Body Length, Body Width, Neck Diameter, Height, NeckHeight and Shoulder Heighto Allow Vert – Check the boxes against the dimensions (length, width orheight) the bottle is allowed vertical when placed inside the shipcase.o Bulge – Enter the amount of bulge allowed along each dimension of thebottle.o Net Weight – Enter the net weight of the bottle.o Gross Weight – Enter the total weight of the bottles including its contents.<strong><strong>TOPS</strong>ePAC</strong>: Web Based Application for Package Design and Palletization 23
• Milk Carton Parameters – Open the Can Definition dialog box if milk carton isselected as primary packs.o Length, Width and Height – Enter the length, width and height for the milkcarton.o Allow Vert – Check the boxes against the dimensions (length, width orheight) the milk carton is allowed vertical when placed inside the shipcase.o Bulge – Enter the amount of bulge allowed along each dimension of the milkcarton.o Caliper – Enter the thickness of the paper used for the milk carton.o Net Weight – Enter the net weight of the carton.o Gross Weight – Enter the total weight of the carton including its contents.• Film Bag Definition – Open the Can Definition dialog box if film bag is selected asprimary packs.o Style – Select from the drop list the bag style to use in your analysis.o Bag Type – Select from the drop list the bag type to be defined. Select fromLxWxH or FxRxA (Former-Repeat-Air Fill).o Length, Width and Height – Enter the length, width and height for the bag.o Allow Vert – Check the boxes against the dimensions (length, width orheight) this bag is allowed vertical when placed inside the shipcase.o Seal Style – Select either Lap or Fin to specify how the bag will be sealed.o Seal Dims – Specify the dimensions of the seal along top, bottom and back ofthe bag.o Net Weight – Enter the Net Weight of the bag including its contents.<strong><strong>TOPS</strong>ePAC</strong>: Web Based Application for Package Design and Palletization 24
Shipcase ParametersIf the design sequence includes primary packs, the “New Shipcase Definition” screen willappear.• Style – Select from the drop list the shipcase style to hold the primary packs.Please refer to Section IV for illustrations of the different box styles.o New – Select New for Style if <strong><strong>TOPS</strong>ePAC</strong> will determine the optimaldimensions of the shipcase. You don’t need to enter the carton dimension inthis case.o Fixed – Select Fixed to use an existing carton with known dimensions. Enterthe Length, Width and Height.• Dividers – Click this button add divider to separate primary packs inside thecarton. Section IV provides illustrations of different divider style available in<strong><strong>TOPS</strong>ePAC</strong>.• Shipcase Quantities – Specify the quantity of primary packs to be placed insidethe shipcase. Specify a range or a set number of units.o Range – To use a range, check the Range option and enter the minimum andmaximum count in the corresponding box.o Values – To use set values, check the Values option and enter the quantities ofunits to be packaged inside the shipcase. Erase any existing quantities notrequired.• Allow Vert – Check the boxes against the dimensions (length, width or height)the shipcases are allowed vertical when placed on the pallet or when bundled.<strong><strong>TOPS</strong>ePAC</strong>: Web Based Application for Package Design and Palletization 25
• Material – Select the materials for the carton.o Specific Caliper – Check this option and enter the thickness of the paper fornon-corrugated paper.o Flute – For corrugated carton, check this option and select the flute size of thebox from the drop list.• Dimensions – Select from the drop list if the dimensions entered are of Outside orInside measure.• Max Weight – Enter the maximum weight of the carton.• Round to nearest 1/16 – Check the box to force <strong><strong>TOPS</strong>ePAC</strong> to round the slackdimensions to the nearest 1/16 of an inch. Do not check this option if you areafraid the program will over round up the measurements.• Slack – Refer to the extra space you intend to include in the carton configuration.Enter the amount of slack allow along each dimension (length, width and height)of the carton.• Bulge – Enter the amount of bulge allowed along each dimension of the carton.• Optional Sizing Limits – Allow you to fine tune the size dimensions of thecarton by limiting the scope of the solutions.o Max along Length – Enter the maximum number of primary packs anddimension along the length of the shipcase.o Max along Width – Enter the maximum number of units and dimension alongthe width of the shipcase.o Max along Depth – Enter the maximum number of units and dimension alongthe depth of the shipcase.o Length to Width Ratio: Enter the length to width ratio for the quantity ofprimary packs to be placed in the shipcase.o Depth to Width Ratio: Enter the depth to width ratio for the quantity ofprimary packs to be placed in the shipcase• Allowed Patterns – Check the box against the allowable patterns whenpackaging the primary packs inside the shipcase.<strong><strong>TOPS</strong>ePAC</strong>: Web Based Application for Package Design and Palletization 26
Unitload ParametersBring up the “Unitload Definition” screen.• Pallet Name – Select the pallet from the drop down list.• Pallet Dimensions – The dimensions of the pallet are pre-defined (grey-out) butyou can specify the maximum height, weight and overhangs for the unitload.• Allowed Patterns – Check off the pallet patterns allowed for the unitload.Illustrations of different pallet patterns are available in the Reference Section IV.• Clampable Load – Specify if the unitloads are clampable and the clampallowabledimension. Leave the two options unchecked if no clamping is allowedon the unitload.• Corner Posts – To use corner posts for the unitload, check off this option andenter length and thickness of the corner posts to be used.<strong><strong>TOPS</strong>ePAC</strong>: Web Based Application for Package Design and Palletization 27
Layer ParametersOnce a solution has been selected, work with the individual layers in the unitload by addingcaps, pads, trays, slip sheets, etc. To define layer parameters, go to Edit | Unitload Layers.Layer OptionsFunction ButtonsFillerSpreadRotate• Layer Options – Check the corresponding box on the left side of the dialog boxto enable a function by layer.o Layer – Indicate the layer in the unitload to which a function/feature will beapplied.o Rotate – Check the box to rotate a corresponding layer in the unitload.o Pad Under – Check the box to insert a pad under a specific layer in theunitload.o Slip Sheet – Check the box to insert a slip sheet under a specific layer in theunitload.o Tray – Check the box to insert a tray in the unitload.o Cap – Check the box to insert a cap over a specific layer in the unitloado 2nd Pat – Check the box to use a secondary layer pattern for a specific layer inthe unitload.<strong><strong>TOPS</strong>ePAC</strong>: Web Based Application for Package Design and Palletization 28
• Function Buttons – Clicking the functions buttons along the middle will performglobal functions on the unitload layers.o Rotate All – Rotate all layers in the unitload.o Rotate Top 2 – Rotate the top two layers in the unitload.o Clear Rotate – Clear all the rotate commands set up for the unitload.o Pad All – Insert pads between each layer in the unitload.o Pad Even – Insert pads under only the even-numbered layers in the unitload.o Clear Pads – Clear all the pad commands set up for the unitload.o Slips All – Insert slip sheets between each layer in the unitload.o Clear Slips – Clear all the slip sheet commands set up for the unitload.o Trays for All – Place every layer in the unitload on a tray.o Clear Trays – Clear all the tray commands set up for the unitload.o Caps for All – Place a cap on every layer in the unitload.o Clear Caps – Clear all the cap commands set up for the unitload.o 2nd Pat All – Replace all the current layers in the unitload with the selectedsecondary pattern.o Clear 2nd Pats – Clear all the secondary layer pattern commands set up for theunitload.• Filler – Filler serves primarily to fill empty space between layers and preventsload shifting.o None – No filler is inserted between layers.o Middle – Inserts filler in the middle of the layers.o End – Inserts filler at the ends of the layers.• Spread – The Spread function specifies how the layers will be spread on thepallet.o Pack Tightly – Shipcases in each layer are packed tightly toward the center,with minimum spread in between.o To Layer Edge – Shipcases in each layer are spread to the edge of theunitload. This option "squares up" the unitload.o To Pallet Edge – Shipcases in each layer are spread to the edge of the pallet.• Rotate – This specifies how the layers will be rotated.o Length – Rotates the layer along its length.o Width – Rotates the layer along its width.o Length and Width – Rotates the layer along both its length and width.o 90 Degrees – Rotates the layer 90 degrees.<strong><strong>TOPS</strong>ePAC</strong>: Web Based Application for Package Design and Palletization 29
View MenuShipcase SolutionsThe Shipcase Solutions option displays a list of all possible shipcase solutions for theprimary packs. Each shipcase solution will correspond to different unitload solutions orpallet patterns.Click this UP arrow tomaximize the solution list.Unitload SolutionsSimilar to the Shipcase Solutions above, the Unitload Solutions displays the possibleunitload solutions for the analysis.<strong><strong>TOPS</strong>ePAC</strong>: Web Based Application for Package Design and Palletization 30
Tools MenuStacking StrengthThe Stacking Strength option displays the Stacking Strength dialog box, used to perform astacking strength test on a package analysis. For details on how to perform stacking strengthanalysis, please go to Section III.Define MenuPalletDefine or modify an existing pallet or slipsheet in the Define Pallet menu option.• Pallet Name – Enter a new pallet, type in the name of the pallet. For an existingpallet, select a pre-defined pallet or type in the first few letters of the pallet.Note: When selecting a pre-defined pallet, <strong><strong>TOPS</strong>ePAC</strong> will automatically insertvalues in the various dimension fields.• Style – Select the style of pallet to define from the following: Stringer, NotchedStringer, Block, Slipsheet, EuroPallet, and No Style.Note: The No Style option creates a pallet without labeling it as one of theexisting pallet styles, or performs an analysis without showing the pallet.Sometimes it’s necessary to define a No Style pallet because <strong><strong>TOPS</strong>ePAC</strong> needsan area of space to use in order to palletize, even a pallet isn’t needed.<strong><strong>TOPS</strong>ePAC</strong>: Web Based Application for Package Design and Palletization 31
• Construction – Specify how the pallet is constructed: Single Face constructionhas deck boards on one side, Double Face construction is basically a pallet that isidentical on both sides.• Units – Select either Imperial or Metric.• Slipsheet – If Slipsheet is selected under Pallet Name, users can further specifythese fields:o Click on the Length Tab box to add a tab to slipsheet lengtho Click on the Width Tab box to add a tab to slipsheet widtho Click on the Both Sides box to add a tab on both sides of the slipsheeto Enter the Tab Width in inches or millimeters, depending on the Unitsselected• Deck Boards – For Pallet Name selections other than slipsheet or none, thesedeck board fields are available:o Outside deck board widtho Number of inside deck boardso Inside deck board widtho Middle board widtho Deck board heighto Stringer width• Size – Specify the size of the pallet including Length, Width, Height and Weightof the pallet.• Save – Click this button to save the current setting in the database.• Delete – Click this button to delete the current selection from the database.• New – Click this to create a new pallet in data base. You will be prompted for apallet name.• Done – Click this button to exit the Pallet Style Definitions dialog box.Session MenuLogoutAllow the user to end <strong><strong>TOPS</strong>ePAC</strong> session. The users will receive a confirmation message“Are you sure you want to logout?”, click “Yes” to exit, otherwise click “Cancel” to resumethe <strong><strong>TOPS</strong>ePAC</strong> session.<strong><strong>TOPS</strong>ePAC</strong>: Web Based Application for Package Design and Palletization 32
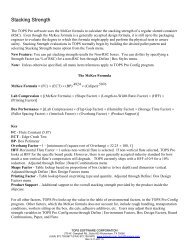
Section IV: ReferencesStacking Strength<strong><strong>TOPS</strong>ePAC</strong> uses the McKee formula to calculate the stacking strength of a regular slottedcontainer (RSC).The McKee FormulaThe McKee formula uses two laboratory tests performed on board components – the edgecrush test (ECT) and/or the ring crush test (RCT) – to derive a box compression strengthvalue. <strong><strong>TOPS</strong>ePAC</strong> adjusts this compression strength value (lab compression) with avariety of environmental and structural factors to calculate a box performance value.Important NoteEven though the McKee formula is a generally accepted designformula, the packaging engineer is ultimately responsible toevaluate the degree to which this formula might apply andperform the physical tests to assure safety.The McKee formula is defined as follows:(FC) × (ECT) × (BP) .4924 × (Caliper) .5076Lab Compression = [(FC) × (ECT) × (BP) .4924 × (Caliper) .5076 ] × (Shape Factor) ×(Length-to-Width Ratio Factor) × (Horizontal Flute Factor) × (Printing Factor)Box Performance = (Lab Compression) × (Flap Gap Factor) × (Humidity Factor) ×(Storage Time Factor) × (Pallet Spacing Factor) × (Interlock Factor) × (Overhang Factor)+ (Product Support)The abbreviated components in the formula are outlined below:FC = Flute Constant (5.87)ECT = Edge Crush TestBP = Box PerimeterOverhang Factor = 1 – [minimum of (square root of overhang) x 32.25 ÷ 100, 1]Horizontal Flute Factor (HFF) = 1, unless non-vertical flute is selected. If non-verticalflute is selected, <strong><strong>TOPS</strong>ePAC</strong> looks at HFF for the specific board grade. However, thereis no generally accepted industry standard for how much a non-vertical flute'scompression will degrade. <strong><strong>TOPS</strong>ePAC</strong> currently ships with a HFF of 0.9 for a 10 percentreductionShape Factor: Shape Factor is based on the proportions of the box – relative to boxdepth – and dimension vertical<strong><strong>TOPS</strong>ePAC</strong>: Web Based Application for Package Design and Palletization 33
Printing Factor: Printing Factor is based on printing type (Flexo Ink or Quick Set) andquantity.For all other factors, <strong><strong>TOPS</strong>ePAC</strong> looks up the environmental factors. Other factors,which the McKee formula does not account for, include rough handling, transportationconditions, workers sitting on the box, die cuts, adhesive additives, etc.Edge Crush TestBox compression strength is a matter of structural mechanics. Engineering formulas havebeen developed using various relationships to predict compression strength. The generalformula used here predicts Box Compression Test (BCT) value as related to Edge CrushTest (ECT), Flexural Rigidity and box perimeter.Edge Crush Test, also known as Short Column Test, is measured as the pounds of forceper inch needed to crush a portion of the sidewall of combined corrugated board.Although not the sole criterion for box performance, ECT values are an excellentindicator of Box Compression Test values and box performance in most of today'sapplications.Ring Crush TestThe Ring Crush Test (RCT) measures paper strength – specifically stiffness. RCT hasbeen widely used and has a history of more than 20 years of data correlated to combinedboard strength (ECT).In the RCT, a strip of paper is placed into a jig that curls it into a short, tubular ring.Pressure is then applied perpendicular to the exposed edge. Ring Crush is measured asthe pounds of force required to crush this specimen. This value has a direct relationshipto predicting Edge Crush values of the combined board and, ultimately, box compressionstrength.Due to industry-wide improvements in the paper-making process, industry average RCTvalues have gradually increased for a given Basis Weight over the years. However,across the industry, there is substantial variation in Ring Crush for a given Basis Weight– from different paper mills, even from different paper machines within the same mill."High Ring Crush" or "High Performance" linerboard and medium are well above theindustry average, at the upper end of the industry variability range for a given BasisWeight. Generally, these papers are more tightly pressed – thinner/denser/less porous –than those at the average or lower end of the range, which gives paper greater strengthper pound.<strong><strong>TOPS</strong>ePAC</strong>: Web Based Application for Package Design and Palletization 34
Calculate Stacking StrengthIn this exercise, we will perform a stacking strength analysis. To calculate stackingstrength, start from the Control Panel and follow these instructions:1. Select a Stacking Strength Analysis package design sequence and click on Start.2. At this point, you'll need to make decisions regarding the following parameters:• Calculation Method – Select the method used to calculate stacking strength. Usethese guidelines:o The Ring Crush method looks up the ring crush values of the boardcombination's liners and mediums and then calculates the edge crush test(ECT) value from those values.o The Edge Crush method uses the exact ECT value typed in for each boardcombination.• Case Specificationso Enter the dimensions and weight of the shipcase.o Designate which dimension is in the vertical orientation by checking off thecorresponding box.o Enter the amount of differential between the minor flaps and major flaps ofthe shipcase as the Flap Gap.o Product Support is the added strength provided by a product packaged insidethe shipcase. The value is entered as the total weight that the product insidethe shipcase (on the whole case basis) can handle.<strong><strong>TOPS</strong>ePAC</strong>: Web Based Application for Package Design and Palletization 35
o Select the direction the flute runs in relation to the shipcase as the FluteDirection.• Environment – Specify the environmental factors affecting the stacking strengthcalculations.o Select the target Storage Time for the unitloads – the period of time youexpect the unitloads to be stored in a warehouse; for example, three months.o Enter the Humidity percentage that exists in the warehouse. The default is 50percent; a typical humidity factor is 85 percent.o Number of Unitloads High is the target number of pallets high the unitloadcan be stacked in the warehouse.• Unitload Specifications – Specify the unitload parameters.o Select the type of Pallet to be used for the unitload.o Specify the number of Cases of Layer for the unitload.o Specify the total number of Layers per Load.o Enter the amount of Overhang for the unitload.o Select the Rotation to be used for the unitloads. If the unitloads are columnar(non-interlocked), select None. This rotation yields no degradation in stackingstrength. If the unitloads are fully interlocked, select All. This rotation yieldsa 30 percent degradation in stacking strength. If the unitloads are partiallyinterlocked – for example, only the top two layers – select Some. This rotationyields a 15 percent degradation in stacking strength.o Footprint Factor – If you have multiple unitloads and not all shipcases helpsupport the unitload above, specify how many shipcases do help support.Lowering this number reduces the number of bottom-most cases that helpsupport the above unitload.• Print – Specify the print parameters affecting the stacking strength calculationso Amount of Printing – Select the amount of printing on the shipcases. Beaware that heavy printing does reduces the stacking strength of mostcorrugated materialso Select the type of printing on the shipcases – QuickSet or FlexoInkNote: For example purposes add a weight of 10 lbs in the Stacking Strengthdialog box and leave the other defaults as it is.Function Buttons• Calculate Button – After completing the stacking strength parameters, click theCalculate button.• Cancel Button – Clicking on Cancel button closes the Stacking Strength windowand takes you back to the Control Panel.• Filter Button – Display the stacking strength Filter dialog box, which allows youto select a number of flute sizes and define minimum and maximum values forcompression strength, safety factor and unitloads high.<strong><strong>TOPS</strong>ePAC</strong>: Web Based Application for Package Design and Palletization 36
• Dividers Button – Display the Dividers dialog box to change the dividersparameters.Dividers provide a significant increase in stacking strength of your shipcases. Forexample, a 12-cell divider, if made of the same cardboard as the shipcase,increases stacking strength by 108 percent.Stacking Strength ResultsOnce you've calculated a stacking strength analysis, <strong><strong>TOPS</strong>ePAC</strong> displays the StackingStrength Results Screen, as pictured below. This screen is divided into two panes:• Stacking Strength Statistics Pane – This information includes any added datarelated to the stacking strength option and your package design.• Stacking Strength List Pane – This pane, the lower section of the screen,displays the stacking strength results.<strong><strong>TOPS</strong>ePAC</strong>: Web Based Application for Package Design and Palletization 37
The Stacking Strength Results Screen provides the following stacking strength information:• (A) At 2 Loads High, bottom case must support 84.33 lbs – Amount of weightthat must be supported by a box on the bottom layer of the bottom pallet.• (B) Board Spacing – Also known as pallet spacing. Use these guidelines:o If this value is less than 0.1 inch, you have tight pallet spacing.o If this value is greater than 0.1 inch and less than 3 inches, you have normalpallet spacing.o If this value is greater than or equal to 3 inches, you have wide pallet spacing.• (C) Selected for Print – Check this checkbox to select the stacking strengthresult.• (D) Board Description – Display the stacking strength result.• (E) Construction – Display the construction in terms of mediums and liners forthe corresponding Board Description.• (F) Flute – Display the flute used for the corresponding board combination.• (G) Total Lab – Total Lab Compression. If you've defined a divider, this valueis the sum of the divider compression and box lab compression; i.e., Total LabCompression = Lab Compression of the divider + Lab Compression of the boxwithout the divider.• (H) Box Perf – Box Performance. The resulting compression strength, whichtakes into account the environmental conditions you've specified.• (I) Safety Factor – Total Lab divided by the weight that must be supported bythe bottom case.• (J) Safety Margin – The percentage that the box performance exceeds the weightthat must be supported by the bottom case; i.e., G = (F – A) ÷ A. Boards withSafety Margins that are greater than zero are highlighted in blue.<strong><strong>TOPS</strong>ePAC</strong>: Web Based Application for Package Design and Palletization 38
• (K) Loads High – How many unit loads it takes to reach the limit (boxperformance) of a bottom-most case.• (L) ECT lbs/in – The ECT of the board. If the calculation method is Edge Crush,this value is the empirical value entered for each board in the <strong>TOPS</strong>Configuration program. If the calculation is Ring Crush, <strong>TOPS</strong> will calculate theECT from the Ring Crush Factor (RCF) of each board's papers.Function Buttons• Print Button – Bring up the Print dialog box where users can select a printer andother print parameters for the selected stacking strength results.• Filter Button – Bring up the Filter Dialog box that allows the user to narrow thestacking strength results by selecting among various flute sizes and settings limitsfor compression strength, safety factor, and unitload height.• Parameters Button – Bring up the stacking strength dialog box which allows theuser to change any parameters for better results.• Recalculate Button – Recalculate the analysis for stacking strength results.• Select All Button – Select all the displayed stacking strength results.• Unselect All Button – Unselect all the displayed stacking strength results.• Close Button – Close the Stacking Strength results screen and takes the user backto the Control Panel.<strong><strong>TOPS</strong>ePAC</strong>: Web Based Application for Package Design and Palletization 39
Pallet Patterns<strong><strong>TOPS</strong>ePAC</strong> allows you to configure unitloads with a specific pattern. For example, theUnitload Definition Screen allows you to select one or multiple pattern arrangements for<strong><strong>TOPS</strong>ePAC</strong> to consider when the system generates solutions for an analysis. This sectiondescribes the pattern styles you can use with <strong><strong>TOPS</strong>ePAC</strong>.Depending on your situation, you may want to use a number of patterns in your analysis toget a tighter load. Conversely, you might want to eliminate some options because you wantsimpler patterns.Note: Each pattern style has a corresponding letter in parentheses. This letter is used in thevarious List panels and unitload statistics, and is a single-letter abbreviation for thatparticular pattern style.1-Block Pattern (C)The 1-block, column stack pattern is a simple pattern with oneblock of shipcases.2-Block Pattern (B)The 2-block pattern, also known as an interlock or bi-blockconfiguration.3-Block Pattern (T)The 3-block, or tri-block, pattern is pictured here.4-Block Pattern (W)The 4-block, pinwheel pattern is pictured below. In the twounitloads, this pattern is made up of four blocks of shipcasesthat form a pinwheel-like figure.5-Block Pattern (P)In these two 5-block unitloads, four blocks of shipcases form apinwheel configuration; the fifth block of shipcase ispositioned in the middle.5-Block Plus Pattern (Q)This is a 5-block pattern with another 5-block pattern in themiddle of the configuration. In these two unitloads, fourblocks of shipcases form a pinwheel configuration; a separate5-block configuration of shipcases is positioned in the middle.<strong><strong>TOPS</strong>ePAC</strong>: Web Based Application for Package Design and Palletization 40
Staggered Pattern (N)The staggered pattern is used to load round containers onto a pallet.As you can see, the round containers mean the configuration will havea staggered, rather than linear, pattern.Soldiered Pattern (S)In the two unitloads, the cases are spaced apart so thatother cases can be turned on their sides and fit into thespace.Diagonal Pattern (D)The diagonal pattern is pictured here. In these two unitloads,this pattern has alternating blocks of shipcases that form adiagonal configuration.Multi-Dimension Pattern (Z)In the multi-dimension pattern, each layer has a differentvertical dimension in the unitload.Multi-Surface Pattern (O)With the multi-surface pattern, <strong><strong>TOPS</strong>ePAC</strong> turns the pallet on its side, loads the pallet,configures the pattern, then turns the pallet upright again.In the figures to the right, the arrows indicate the side onwhich <strong><strong>TOPS</strong>ePAC</strong> loaded the pallet.To use a multi-surface pattern, it's necessary to select atleast two dimensions as vertical dimensions. When you use a multi-surface pattern,<strong><strong>TOPS</strong>ePAC</strong> automatically calculates other multi-patterns.Multi-Layer Pattern (Z)In these two unitloads, the top layer is lifted to show thatdifferent layers have different patterns. With a multi-layerpattern, <strong><strong>TOPS</strong>ePAC</strong> configures the unitload with the verticaldimension you specified, with the exception of the top layer.(The top layer is not affected by stacking strength).<strong><strong>TOPS</strong>ePAC</strong>: Web Based Application for Package Design and Palletization 41
Box StylesThis section outlines the box styles defined in the <strong><strong>TOPS</strong>ePAC</strong> database:Bundle (Invisible) Carton CubeCube (No Thicknesses) Die Cut FEFCO 200FEFCO 201 (RSC) FEFCO 202 FEFCO 203 (FOL)FEFCO 204 FEFCO 205 FEFCO 206FEFCO 209 FEFCO 210-15 (Die Cut) FEFCO 215FEFCO 216 FEFCO 230 FEFCO 300FEFCO 304 FEFCO 308 FEFCO 406FEFCO 421 FEFCO 422 FEFCO 453<strong><strong>TOPS</strong>ePAC</strong>: Web Based Application for Package Design and Palletization 42
FOLFriction LockTucFull Overlap Seal End CartonHSC RSC RSC (Closed)RSC (FEFCP 0201) Shrink Wrap Standard Reverse Tuck CartonTelescoping Tray and Shroud Tray (2-inch)Tray (Half Height) Tray (Shrink Wrap) TuckWrap Around<strong><strong>TOPS</strong>ePAC</strong>: Web Based Application for Package Design and Palletization 43
Divider StylesThis section outlines the partitions/divider styles defined in the <strong><strong>TOPS</strong>ePAC</strong> database:2-Way Cell (A) 2-Way w/ Partial (B) 2-Way w/ Sleeve (C)2-Way w/ Closed E (D) 2-Way w/ Closed M (E) 3-Cell w/ Tabs (F)Z-Part Length (G) Z-Part Length w/ T (H) Z-Part Width (I)Z-Part Width w/ T (J) H-Part (Inside) (K) H-Part (Outside) (L)H-Part (Outside) (M) H-Part w/ tabs (Outside) (N) H-Part w/ Tabs IN (O)Split Width (P) Split Length (Q) Perimeter (R)Perimeter w/ Gap (S) Perimeter w/ Center T (T) U-Part w/ Tabs (U)Dual U w/ Box IN (V)Cradle (W)<strong><strong>TOPS</strong>ePAC</strong>: Web Based Application for Package Design and Palletization 44