ease diagnostics win ce/pocket pc scan tool user's manual
ease diagnostics win ce/pocket pc scan tool user's manual
ease diagnostics win ce/pocket pc scan tool user's manual

You also want an ePaper? Increase the reach of your titles
YUMPU automatically turns print PDFs into web optimized ePapers that Google loves.
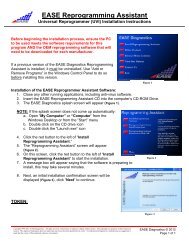
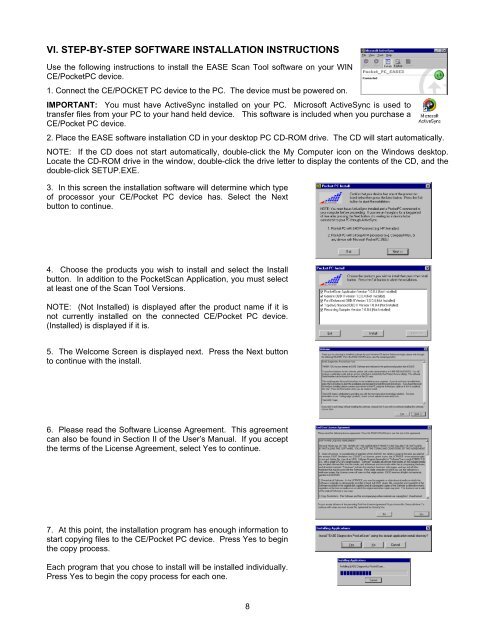
VI. STEP-BY-STEP SOFTWARE INSTALLATION INSTRUCTIONS<br />
Use the follo<strong>win</strong>g instructions to install the EASE Scan Tool software on your WIN<br />
CE/PocketPC devi<strong>ce</strong>.<br />
1. Connect the CE/POCKET PC devi<strong>ce</strong> to the PC. The devi<strong>ce</strong> must be powered on.<br />
IMPORTANT: You must have ActiveSync installed on your PC. Microsoft ActiveSync is used to<br />
transfer files from your PC to your hand held devi<strong>ce</strong>. This software is included when you purchase a<br />
CE/Pocket PC devi<strong>ce</strong>.<br />
2. Pla<strong>ce</strong> the EASE software installation CD in your desktop PC CD-ROM drive. The CD will start automatically.<br />
NOTE: If the CD does not start automatically, double-click the My Computer icon on the Windows desktop.<br />
Locate the CD-ROM drive in the <strong>win</strong>dow, double-click the drive letter to display the contents of the CD, and the<br />
double-click SETUP.EXE.<br />
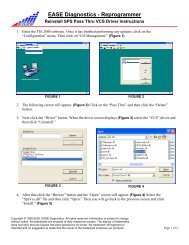
3. In this screen the installation software will determine which type<br />
of pro<strong>ce</strong>ssor your CE/Pocket PC devi<strong>ce</strong> has. Select the Next<br />
button to continue.<br />
4. Choose the products you wish to install and select the Install<br />
button. In addition to the PocketScan Application, you must select<br />
at least one of the Scan Tool Versions.<br />
NOTE: (Not Installed) is displayed after the product name if it is<br />
not currently installed on the connected CE/Pocket PC devi<strong>ce</strong>.<br />
(Installed) is displayed if it is.<br />
5. The Welcome Screen is displayed next. Press the Next button<br />
to continue with the install.<br />
6. Pl<strong>ease</strong> read the Software Li<strong>ce</strong>nse Agreement. This agreement<br />
can also be found in Section II of the User’s Manual. If you ac<strong>ce</strong>pt<br />
the terms of the Li<strong>ce</strong>nse Agreement, select Yes to continue.<br />
7. At this point, the installation program has enough information to<br />
start copying files to the CE/Pocket PC devi<strong>ce</strong>. Press Yes to begin<br />
the copy pro<strong>ce</strong>ss.<br />
Each program that you chose to install will be installed individually.<br />
Press Yes to begin the copy pro<strong>ce</strong>ss for each one.<br />
8