Ascent: Mag-3L Trainer - Nashbar
Ascent: Mag-3L Trainer - Nashbar
Ascent: Mag-3L Trainer - Nashbar

You also want an ePaper? Increase the reach of your titles
YUMPU automatically turns print PDFs into web optimized ePapers that Google loves.
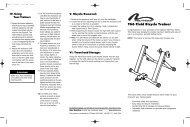
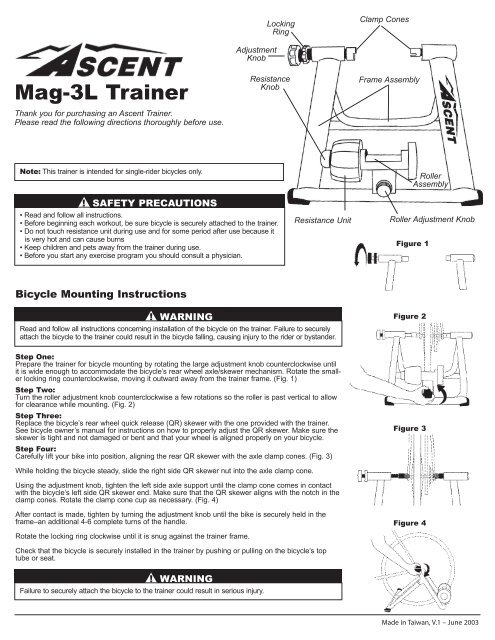
Locking<br />
Ring<br />
Clamp Cones<br />
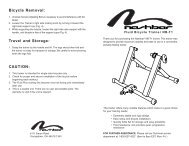
<strong>Mag</strong>-<strong>3L</strong> <strong>Trainer</strong><br />
Thank you for purchasing an <strong>Ascent</strong> <strong>Trainer</strong>.<br />
Please read the following directions thoroughly before use.<br />
Adjustment<br />
Knob<br />
Resistance<br />
Knob<br />
Frame Assembly<br />
Note: This trainer is intended for single-rider bicycles only.<br />
▲ ! SAFETY PRECAUTIONS<br />
• Read and follow all instructions.<br />
• Before beginning each workout, be sure bicycle is securely attached to the trainer.<br />
• Do not touch resistance unit during use and for some period after use because it<br />
is very hot and can cause burns<br />
• Keep children and pets away from the trainer during use.<br />
• Before you start any exercise program you should consult a physician.<br />
Resistance Unit<br />
Roller<br />
Assembly<br />
Roller Adjustment Knob<br />
Figure 1<br />
Bicycle Mounting Instructions<br />
▲ ! WARNING<br />
Read and follow all instructions concerning installation of the bicycle on the trainer. Failure to securely<br />
attach the bicycle to the trainer could result in the bicycle falling, causing injury to the rider or bystander.<br />
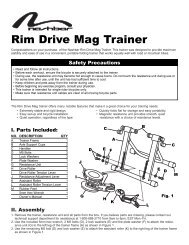
Figure 2<br />
Step One:<br />
Prepare the trainer for bicycle mounting by rotating the large adjustment knob counterclockwise until<br />
it is wide enough to accommodate the bicycle’s rear wheel axle/skewer mechanism. Rotate the smaller<br />
locking ring counterclockwise, moving it outward away from the trainer frame. (Fig. 1)<br />
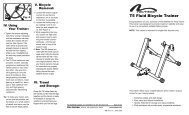
Step Two:<br />
Turn the roller adjustment knob counterclockwise a few rotations so the roller is past vertical to allow<br />
for clearance while mounting. (Fig. 2)<br />
Step Three:<br />
Replace the bicycle’s rear wheel quick release (QR) skewer with the one provided with the trainer.<br />
See bicycle owner’s manual for instructions on how to properly adjust the QR skewer. Make sure the<br />
skewer is tight and not damaged or bent and that your wheel is aligned properly on your bicycle.<br />
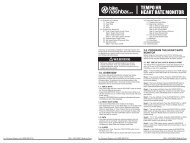
Step Four:<br />
Carefully lift your bike into position, aligning the rear QR skewer with the axle clamp cones. (Fig. 3)<br />
Figure 3<br />
While holding the bicycle steady, slide the right side QR skewer nut into the axle clamp cone.<br />
Using the adjustment knob, tighten the left side axle support until the clamp cone comes in contact<br />
with the bicycle’s left side QR skewer end. Make sure that the QR skewer aligns with the notch in the<br />
clamp cones. Rotate the clamp cone cup as necessary. (Fig. 4)<br />
After contact is made, tighten by turning the adjustment knob until the bike is securely held in the<br />
frame–an additional 4-6 complete turns of the handle.<br />
Rotate the locking ring clockwise until it is snug against the trainer frame.<br />
Figure 4<br />
Check that the bicycle is securely installed in the trainer by pushing or pulling on the bicycle’s top<br />
tube or seat.<br />
▲ ! WARNING<br />
Failure to securely attach the bicycle to the trainer could result in serious injury.<br />
Made in Taiwan, V.1 – June 2003
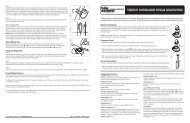
Step Five:<br />
Tighten the roller assembly against the rear tire by turning the roller adjustment knob clockwise until<br />
roller is firmly against tire. As a guide, once roller touches tire, rotate knob 1-2 additional turns for a<br />
high pressure road tire, or 1-3 additional turns for a mountain tire. (Fig. 5)<br />
Figure 5<br />
Changing <strong>Trainer</strong> Resistance<br />
This trainer has three levels of resistance to help keep variety in your workout program. To change<br />
the level, pull the resistance knob outward and rotate it to the desired level (fig. 6). Level one offers<br />
the least resistance while level three offers the most.<br />
Changing the gears on your bike will also have an effect on your exertion levels.<br />
Riding Comfort Tip<br />
Once attached to the trainer, the bicycle naturally slopes downward slightly. To level bike, place a hard<br />
cover book or block of wood under front tire to compensate.<br />
Figure 6<br />
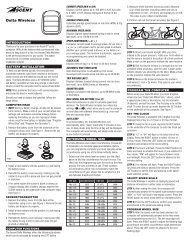
Bicycle Removal:<br />
Step One:<br />
Loosen the roller assembly (resistance unit) from the rear tire by turning the roller adjustment knob<br />
counter-clockwise until the roller is not touching the tire.<br />
1<br />
Step Two:<br />
While holding the bike securely – loosen the clamp cones by turning the rotating ring counter-clockwise<br />
then the adjustment know counter-clockwise, until the bike is free of the clamp cones.<br />
Note: The QR skewer provided with the trainer can also be used when riding the bicycle when off the<br />
trainer. If you prefer to replace it with the skewer provided with the bicycle, refer to the bicycle owner’s<br />
manual for instructions on how to properly adjust the skewer. Be sure the replaced skewer is tight.<br />
2<br />
3<br />
Made in Taiwan, V.1 – June 2003