NB-RDT Nashbar Rim Drive Mag Trainer
NB-RDT Nashbar Rim Drive Mag Trainer
NB-RDT Nashbar Rim Drive Mag Trainer
- No tags were found...

Create successful ePaper yourself
Turn your PDF publications into a flip-book with our unique Google optimized e-Paper software.
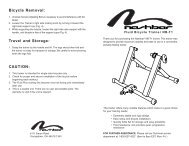
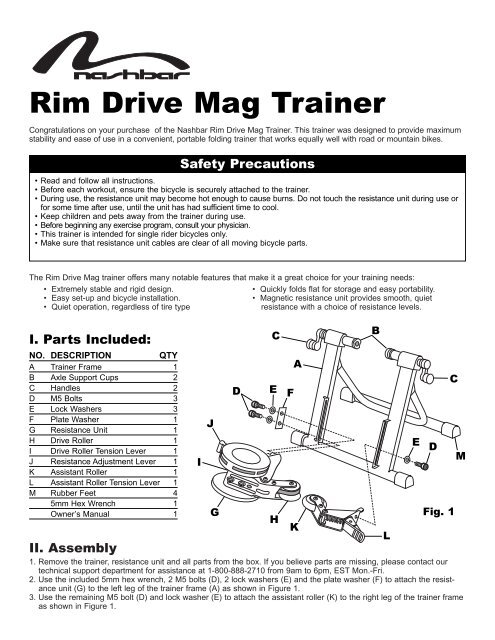
<strong>Rim</strong> <strong>Drive</strong> <strong>Mag</strong> <strong>Trainer</strong>Congratulations on your purchase of the <strong>Nashbar</strong> <strong>Rim</strong> <strong>Drive</strong> <strong>Mag</strong> <strong>Trainer</strong>. This trainer was designed to provide maximumstability and ease of use in a convenient, portable folding trainer that works equally well with road or mountain bikes.Safety Precautions• Read and follow all instructions.• Before each workout, ensure the bicycle is securely attached to the trainer.• During use, the resistance unit may become hot enough to cause burns. Do not touch the resistance unit during use orfor some time after use, until the unit has had sufficient time to cool.• Keep children and pets away from the trainer during use.• Before beginning any exercise program, consult your physician.• This trainer is intended for single rider bicycles only.• Make sure that resistance unit cables are clear of all moving bicycle parts.The <strong>Rim</strong> <strong>Drive</strong> <strong>Mag</strong> trainer offers many notable features that make it a great choice for your training needs:• Extremely stable and rigid design.• Easy set-up and bicycle installation.• Quiet operation, regardless of tire typeI. Parts Included:NO. DESCRIPTIONQTYA <strong>Trainer</strong> Frame 1B Axle Support Cups 2C Handles 2D M5 Bolts 3E Lock Washers 3F Plate Washer 1G Resistance Unit 1H <strong>Drive</strong> Roller 1I <strong>Drive</strong> Roller Tension Lever 1J Resistance Adjustment Lever 1K Assistant Roller 1L Assistant Roller Tension Lever 1M Rubber Feet 45mm Hex Wrench 1Owner’s Manual 1IJGD• Quickly folds flat for storage and easy portability.• <strong>Mag</strong>netic resistance unit provides smooth, quietresistance with a choice of resistance levels.II. Assembly1. Remove the trainer, resistance unit and all parts from the box. If you believe parts are missing, please contact ourtechnical support department for assistance at 1-800-888-2710 from 9am to 6pm, EST Mon.-Fri.2. Use the included 5mm hex wrench, 2 M5 bolts (D), 2 lock washers (E) and the plate washer (F) to attach the resistanceunit (G) to the left leg of the trainer frame (A) as shown in Figure 1.3. Use the remaining M5 bolt (D) and lock washer (E) to attach the assistant roller (K) to the right leg of the trainer frameas shown in Figure 1.CEHFAKBLCE DMFig. 1
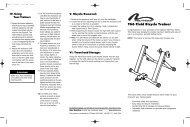
III. Bicycle Installation▲! WARNINGRead and follow all instructions concerning installation of the bicycle on the trainer. Failure to securely attach the bicycleto the trainer may allow the bicycle to fall, resulting in injury to the rider or bystanders.1. Set the <strong>Rim</strong> <strong>Drive</strong> <strong>Mag</strong> <strong>Trainer</strong> on a flat, stable surface.2. Spin the handles (C) counterclockwise to fully loosen the left and right side axle support cups (B).3. Push the white tension levers (I) and (L) toward the trainer frame to disengage the drive roller (H) and assistant roller(K) and allow clearance for the rear wheel.4. Lift the bicycle into position, so that the rear QR skewer is aligned with the right and left axle support cups (B).5. Fit the QR skewer lever on the left side of the wheel into the left axle support cup. Rotate the support cup as necessary,until the notch in the cup is aligned with the QR skewer lever.6. Tighten both axle support cups against the QR skewer by spinning the handles (C) clockwise until they contact the QRskewer lever and nut. Once contact is made, tighten the handles an additional 2-3 rotations or so.7. Check that the bicycle is securely installed in the trainer by pushing or pulling on the bicycle’s top tube or seat.8. If the bicycle is not secure, check to see that the quick release skewer lever and nut are properly positioned in theaxle support cups, and that the handles are securely tightened.▲! WARNINGFailure to securely attach the bicycle to the trainer could result in serious injury.IV. Using Your <strong>Trainer</strong>Adjust Roller Position1. Adjust the position of the drive roller and assistant roller so thatboth squarely contact the wheel rim. See Figure 2.2. Pull the tension levers (I) and (L) away from the trainer frame toengage the rollers, and note their alignment with the rim. I3. If the rollers do not contact the rim squarely, loosen the M5 bolts(D) slightly and adjust the vertical position of the drive roller andassistant roller by sliding them up or down along the slotted trackson the rear trainer frame legs. Once the rollers are positionedproperly, tighten the M5 bolts securely.Adjust Roller Tension and Resistance4. Once both rollers are aligned with the rim, engage both rollers and make sure the drive roller firmlycontacts the rim. If it does not, loosen the left side axle support cup and tighten the right sideaxle support cup an equal amount to move the rim closer to the drive roller. The rollers need toprovide enough pressure against the rim to prevent the rear wheel from slipping while in use.5. The <strong>Rim</strong> <strong>Drive</strong> <strong>Mag</strong> resistance unit offers seven resistance settings to vary the intensity ofyour workout. As the resistance adjustment lever (J) is moved from “L” to “H”, the resistancelevel will increase. See Figure 3. Middle range settings simulate level road conditions,lower settings are useful for warm-ups or high cadence training, and the higher settingsapproximate hill climbing conditions.Tip: To make your indoor workout as quiet as possible, set the trainer on a small section of carpet.JFig. 2LV. Bicycle Removal1. Push the white tension levers (I) and (L) toward the trainer frame to disengage the drive roller (H) and assistant roller (K).2. While supporting the bicycle, loosen the left and right side axle support cups (B) by spinning the handles (C) counterclockwiseuntil the rear wheel axle is free of the support cups.VI. Travel and StorageFig. 31. Grasp the top of the <strong>Rim</strong> <strong>Drive</strong> <strong>Mag</strong> trainer frame and lift. Fold the legs together and the trainer is ready for transport orstorage. Be careful to avoid pinching your fingers when you fold the legs.For technical support, call 1-800-888-2710, M-F 9am-6pm ESTBike <strong>Nashbar</strong>, 6103 Rt. 446, Canfield,OH. 44406Made in Japanwww.nashbar.com<strong>NB</strong>-<strong>RDT</strong>, V.1 – November 2003