
You also want an ePaper? Increase the reach of your titles
YUMPU automatically turns print PDFs into web optimized ePapers that Google loves.
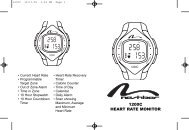
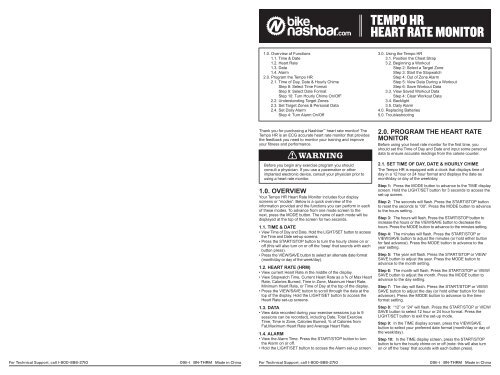
<strong>TEMPO</strong> <strong>HR</strong><strong>HEART</strong> <strong>RATE</strong> <strong>MONITOR</strong>1.0. Overview of Functions1.1. Time & Date1.2. Heart Rate1.3. Data1.4. Alarm2.0. Program the Tempo <strong>HR</strong>2.1. Time of Day, Date & Hourly ChimeStep 8: Select Time FormatStep 9: Select Date FormatStep 10: Turn Hourly Chime On/OfF2.2. Understanding Target Zones2.3. Set Target Zones & Personal Data2.4. Set Daily AlarmStep 4: Turn Alarm On/Off3.0. Using the Tempo <strong>HR</strong>3.1. Position the Chest Strap3.2. Beginning a WorkoutStep 2: Select a Target ZoneStep 3: Start the StopwatchStep 4: Out of Zone AlarmStep 5: View Data During a WorkoutStep 6: Save Workout Data3.3. View Saved Workout DataStep 4: Clear Workout Data3.4. Backlight3.5. Daily Alarm4.0. Replacing Batteries5.0. TroubleshootingThank you for purchasing a <strong>Nashbar</strong> heart rate monitor! TheTempo <strong>HR</strong> is an ECG accurate heart rate monitor that providesthe feedback you need to monitor your training and improveyour fitness and performance.WARNINGBefore you begin any exercise program you shouldconsult a physician. If you use a pacemaker or otherimplanted electronic device, consult your physician prior tousing a heart rate monitor.2.0. PROGRAM THE <strong>HEART</strong> <strong>RATE</strong><strong>MONITOR</strong>Before using your heart rate monitor for the first time, youshould set the Time of Day and Date and input some personaldata to ensure accurate readings from the calorie counter.2.1. SET TIME OF DAY, DATE & HOURLY CHIMEThe Tempo <strong>HR</strong> is equipped with a clock that displays time ofday in a 12 hour or 24 hour format and displays the date asmonth/day or day of the week/day.1.0. OVERVIEWYour Tempo <strong>HR</strong> Heart Rate Monitor includes four displayscreens or “modes”. Below is a quick overview of theinformation provided and the functions you can perform in eachof these modes. To advance from one mode screen to thenext, press the MODE button. The name of each mode will bedisplayed at the top of the screen for two seconds.1.1. TIME & DATE• View Time of Day and Date. Hold the LIGHT/SET button to accessthe Time and Date set-up screens.• Press the START/STOP button to turn the hourly chime on oroff (this will also turn on or off the ‘beep’ that sounds with eachbutton press).• Press the VIEW/SAVE button to select an alternate date format(month/day or day of the week/day).1.2. <strong>HEART</strong> <strong>RATE</strong> (<strong>HR</strong>M)• View current Heart Rate in the middle of the display.• View Stopwatch Time, Current Heart Rate as a % of Max HeartRate, Calories Burned, Time in Zone, Maximum Heart Rate,Minimum Heart Rate, or Time of Day at the top of the display.• Press the VIEW/SAVE button to scroll through the data at thetop of the display. Hold the LIGHT/SET button to access theHeart Rate set-up screens.Step 1: Press the MODE button to advance to the TIME displayscreen. Hold the LIGHT/SET button for 3 seconds to access theset-up screen.Step 2: The seconds will flash. Press the START/STOP buttonto reset the seconds to “00”. Press the MODE button to advanceto the hours setting.Step 3: The hours will flash. Press the START/STOP button toincrease the hours or the VIEW/SAVE button to decrease thehours. Press the MODE button to advance to the minutes setting.Step 4: The minutes will flash. Press the START/STOP orVIEW/SAVE button to adjust the minutes (or hold either buttonfor fast advance). Press the MODE button to advance to theyear setting.Step 5: The year will flash. Press the START/STOP or VIEW/SAVE button to adjust the year. Press the MODE button toadvance to the month setting.Step 6: The month will flash. Press the START/STOP or VIEW/SAVE button to adjust the month. Press the MODE button toadvance to the day setting.Step 7: The day will flash. Press the START/STOP or VIEW/SAVE button to adjust the day (or hold either button for fastadvance). Press the MODE button to advance to the timeformat setting.1.3. DATA• View data recorded during your exercise sessions (up to 9sessions can be recorded), including Date, Total ExerciseTime, Time in Zone, Calories Burned, % of Calories fromFat,Maximum Heart Rate and Average Heart Rate.1.4. ALARM• View the Alarm Time. Press the START/STOP button to turnthe Alarm on or off.• Hold the LIGHT/SET button to access the Alarm set-up screen.Step 8: “12” or “24” will flash. Press the START/STOP or VIEW/SAVE button to select 12 hour or 24 hour format. Press theLIGHT/SET button to exit the set-up mode.Step 9: In the TIME display screen, press the VIEW/SAVEbutton to select your preferred date format (month/day or day ofthe week/day).Step 10: In the TIME display screen, press the START/STOPbutton to turn the hourly chime on or off (note: this will also turnon or off the ‘beep’ that sounds with each button press).For Technical Support, call 1-800-888-27100911-1 BN-T<strong>HR</strong>M Made in ChinaFor Technical Support, call 1-800-888-27100911-1 BN-T<strong>HR</strong>M Made in China
2.2. UNDERSTANDING TARGET ZONESMeasuring heart rate is the most practical method of determiningthe level of exertion during exercise. Every individual has amaximum heart rate (M<strong>HR</strong>)—the fastest rate at which their heartcan beat per minute. This rate varies widely depending on age,fitness level and many other factors, but it steadily decreases aswe get older.A heart rate “target zone” is simply a heart rate range, with anupper and lower limit. Exercising within the appropriate target zonefor your particular fitness goals will make the most efficient use ofyour training time. Target Zones are calulated as a percentage ofyour maximum heart rate.The four target zones generally identified by exercisephysiologists are listed below.Zone 1: Between 50% and 60% of M<strong>HR</strong>Exercise in this zone to warm up and burn fat.Zone 2: Between 60% and 70% of M<strong>HR</strong>Exercise in this zone to develop basic endurance and aerobiccapacity, burn fat or to recover from a more strenuous workout.Zone 3: Between 70% and 80% of M<strong>HR</strong>Exercise in this zone to increase aerobic capacity.Zone 4: Between 80% and 90% of M<strong>HR</strong>Exercise in this zone to increase anaerobic threshold.How do you calculate your maximum heart rate (M<strong>HR</strong>)? Thesimple formula most commonly used to estimate maximumheart rate is: M<strong>HR</strong> = 220 - Age. As an example, the maximumheart rate for a 45 year-old would be: 220 - 45 = 175bpm(beats per minute).Use your maximum heart rate to calculate and program your targetzones. Then, based on your fitness goals, select an appropriatetarget zone each time you exercise—keeping in mind yourcurrent fitness level, any existing medical conditions and anyrecommendations your doctor has made.If the 45 year-old in our example above wanted to exercise inZone 2 to build aerobic capacity, the target zone lower limitwould be 105bpm (60% of 175bpm) and the upper limit wouldbe 122bpm (70% of 175bpm). During his workout, he would tryto keep his heart rate between 105bpm and 122bpm.2.3. TARGET ZONES & PERSONAL DATAFor more effective training, the Tempo <strong>HR</strong> offers 3programmable target zones. To help with fitness and weighloss goals, the Tempo <strong>HR</strong> calculates calories burned and thepercentage of those calories that come from fat. To ensure themost accurate calculations, you will need to program your age,gender, height and weight.Step 1: Press the MODE button to advance to the <strong>HR</strong>Mdisplay screen. Hold the LIGHT/SET button for 3 seconds toaccess the set-up screen.Step 2: The Age value will flash. Press the START/STOPbutton to increase age or the VIEW/SAVE button to decreaseage (or hold either button for fast advance). Press the MODEbutton to advance to gender setting.Step 3: “M” or “F” will flash. Press the START/STOP buttonto select gender (Male or Female). Press the MODE button toadvance to target zone setting.Step 4: The zone number will flash (1, 2 or 3). Press theSTART/STOP button to select the zone you wish to program.Press the MODE button to advance to upper limit setting.Step 5: The upper limit value will flash. Press the START/STOP button to increase the value or the VIEW/SAVE buttonto decrease the value (or hold either button for fast advance).Press the MODE button to advance to the lower limit setting.Step 6: The lower limit value will flash. Press the START/STOPor VIEW/SAVE button to adjust the value. Press the MODEbutton to advance to the units of measure setting screen. (Note:Programming additional target zones will be explained at the endof the set-up procedure.)Step 7: “Ft-Lb” or “CM-KG” will flash. Press the START/STOP button to select Imperial (feet and pounds) or Metric(centimeters and kilograms) units of measure. Press the MODEbutton to advance to the height setting.Step 8: The height value (in feet or centimeters) will flash.Press the START/STOP or VIEW/SAVE button to adjust thevalue. If Imperial units of measure were chosen, press theMODE button to advance to inches setting and use the START/STOP button to adjust inches. Press the MODE button toadvance to the weight setting.Step 9: The weight value (in pounds or kilograms) will flash.Press the START/STOP or VIEW/SAVE button to adjust thevalue. Press the MODE button to advance to the out of zonealarm setting screen.Step 10: “OFF” or “On” will flash. Press the START/STOPbutton to turn the out of zone alarm on or off. If activated, visualarrows in the display screen and an audible alarm will indicatewhen your heart rate rises above your upper limit (up arrow andtwo quick beeps) or falls below your lower limit (down arrow andsingle beep).Step 11: If you wish to program a second and third target zoneat this time, press the MODE button 3 times to return to thetarget zone setting screen and continue from STEP 4, above.Otherwise, press the LIGHT/SET button to exit set-up mode.2.4. SET THE DAILY ALARMStep 1: Press the MODE button to advance to the ALARMdisplay screen. Hold the LIGHT/SET button for 3 seconds toaccess the set-up screen.Step 2: The hours will flash. Press the START/STOP button toincrease the hours or the VIEW/SAVE button to decrease thehours (or hold either button for fast advance). Press the MODEbutton to advance to the minutes setting.Step 3: The minutes will flash. Press the START/STOP orVIEW/SAVE button to adjust the minutes. Press the LIGHT/SETbutton to turn the alarm on and exit the set-up mode.Step 4: In the ALARM display screen, press the START/STOPbutton to activate or deactivate the alarm.Sttep 5: When activated, the alarm will sound for 20 seconds.Press any button to silence the alarm.3.0. USING THE <strong>HEART</strong> <strong>RATE</strong><strong>MONITOR</strong>Now that the target zones have been programmed and thepersonal data has been entered, you’re ready to begin yourfirst workout.3.1. POSITION THE CHEST STRAPThe chest strap provided with your heart rate monitor operatesas both a sensor and transmitter. The electrode pads on theback of the straps measure your heart rate and the transmitterat the center of the strap sends this information to the watch byradio frequency. The accuracy of the measurement depends onthe correct positioning of the strap and good contact betweenthe electrode pads and your skin.Step 1: Moisten the electrode pads on the back of thetransmitter strap with water, saliva or a conductive gel (suchas <strong>Nashbar</strong> Heart Rate Gel, NB-<strong>HR</strong>G). Position the cheststrap on the center of the chest below the pectoral muscles,as shown in Figure 1. Adjust the elastic strap length to achievea snug, comfortablefit. The strap should Fig 1not move when youjump or move yourarms. The transmitteris automaticallyactivated when placedon the body, but thesignal may be weakor irregular if theelectrode pads on theback of the strap arenot sufficiently moist.3.2. BEGINNING A WORKOUTStep 1: Press the MODE button to advance to the <strong>HR</strong>M displayscreen. If you wish to select one of your programmed targetzones, hold the LIGHT/SET button for 3 seconds to access theset-up screen. Then press the MODE button twice to accessthe Zone selection screen. “1”, “2” or “3” will flash in the screen.Press the START/STOP button to select the desired target zone.Press the LIGHT/SET button to return to the <strong>HR</strong>M display screen.Step 2: The “- - -“ symbol will flash in the display screen whilethe watch searches for the chest strap signal. After severalseconds (provided the chest strap is positioned correctly andproperly moistened), the heart icon will flash and your currentheart rate will be displayed on the screen. If the watch does notdetect a signal within 60 seconds, the “- - -“ will stop flashingand the watch will stop searching for a signal. To reactivate thesignal search, exit <strong>HR</strong>M mode and return to <strong>HR</strong>M mode usingthe MODE button.Step 3: Once your current heart rate is displayed on the screenand you’re ready to begin your workout, press the STOP/STARTbutton to start the stopwatch. Your workout data will only berecorded while the stopwatch is running, so if you want torecord your exercise data you must start the stopwatch at thebeginning of your workout.Step 4: If you activated the out of zone alarm during set-up (seesection 2.3, step 10) an up or down arrow will appear next to yourcurrent heart rate to indicate whether your heart rate is above orbelow your selected target zone. If your heart rate is within thezone limits, no arrows will appear. Additionally, a single beep willsound every 7 seconds while you’re below zone and a doublebeep will sound every 7 seconds while you’re above zone.Step 5: During your workout, while in the <strong>HR</strong>M display screen,press the VIEW/SAVE button to view additional data about yourcurrent workout, including:• Current heart rate as a % of your maximum heart rate• Calories burned• Time in zone• Highest heart rate attained during current session• Lowest heart rate during current session• Time of day• Stopwatch timeStep 6: At the end of your workout, press the START/STOPbutton (in the <strong>HR</strong>M display screen) to stop the stopwatch. If youwish to save the data from this workout session for later review,hold the VIEW/SAVE button for 3 seconds to record your sessiondata. If you don’t want to save the data when you complete aworkout, hold the LIGHT/SET button for 3 seconds to clear thedata and reset the stopwatch.3.3. VIEW SAVED WORKOUT DATAThe Tempo <strong>HR</strong> can store data for as many as 9 exercisesessions. See section 3.2, step 6 about saving data at the endof a workout.Step 1: Press the MODE button to advance to the DATA displayscreen. If data from any exercise sessions is stored in memory,the name of the first session (‘RUN 1’) will appear in the screen,before automatically scrolling through the following data recordedfor the first session:• Date• Total Exercise Time• Total Time in Zone• Total Calories Burned• % of Calories Burned from Fat• Maximum Heart Rate for session• Average Heart Rate for sessionStep 2: To skip forward in the scrolling sequence for the currentsession, press the VIEW/SAVE button. To skip forward to thenext recorded session, press the START/STOP button.Step 3: After the last recorded session is displayed, press theSTART/STOP button to view the total cumulative exercise timeand calories burned for all recorded exercise sessions. ‘ACC’will appear in the display screen before automatically scrollingthrough cumulative exercise time and cumulative calories burned.Step 4: To clear all recorded exercise sessions from memory,hold the LIGHT/SET button for 4 seconds within any of theDATA display screens. To clear just one recorded exercisesession from memory, hold the LIGHT/SET button for 3 secondswhile viewing the session you wish to delete. (Tip: Release thebutton as soon as ‘ALL’ appears at the top of the screen.)3.4. BACKLIGHTPress the LIGHT/SET button in any display screen to activatethe backlight for 3 seconds.3.5. DAILY ALARMStep 1: To set the Alarm, see section 2.4.Step 2: In the ALARM display screen, press the START/STOPbutton to activate or deactivate the alarm.Step 3: When activated, the alarm will sound for 20 seconds.Press any button to silence the alarm.4.0. REPLACING BATTERIESChest StrapBattery type: 3V Lithium CR2032.The battery in the chest strap is user serviceable and can bereplaced without any special tools.Step 1: Remove thebattery compartmentcover from the backof the chest strapusing a coin (seeFigure 2).25cStep 2: Removethe old batteryand dispose ofproperly. Install the new battery with the positive pole facing thecompartment cover and the negative pole contacting the metalprongs inside the battery compartment.Step 3: Make sure the rubber O-ring around the batterycompartment opening is still in place, carefully replace thecompartment cover, and tighten it with a coin.WATCHBattery type: 3V Lithium CR 2032.To prevent damage to the watch’s water-tight seal, werecommend you take your watch to a jeweler or watch repairshop for battery replacement.5.0. TROUBLESHOOTINGHeart rate reading is erratic or totally absentStep 1: Make sure you are in the <strong>HR</strong>M display screen andthat the “- - -“ symbol is flashing (indicating that the watch issearching for a signal from the chest strap transmitter). If the“- - -“ symbol is steady (not flashing), press the MODE button toexit the <strong>HR</strong>M display screen and then return to it to reactivatethe signal search. If the watch does not locate a signal within60 seconds, it will stop searching.Step 2: Make sure the electrode pads are sufficiently moist.Moisture enables the electrodes to make proper electricalcontact with the skin. Moisten the electrode pads with water,saliva, or a conductive gel product.Step 3: Make sure the chest strap is sufficiently tight. The strapshould be positioned and tightened so that the electrode padsare just below the pectoral muscles and are flat against your skin.Adjust the strap side to side or slightly up or down until the strapis positioned properly. The strap should be tight enough that itdoesn’t move when you jump or move your arms.Step 4: Accumulated dirt or residue on the chest strapelectrode pads may impair electrical contact. Make sure theelectrode pads are clean.Step 5: Make sure the chest strap transmitter battery isinstalled properly and still fresh.Fig 2Heart rate reading is erratic or extremely highElectromagnetic signals from outside sources may cause erraticor abnormally high heart rate readings. Common sources ofelectromagnetic signals include high voltage power lines, motordriven equipment, and other heart rate monitors. Check yoursurroundings for possible sources of electromagnetic signals,and move away from the source.