CRACKING RAY TUBES - Cracked Ray Tube
CRACKING RAY TUBES - Cracked Ray Tube
CRACKING RAY TUBES - Cracked Ray Tube

You also want an ePaper? Increase the reach of your titles
YUMPU automatically turns print PDFs into web optimized ePapers that Google loves.
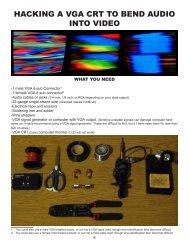
2.2 SOLDERING THE 1/4 INCH JACKS<br />
-Cut three 6-inch wires and strip both ends 3/4 of an inch on all.<br />
-Connect one end of 2 of the wires to each positive solder lug on both jacks by putting the wire<br />
half-way through the hole and twisting it to hold it in place, then solder them together.<br />
-Connect one end of the remaining wire to a negative solder lug on one of the two audio jacks<br />
the same way and solder them together.<br />
positive lugs,connect both to a color pin<br />
negative lug, connect one to a color pin to<br />
generate the majority of the visuals.<br />
2.2 CONNECTING THE 1/4 INCH JACKS TO THE R, G, AND B PINS<br />
-Solder the other end of the wire attached to the NEGTIVE lug of one of the audio jacks to one<br />
of the wires soldered to the color pins.<br />
-Solder the other ends of the wires attached to the POSITIVE lugs of each of the audio jacks to<br />
the 2 of the wires attached to color pins<br />
-(It doesn’t matter which pin goes to which lug, just make sure two are attached to each of the<br />
positive signals and one is attached to one of the negative signals).<br />
15