How To Build A Spray-In-Place Concrete Fence - Monolithic
How To Build A Spray-In-Place Concrete Fence - Monolithic
How To Build A Spray-In-Place Concrete Fence - Monolithic

Create successful ePaper yourself
Turn your PDF publications into a flip-book with our unique Google optimized e-Paper software.
out to full thickness because we are<br />
going to spray one more time with the<br />
colored concrete. The second day it is<br />
a good idea to have most of the thickness<br />
finished up. You don’t want to<br />
spend a lot of time with colored concrete<br />
trying to cover up missed places.<br />
Note: It is very difficult to judge<br />
the depth of sprayed concrete as it is<br />
being applied. A 1” layer can look<br />
very much like a 1/8” layer. <strong>To</strong> be<br />
sure of a uniform build up of thickness,<br />
a very uniform spraying pattern<br />
should be followed. This pattern can<br />
vary according to the nozzleman, but<br />
it should be consistent. <strong>To</strong> insure<br />
proper thickness, check the depth<br />
gauges.<br />
It is important to use good shotcrete<br />
techniques when shooting around<br />
rebar, that is, shoot from close enough<br />
to the bar and with enough force that<br />
the concrete cannot build up on the<br />
face of the bar but closes around it<br />
from the back.<br />
After the fence has set overnight,<br />
gently, and I use the word gently,<br />
remove the forms, clean them, and<br />
move them on to get ready for another<br />
section of fence.<br />
The Last Coat<br />
The concrete can now be applied<br />
to both sides of the fence. This last<br />
coat of concrete to the front side and<br />
the complete coating on the back side<br />
should be done with a half to three<br />
quarter inch covering.<br />
This spray of approximately 1/2 to<br />
3/4 inch of concrete on the form side<br />
is to protect the rebar.<br />
The fence will harden up considerably<br />
over the first thirty days. It is<br />
very helpful if it can be kept damp<br />
within that same thirty day period.<br />
This can be done by hanging cloth or<br />
burlap over the fence and spraying<br />
water on it from time to time during<br />
the day. It is extremely important that<br />
the fence be kept moist during periods<br />
of direct sun, hot sun, and dry winds.<br />
The fence can be protected by coating<br />
with a concrete sealer available from<br />
the concrete accessory supplier.<br />
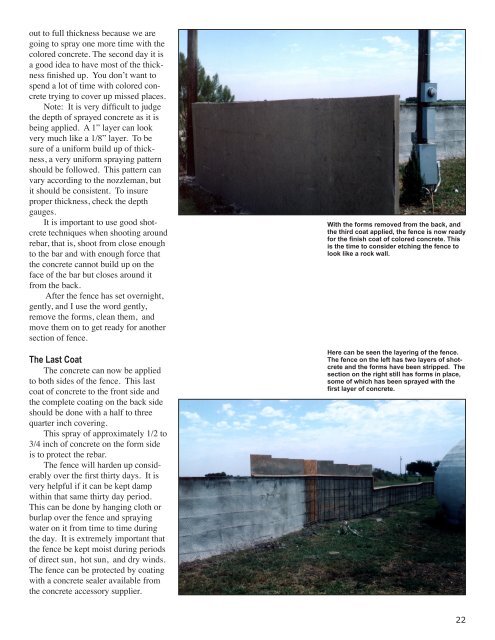
With the forms removed from the back, and<br />
the third coat applied, the fence is now ready<br />
for the finish coat of colored concrete. This<br />
is the time to consider etching the fence to<br />
look like a rock wall.<br />
Here can be seen the layering of the fence.<br />
The fence on the left has two layers of shotcrete<br />
and the forms have been stripped. The<br />
section on the right still has forms in place,<br />
some of which has been sprayed with the<br />
first layer of concrete.<br />
22