Detailed User's Manual - Sans Digital
Detailed User's Manual - Sans Digital
Detailed User's Manual - Sans Digital

You also want an ePaper? Increase the reach of your titles
YUMPU automatically turns print PDFs into web optimized ePapers that Google loves.
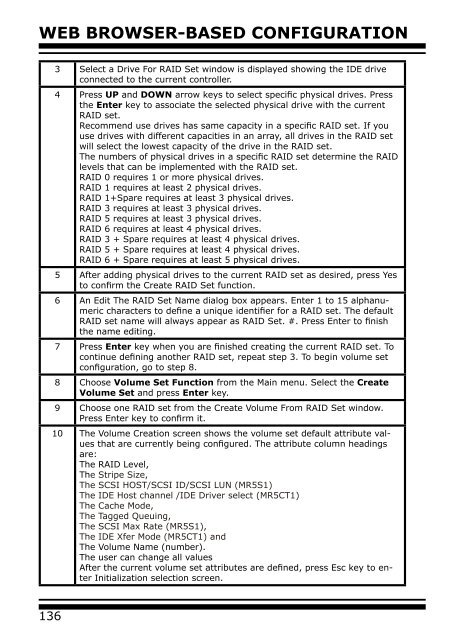
WEB BROWSER-BASED CONFIGURATION<br />
3 Select a Drive For RAID Set window is displayed showing the IDE drive<br />
connected to the current controller.<br />
4 Press UP and DOWN arrow keys to select specific physical drives. Press<br />
the Enter key to associate the selected physical drive with the current<br />
RAID set.<br />
Recommend use drives has same capacity in a specific RAID set. If you<br />
use drives with different capacities in an array, all drives in the RAID set<br />
will select the lowest capacity of the drive in the RAID set.<br />
The numbers of physical drives in a specific RAID set determine the RAID<br />
levels that can be implemented with the RAID set.<br />
RAID 0 requires 1 or more physical drives.<br />
RAID 1 requires at least 2 physical drives.<br />
RAID 1+Spare requires at least 3 physical drives.<br />
RAID 3 requires at least 3 physical drives.<br />
RAID 5 requires at least 3 physical drives.<br />
RAID 6 requires at least 4 physical drives.<br />
RAID 3 + Spare requires at least 4 physical drives.<br />
RAID 5 + Spare requires at least 4 physical drives.<br />
RAID 6 + Spare requires at least 5 physical drives.<br />
5 After adding physical drives to the current RAID set as desired, press Yes<br />
to confirm the Create RAID Set function.<br />
6 An Edit The RAID Set Name dialog box appears. Enter 1 to 15 alphanumeric<br />
characters to define a unique identifier for a RAID set. The default<br />
RAID set name will always appear as RAID Set. #. Press Enter to finish<br />
the name editing.<br />
7 Press Enter key when you are finished creating the current RAID set. To<br />
continue defining another RAID set, repeat step 3. To begin volume set<br />
configuration, go to step 8.<br />
8 Choose Volume Set Function from the Main menu. Select the Create<br />
Volume Set and press Enter key.<br />
9 Choose one RAID set from the Create Volume From RAID Set window.<br />
Press Enter key to confirm it.<br />
10 The Volume Creation screen shows the volume set default attribute values<br />
that are currently being configured. The attribute column headings<br />
are:<br />
The RAID Level,<br />
The Stripe Size,<br />
The SCSI HOST/SCSI ID/SCSI LUN (MR5S1)<br />
The IDE Host channel /IDE Driver select (MR5CT1)<br />
The Cache Mode,<br />
The Tagged Queuing,<br />
The SCSI Max Rate (MR5S1),<br />
The IDE Xfer Mode (MR5CT1) and<br />
The Volume Name (number).<br />
The user can change all values<br />
After the current volume set attributes are defined, press Esc key to enter<br />
Initialization selection screen.<br />
136