Installation manual for 1.6 using LPC rebuild board - Xbox-Scene.com
Installation manual for 1.6 using LPC rebuild board - Xbox-Scene.com
Installation manual for 1.6 using LPC rebuild board - Xbox-Scene.com

Create successful ePaper yourself
Turn your PDF publications into a flip-book with our unique Google optimized e-Paper software.
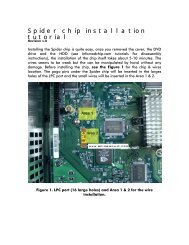
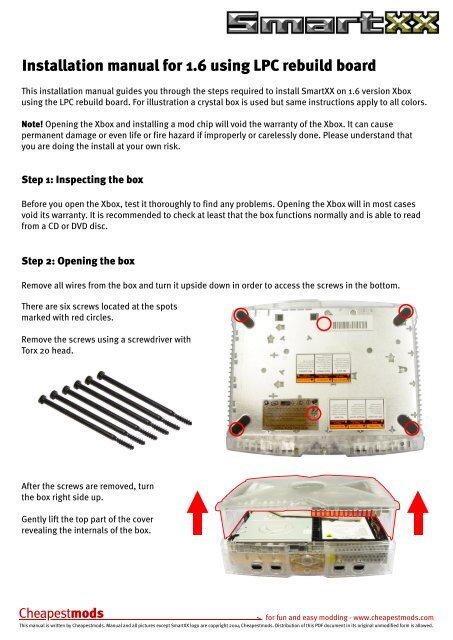
<strong>Installation</strong> <strong>manual</strong> <strong>for</strong> <strong>1.6</strong> <strong>using</strong> <strong>LPC</strong> <strong>rebuild</strong> <strong>board</strong>This installation <strong>manual</strong> guides you through the steps required to install SmartXX on <strong>1.6</strong> version <strong>Xbox</strong><strong>using</strong> the <strong>LPC</strong> <strong>rebuild</strong> <strong>board</strong>. For illustration a crystal box is used but same instructions apply to all colors.Note! Opening the <strong>Xbox</strong> and installing a mod chip will void the warranty of the <strong>Xbox</strong>. It can causepermanent damage or even life or fire hazard if improperly or carelessly done. Please understand thatyou are doing the install at your own risk.Step 1: Inspecting the boxBe<strong>for</strong>e you open the <strong>Xbox</strong>, test it thoroughly to find any problems. Opening the <strong>Xbox</strong> will in most casesvoid its warranty. It is re<strong>com</strong>mended to check at least that the box functions normally and is able to readfromaCDorDVDdisc.Step 2: Opening the boxRemove all wires from the box and turn it upside down in order to access the screws in the bottom.There are six screws located at the spotsmarked with red circles.Remove the screws <strong>using</strong> a screwdriver withTorx 20 head.After the screws are removed, turnthe box right side up.Gently lift the top part of the coverrevealing the internals of the box.<strong>for</strong> fun and easy modding - www.cheapestmods.<strong>com</strong>This <strong>manual</strong> is written by Cheapestmods. Manual and all pictures except SmartXX logo are copyright 2004 Cheapestmods. Distribution of this PDF document in its original unmodified <strong>for</strong>m is allowed.
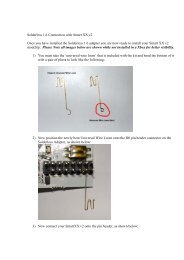
Step 3: Removing the DVD and HDD trayIn order to access the mother<strong>board</strong>, the DVDand HDD tray must be removed.Remove the data and power cables from bothHard Drive and DVD Drive.After unplugging the cables unscrew the screw(1) that is holding the HDD tray in place. Removethe HDD tray (A) by lifting it up.Unscrew the two screws (2) that are holding theDVDtrayinplace.RemovetheDVDtray(B)bylifting it up.2B12ADetach all cables that are connected to themother<strong>board</strong>.- Power cable- Front panel cable- Fan power cable- Game port cables (2)- IDE cable- DVD drive power and control cable<strong>for</strong> fun and easy modding - www.cheapestmods.<strong>com</strong>This <strong>manual</strong> is written by Cheapestmods. Manual and all pictures except SmartXX logo are copyright 2004 Cheapestmods. Distribution of this PDF document in its original unmodified <strong>for</strong>m is allowed.
The mother<strong>board</strong> is secured with 10 Torx 10screws. Unscrew the screws circled on thepicture.After the screws have been removed, themother<strong>board</strong> can be taken out from the <strong>Xbox</strong>case by first tilting it (1) and then sliding ittowards the front of the <strong>Xbox</strong> (2).Note: Do not use excessive <strong>for</strong>ce whenremoving the mother<strong>board</strong>. It should <strong>com</strong>e outeasily.21<strong>for</strong> fun and easy modding - www.cheapestmods.<strong>com</strong>This <strong>manual</strong> is written by Cheapestmods. Manual and all pictures except SmartXX logo are copyright 2004 Cheapestmods. Distribution of this PDF document in its original unmodified <strong>for</strong>m is allowed.
Step 5: Soldering <strong>LPC</strong> <strong>rebuild</strong> <strong>board</strong> in placePut <strong>rebuild</strong> <strong>board</strong> on the bottom side of themother<strong>board</strong> over the unsoldered points of thepinheader.Verify that it is properly alignedMake sure the <strong>rebuild</strong> <strong>board</strong> is lying tightly withthe mothe<strong>board</strong> so that there is no spacebetween the two.Solder all spots marked with yellow arrow inorder.Note: Ensure all points of the <strong>rebuild</strong> moduleare making contact with the correspondingpoints of the mother<strong>board</strong>.Put a wire through the hole between D0 solderpads. Solder the wire to D0 solder pad. (whitearrow)<strong>for</strong> fun and easy modding - www.cheapestmods.<strong>com</strong>This <strong>manual</strong> is written by Cheapestmods. Manual and all pictures except SmartXX logo are copyright 2004 Cheapestmods. Distribution of this PDF document in its original unmodified <strong>for</strong>m is allowed.
Step 6: Placing and soldering the SmartXX chipPut the SmartXX chip on top of the pinheaderand gently push it so that the pinheader pinssink in the pinheader socket (the black thing onthe chip)Solder the other end of the wire that isconnected to the <strong>rebuild</strong> module Lframe/D0solder pad to the pin labeled as D0 on theSmartXX.Step 7: Putting the mother<strong>board</strong> back in case and testingPut the mother<strong>board</strong> back in case by firstsliding it tilted towards the back of the case (1)and then leveling the <strong>board</strong> (2).Do not use excessive <strong>for</strong>ce when puttingmother<strong>board</strong> in.12<strong>for</strong> fun and easy modding - www.cheapestmods.<strong>com</strong>This <strong>manual</strong> is written by Cheapestmods. Manual and all pictures except SmartXX logo are copyright 2004 Cheapestmods. Distribution of this PDF document in its original unmodified <strong>for</strong>m is allowed.
This is the most efficient time to testyour <strong>Installation</strong>. If there is an instalationproblem there will be minimaldisassembly required.NOTE: DO AT YOUR OWN RISK. THERE IS ARISK OF ELECTRIC SHOCK AND PERSONALINJURY INVOLVED IN KEEPING THE XBOXOPEN WHILE POWER IS CONNECTED. Ifyou feel unsure about this, follow thenext steps of fully assembling the boxbe<strong>for</strong>e connecting powerAttach the following cables:- Power cable- Front panel cable (yellow or brown)- Fan power cable- Game port cables (2)After this plug in the power cord (and optionally AV cable) and press thepower button on the front panel. If everything worked correctly the Leds onthe SmartXX will start blinking red and blue alternating.KEEP OUT OF THISAREA WHEN POWERIS CONNECTED!Ensure that nothingenters this area whenpower cord is pluggedin (your hand, yourpets, any objects etc.)If leds do not blink in correct sequence please check all solder points.Step 8: Reassembling the <strong>Xbox</strong>Secure the mother<strong>board</strong> with 10 Torx 10 screws.Put a screw in each place circled in the picture.<strong>for</strong> fun and easy modding - www.cheapestmods.<strong>com</strong>This <strong>manual</strong> is written by Cheapestmods. Manual and all pictures except SmartXX logo are copyright 2004 Cheapestmods. Distribution of this PDF document in its original unmodified <strong>for</strong>m is allowed.