- Page 1 and 2:
0CVP0-01D (Replaces:0CVP0-01C)Indoo
- Page 3 and 4:
Introduction1. PrefaceR410A Modelis
- Page 5 and 6:
Indoor unitGeneral Information1. Mo
- Page 7 and 8:
2. External AppearanceCeiling Casse
- Page 9:
4. Indoor Unit Capacity IndexINDOOR
- Page 12:
1. List of functionsCategoryFunctio
- Page 16 and 17:
5. Wiring DiagramsTJ ChassisCassett
- Page 18 and 19:
6.2 Heating CapacityHeating capacit
- Page 20 and 21:
ARNU12GTJ*2CoolingHeatingDischarge
- Page 22 and 23:
9. Sound LevelsOverall1.5mNotes:- S
- Page 24 and 25:
10.2 Ceiling opening dimensions and
- Page 26 and 27:
10.4 Installation of Decoration Pan
- Page 28 and 29:
Remote Contro lerTEMPRemote Control
- Page 30 and 31:
Ceiling Cassette 2-Way1. List of fu
- Page 32 and 33:
2. Specifications* Model NameA:Basi
- Page 34 and 35:
3. DimensionsCeiling Cassette 2-way
- Page 36 and 37:
TL Chassis5. Wiring Diagrams2Casset
- Page 38 and 39:
Cooling capacityCapacityIndexOutdoo
- Page 40 and 41:
Heating capacityCapacityIndex7.1Out
- Page 42 and 43:
8. Electric CharacteristicsUnitsPow
- Page 44 and 45:
Remote ControllerTEMP10. Installati
- Page 46 and 47:
Hanging bolt(W3/8 or M10)Nut(W3/8 o
- Page 48 and 49:
10.5 Indoor Unit Drain Piping• Dr
- Page 50 and 51:
11. AccessoriesStandard Accessories
- Page 52 and 53:
1. List of functionsCategoryAir flo
- Page 54 and 55:
* Model NameA:Basic, C:PlasmaCoolin
- Page 56 and 57:
TypeModelUnitCooling CapacitykWkcal
- Page 58 and 59:
204652540Ceiling Cassette 4-wayARNU
- Page 60 and 61:
Ceiling Cassette 4-wayARNU42GTM*2AR
- Page 62 and 63:
TE Chassis5. Wiring DiagramsCassett
- Page 64 and 65:
6. Capacity Tables6.1 Cooling Capac
- Page 66 and 67:
Cooling capacityCapacityIndex8.210.
- Page 68 and 69:
6.2 Heating CapacityHeating capacit
- Page 70 and 71:
Heating capacityCapacityIndex8.210.
- Page 72 and 73:
7. Air Velocity and Temperature Dis
- Page 74 and 75:
ARNU24GTP*2Discharge angle: 40°Air
- Page 76 and 77:
ARNU48GTM*2CoolingHeatingDischarge
- Page 78 and 79:
9. Sound LevelsOverall1.5mCeilingNo
- Page 80 and 81:
Remote ControllerTEMP10. Installati
- Page 82 and 83:
CeilingHanging bolt(W3/8 or M10)Nut
- Page 84 and 85:
10.5 Indoor Unit Drain Piping• Dr
- Page 86 and 87:
11. AccessoriesStandard Accessories
- Page 88 and 89:
1. List of functionsCategoryAir flo
- Page 90 and 91:
TypeModelCooling CapacityHeating Ca
- Page 92 and 93:
TypeModelCooling CapacityHeating Ca
- Page 94 and 95:
Ceiling Concealed Duct- High Static
- Page 96 and 97:
Ceiling Concealed Duct (High Static
- Page 98 and 99:
BH Chassis5. Wiring DiagramsCeiling
- Page 100 and 101:
B8 ChassisCeiling Concealed Duct- H
- Page 102 and 103:
Cooling capacityCapacityIndex4.55.6
- Page 104 and 105:
Cooling capacityCapacityIndex14.122
- Page 106 and 107:
Heating capacityCapacityIndex4.55.6
- Page 108 and 109:
Heating capacityCapacityIndex14.122
- Page 110 and 111:
URNU76GB8A2, URNU96GB8A2(Unit: CMM)
- Page 112 and 113:
ARNU48GBRA2Capacity Mode Set value4
- Page 114 and 115:
9. Sound LevelsOverallDISCHARGEDUCT
- Page 116 and 117:
Remote ControllerTEMP10. Installati
- Page 118 and 119:
NOTE:• Throughly study the follow
- Page 120 and 121:
10.5 Indoor Unit Drain Piping• Dr
- Page 122 and 123:
Remote Contro lerTEMPRemote Control
- Page 124 and 125:
Ceiling Concealed Duct(Low Static)1
- Page 126 and 127:
2. SpecificationsTypeModelCooling C
- Page 128 and 129:
3. Dimensions & Gravity pointCeilin
- Page 130 and 131:
B1/B2 Chassis5. Wiring DiagramsCeil
- Page 132 and 133:
Cooling capacityCapacityIndex4.55.6
- Page 134 and 135:
Heating capacityCapacityIndex4.55.6
- Page 136 and 137:
URNU07GB1G1, URNU09GB1G1, URNU12GB1
- Page 138 and 139: 9. Sound LevelsOverall2.0mModel Nam
- Page 140 and 141: 10.2 Ceiling dimension and hanging
- Page 142 and 143: 10.5 Ground drain pipinga) It is st
- Page 144 and 145: 11. AccessoriesStandard Accessories
- Page 146 and 147: 1. List of FunctionsCategoryAir flo
- Page 148 and 149: TypeAccessoryModelCooling CapacityH
- Page 150 and 151: 4. Piping DiagramsTh3Heat Exchanger
- Page 152 and 153: 6. Capacity Tables6.1 Cooling Capac
- Page 154 and 155: 6.2 Heating CapacityHeating capacit
- Page 156 and 157: 7. External Static Pressure (E.S.P)
- Page 158 and 159: 8. Electric CharacteristicsUnitsPow
- Page 160 and 161: Remote ControllerRemote ControllerT
- Page 162 and 163: 10.2 Ceiling dimension and hanging
- Page 164 and 165: 10.4 Part name and functionsAir out
- Page 166 and 167: CAUTION1. Install declination of th
- Page 168 and 169: Remote Contro lerTEMPRemote Control
- Page 170 and 171: Wall Mounted1. List of functions2.
- Page 172 and 173: 2. Specifications* Model NameA:Basi
- Page 174 and 175: 3. DimensionsWall MountedARNU07GSE*
- Page 176 and 177: 4. Piping DiagramsHeat ExchangerEEV
- Page 178 and 179: 6. Capacity Tables6.1 Cooling Capac
- Page 180 and 181: 6.2 Heating CapacityHeating Capacit
- Page 182 and 183: 7. Air Velocity and Temperature Dis
- Page 184 and 185: 8. Electric CharacteristicsUnitsPow
- Page 186 and 187: 10. Installation• Please read the
- Page 190 and 191: 3. Insert the connecting cable into
- Page 192 and 193: 10.2 Connection of Pipings1. To rem
- Page 194 and 195: Remote Contro lerTEMPRemote Control
- Page 196 and 197: ART COOL Mirror1. List of functions
- Page 198 and 199: 2. SpecificationsCooling CapacityHe
- Page 200 and 201: 3. DimensionsART COOL MirrorARNU07G
- Page 202 and 203: 4. Piping DiagramsHeat ExchangerEEV
- Page 204 and 205: S3 ChassisBLDCMOTORART COOL MirrorD
- Page 206 and 207: Cooling CapacityCapacityIndex4.55.6
- Page 208 and 209: Heating CapacityCapacityIndex4.55.6
- Page 210 and 211: 8. Electric CharacteristicsUnitsPow
- Page 212 and 213: 10. Installation• Please read thi
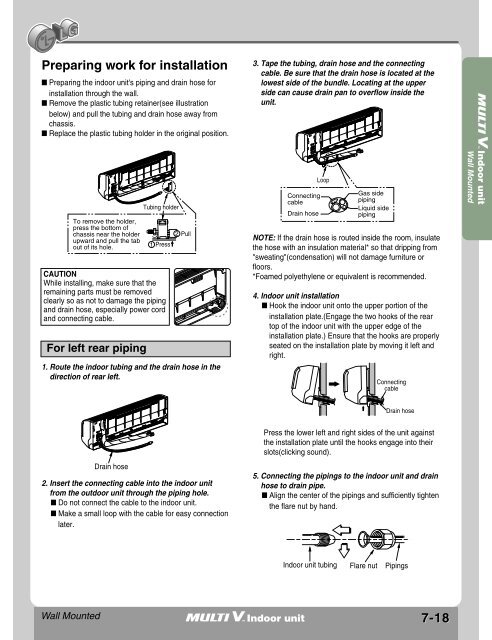
- Page 214 and 215: Preparing work for installation■
- Page 216 and 217: 3. Insert the connecting cable into
- Page 218 and 219: 10.2 Connection of Pipings1. To rem
- Page 220 and 221: Remote Contro lerTEMPRemote Control
- Page 222 and 223: 1. List of functions2. Specificatio
- Page 224 and 225: 2. SpecificationsCooling CapacityHe
- Page 226 and 227: 4. Piping DiagramsHeat ExchangerEEV
- Page 228 and 229: 6. Capacity Tables6.1 Cooling Capac
- Page 230 and 231: 7. Electric CharacteristicsUnitsPow
- Page 232 and 233: 9. Installation• Please read the
- Page 234 and 235: 9.3 Fixing Indoor Unit1. Attach an
- Page 236 and 237: Good caseCAUTION: Installation Info
- Page 238 and 239:
9.7 Connect the cable to the Indoor
- Page 240 and 241:
10. AccessoriesStandard Accessories
- Page 242 and 243:
1. List of functionsCategoryAir flo
- Page 244 and 245:
Cooling CapacityHeating CapacityCas
- Page 246 and 247:
Ceiling Suspended80041ARNU18GVJA2AR
- Page 248 and 249:
VE Chassis5. Wiring DiagramsCeiling
- Page 250 and 251:
6. Capacity Tables6.1 Cooling Capac
- Page 252 and 253:
6.2 Heating CapacityHeating capacit
- Page 254 and 255:
7. Electric CharacteristicsSymbols:
- Page 256 and 257:
9. Installation• Please read this
- Page 258 and 259:
VE Chassis9.2 Installation MapNOTIC
- Page 260 and 261:
9.5 Mounting the installation plate
- Page 262 and 263:
: Installation Information For righ
- Page 264 and 265:
VJ Chassis9.9 Select the best Locat
- Page 266 and 267:
MOUNTING THE ANCHOR NUT ANDBOLT•
- Page 268 and 269:
9.12 Checking the Drainage1. Set th
- Page 270 and 271:
CAUTION:After the confirmation of t
- Page 272 and 273:
10. AccessoriesStandard Accessories
- Page 274 and 275:
1. List of functionsCategoryAir flo
- Page 276 and 277:
TypeModelCooling CapacityHeating Ca
- Page 278 and 279:
TypeFloor StandingTransmission cabl
- Page 280 and 281:
Floor StandingARNU18GCFA2ARNU24GCFA
- Page 282 and 283:
CE/CF Chassis5. Wiring DiagramsFloo
- Page 284 and 285:
Cooling capacityCapacityIndex4.55.6
- Page 286 and 287:
Heating capacityCapacityIndex4.55.6
- Page 288 and 289:
8. Electric CharacteristicsUnitsMod
- Page 290 and 291:
Remote ControllerTEMP10. Installati
- Page 292 and 293:
Bolt pitch• Positioning of holes
- Page 294 and 295:
10.5 Wiring ConnectionConnect the w
- Page 296 and 297:
11. AccessoriesStandard Accessories