TECHNICAL & SERVICE MANUAL Ceiling Cassettes ... - Engvent.ru
TECHNICAL & SERVICE MANUAL Ceiling Cassettes ... - Engvent.ru
TECHNICAL & SERVICE MANUAL Ceiling Cassettes ... - Engvent.ru

You also want an ePaper? Increase the reach of your titles
YUMPU automatically turns print PDFs into web optimized ePapers that Google loves.
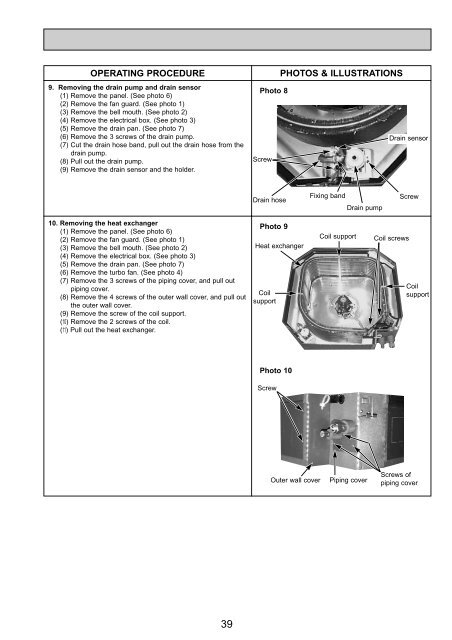
OPERATING PROCEDURE9. Removing the drain pump and drain sensor(1) Remove the panel. (See photo 6)(2) Remove the fan guard. (See photo 1)(3) Remove the bell mouth. (See photo 2)(4) Remove the electrical box. (See photo 3)(5) Remove the drain pan. (See photo 7)(6) Remove the 3 screws of the drain pump.(7) Cut the drain hose band, pull out the drain hose from thedrain pump.(8) Pull out the drain pump.(9) Remove the drain sensor and the holder.PHOTOS & ILLUSTRATIONSPhoto 8Drain sensorScrewDrain hoseFixing bandDrain pumpScrew10. Removing the heat exchanger(1) Remove the panel. (See photo 6)(2) Remove the fan guard. (See photo 1)(3) Remove the bell mouth. (See photo 2)(4) Remove the electrical box. (See photo 3)(5) Remove the drain pan. (See photo 7)(6) Remove the turbo fan. (See photo 4)(7) Remove the 3 screws of the piping cover, and pull outpiping cover.(8) Remove the 4 screws of the outer wall cover, and pull outthe outer wall cover.(9) Remove the screw of the coil support.(10) Remove the 2 screws of the coil.(11) Pull out the heat exchanger.Photo 9Heat exchangerCoilsupportCoil supportCoil screwsCoilsupportPhoto 10ScrewOuter wall coverPiping coverScrews ofpiping cover39