assembly and erection of pamunkey river bridge bascules
assembly and erection of pamunkey river bridge bascules
assembly and erection of pamunkey river bridge bascules
- No tags were found...

Create successful ePaper yourself
Turn your PDF publications into a flip-book with our unique Google optimized e-Paper software.
The engineer’s estimate for this machinery was twice that <strong>of</strong> a conventional design, at acost <strong>of</strong> approximately $2m extra, <strong>and</strong> the bascule spans had to be lengthened by 5 feet toprovide sufficient space in the machinery rooms for this large equipment. (Figure 4)Figure 4 – Machinery Layout: Dual Independent Drive Systems4
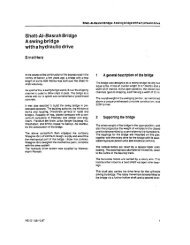
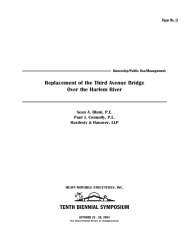
3. FABRICATION, OFFSITE ASSEMBLY, AND TRANSPORTMethodologyMachinery manufacture originated at various locations across the US; however, the finalmachining <strong>and</strong> point <strong>of</strong> shipment was Miami, Florida. The bascule steel was fabricatedin Palatka, Florida at a facility on the St. Johns River. It was originally planned to shipthe machinery components <strong>and</strong> bascule steel together by barge to Virginia, where thecontractor would assemble each bascule into two pieces at an <strong>of</strong>fsite facility. The fourpreassembled pieces, two counterweights <strong>and</strong> two leaves, would then be loaded onto two150’ by 55’ barges <strong>and</strong> transported approximately 75 miles to the project site, where a350-ton stiffleg derrick would lift the pieces into position 55’ above the waterway.However, as fabrication proceeded, the advantages <strong>of</strong> a revised sequence became clear:assembling the bascule structures on transport barges in Florida, instead <strong>of</strong> at the yardin Virginia, would provide a significant schedule benefit by allowing <strong>assembly</strong> to beginduring fabrication. This advantage was important, as the bascule work was on the projectcritical path. The revised sequence also eliminated the requirement for temporarysupport foundations at the <strong>assembly</strong> yard in Virginia, as well as for the heavy lifts <strong>of</strong> thepreassembled pieces onto barges in Virginia. Disadvantages <strong>of</strong> this scheme included theincreased towing costs from Florida to Virginia, as two tugboats per barge would berequired due to the height <strong>of</strong> the assembled pieces, <strong>and</strong> the reduced degree <strong>of</strong> <strong>of</strong>fsite<strong>assembly</strong> possible in Florida.Consideration was given to whether the preassembled pieces, approximately 30’ tall <strong>and</strong>77’ wide, would be transported to Virginia via the Atlantic Intracoastal Waterway (AIW)or <strong>of</strong>fshore as an ocean tow. After weighing the costs <strong>and</strong> risks, the contractor selectedthe AIW option. However, due to the width restrictions <strong>of</strong> the inl<strong>and</strong> waterway, only theportion <strong>of</strong> the bascule spans between <strong>and</strong> including the bascule girders (approximately50’ wide) could be preassembled, while the remaining steel outside the bascule girderswas shipped loose <strong>and</strong> was attached upon the barges’ arrival at the jobsite. (Figure 5)Figure 5 – Barge Transport <strong>of</strong> Bascule Heel (Counterweight) <strong>and</strong> Toe Sections5
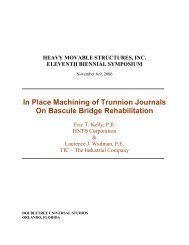
Trunnion Shafts <strong>and</strong> HubsThe size <strong>and</strong> weight <strong>of</strong> the span-mounted machinery components presented their ownfabrication challenges. The trunnion shafts were forged at a facility utilizing a 5,000-tonpress—the largest in the country. Careful consideration had to be given to the sequencefor fitting the trunnion shafts to the hubs <strong>and</strong> the hubs to the bascule girders, both <strong>of</strong>which were specified as ANSI class FN3 interference fits. (Several papers have beenwritten on this topic <strong>and</strong> varied sequences used in the past.) The size <strong>of</strong> the pieces,available shop h<strong>and</strong>ling equipment, heating <strong>and</strong> cooling capabilities, <strong>and</strong> the internalstresses in the hubs caused by the heating <strong>and</strong> cooling process were all factors to beconsidered.The decision was made to fit thehubs to the bascule girders first <strong>and</strong>then the shafts to the hubs. Thissequence reduced the possibility<strong>of</strong> cracking the hubs due to the hightensile stresses experienced if thehub-<strong>and</strong>-shaft <strong>assembly</strong> were cooledexternally as a single unit. Thesestresses would be caused by thefaster cooling <strong>of</strong> the hubs <strong>and</strong> theslower cooling <strong>of</strong> the shafts due totheir higher thermal mass.After the hubs were fit to the basculegirders in the horizontal position,these assemblies were heated to270 degrees F <strong>and</strong> the shafts cooledto minus 90 degrees in order to fitthem to the hubs. (Figure 6) Thegirder-<strong>and</strong>-shaft units were thentransported outside, rotated into thevertical position, <strong>and</strong> lifted ontotemporary supports on the bargesfor the initial stages <strong>of</strong> <strong>assembly</strong>.Maneuvering the four bascule girdersections with the 12-ton, 17-footlongtrunnion shafts installedperpendicular to the webs requiredspecial lifting considerations.Figure 6 – Fitting the Cooled Trunnion Shaft into the Heated Bascule-Girder Hub6
4. ONSITE ASSEMBLY AND ERECTIONBascule Span Assembly <strong>and</strong> Lock BarsOverall bascule geometry <strong>and</strong> dimensions were controlled by st<strong>and</strong>ard survey methodsduring the initial stage <strong>of</strong> <strong>assembly</strong> in Florida. An as-built survey <strong>of</strong> the leaves wasprovided to the contractor for use in establishing the trunnion centerlines on site, fromwhich the remaining machinery layout was derived. Once the barges containing thepreassembled sections arrived at the jobsite, the remaining <strong>assembly</strong> was completed.The lock bars <strong>and</strong> sockets were installed <strong>and</strong> bolted in their final configuration on thefirst leaf, while the receiving sockets were temporarily attached to the opposing leaf withundersized bolts until achievement <strong>of</strong> final alignment. Splice plates were attached on oneside <strong>of</strong> the structural connections <strong>and</strong> as much <strong>of</strong> the electrical hardware <strong>and</strong> lubricationsystempiping installed as possible.Racks <strong>and</strong> PinionsThe machinery plans prohibited the finalalignment, drilling, reaming, <strong>and</strong> attachment<strong>of</strong> the racks to the underside <strong>of</strong> the basculegirders until the spans were set in place <strong>and</strong>aligned. The racks were originally to bedelivered to the steel fabrication yard during<strong>assembly</strong> in Florida <strong>and</strong> transported to thejobsite bolted in position on the underside <strong>of</strong>the bascule girders with temporary bolts insub-sized holes.Figure 7 – Temporary Positioning <strong>of</strong> Rack <strong>and</strong> PinionHowever, fabrication took considerably longer than anticipated because <strong>of</strong> factorsassociated with the size <strong>of</strong> the racks <strong>and</strong> pinions. The machine shop had to manufacturecustom tooling <strong>and</strong> use single-index cutting methods for the gear teeth, for instance, <strong>and</strong>the machining work was limited to the largest equipment in the shop. As a result, theracks <strong>and</strong> pinions were trucked directly to the jobsite just prior to setting each bascule inplace. Temporary supports were designed <strong>and</strong> fabricated to hang the 16-ton racks 35 feetabove the bascule pit floor so that they could be set in place prior to the counterweightsections. In order not to interfere with the setting <strong>of</strong> the <strong>bascules</strong>, the racks were set oneinch below <strong>and</strong> about 10 inches forward <strong>of</strong> their final position. (Figure 7)The pinion-gear assemblies also had to be set in place, <strong>of</strong>fset forward <strong>of</strong> their correctposition, before the racks <strong>and</strong> bascule spans were set. The pinions could not be installedin their final configuration, as they would engage the rack <strong>and</strong> be back-driven when thebascule was opened during initial testing. The pinions could easily be damaged duringthis back-driving, <strong>and</strong> their placement would also hinder the rack alignment process.Therefore, coupled anchor bolts were used so the pinions could be slid into positionafter the racks were aligned <strong>and</strong> then the upper portion <strong>of</strong> the anchor bolts installed.7
Trunnion BearingsEach trunnion bearing was set in position over its anchor bolts onto four shim packs onthe trunnion pedestals. The bearings were aligned to the trunnion centerline <strong>and</strong> adjustedbased on the assembled leaf as-built survey. The south bearings were set in their finalposition, while the north bearings were set ½” outside final position to allow clearancebetween the edge <strong>of</strong> the bearing <strong>and</strong> the trunnion shaft thrust collars while setting thecounterweight portion <strong>of</strong> the <strong>bascules</strong>. These bearings were then jacked into position afterthe <strong>bascules</strong> were set. To ensure full bearing on the ends <strong>of</strong> the shafts, it was necessary toset the bearings with a 0.004” per foot cross slope to accommodate the anticipateddeflection in the trunnion shafts once the entire load <strong>of</strong> the bascule was transferred to theshafts. The maximum allowable out-<strong>of</strong>-level tolerance was 0.002” per foot, checkedusing machinist’s levels. (Figure 8)Trunnion Shaft AlignmentFigure 8 – Trunnion Shaft <strong>and</strong> BearingWhile the bascule steel was still on the barge, the trunnion shafts were aligned byadjusting the position <strong>of</strong> the square end <strong>of</strong> the shafts where they pass through the trunniongirders. This was done by driving or withdrawing four tapered wedges between the fourfaces <strong>of</strong> each shaft <strong>and</strong> the trunnion girder web. This alignment accounted for theanticipated bending in the shafts caused by the load transfer to them once the bascule wasset. Alignment was checked using a piano wire stretched through the center bore <strong>of</strong> theshafts. A 72-pound weight was attached to one end <strong>of</strong> the wire so that the catenarydeflection could be calculated <strong>and</strong> a correction applied.8
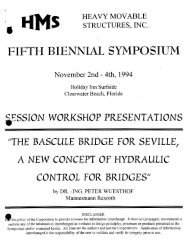
Erection <strong>of</strong> the Heel SectionA temporary support structure was erected in the bascule pit to support the counterweightin the closed position after setting. After the live load shoes were set in place, the tophalves <strong>of</strong> the trunnion bearings were removed <strong>and</strong> the lower halves cleaned. Speciallydesigned <strong>and</strong> fabricated padeyes were attached to the top <strong>of</strong> the bascule girders <strong>and</strong>counterweight box. The heel sections without the racks attached weighed 282 tons <strong>and</strong>were set in place by the 350-ton stiffleg derrick Samson during a one-day closure <strong>of</strong> thenavigation channel. After picking the load <strong>of</strong>f the barge, the crane was shifted intoposition, using a system <strong>of</strong> four winches <strong>and</strong> anchor lines, to set the load in place on thestructure. (Figure 9) The orientation <strong>of</strong> the load in the air was controlled by two airtuggerlines attached to the underside.Once the counterweight section was close enough to the structure, chain falls <strong>and</strong> cablecomealongs were attached to guide it into its final position on the lower half <strong>of</strong> thetrunnion bearings. The load was carefully set down on the bearings <strong>and</strong> the temporarysupports, checked for alignment, <strong>and</strong> the rigging unhooked. The weights were reattachedto the ends <strong>of</strong> the trunnion alignment wire <strong>and</strong> the ends <strong>of</strong> the shafts checked for beingcentered on the wire. The top halves <strong>of</strong> the trunnion bearings were set in place <strong>and</strong> thelive load shoes shimmed to elevation.Figure 9 – Erection <strong>of</strong> West Heel (Counterweight) Section9