D221600 Series_QSG_EN_R1 - Digimerge
D221600 Series_QSG_EN_R1 - Digimerge
D221600 Series_QSG_EN_R1 - Digimerge

Create successful ePaper yourself
Turn your PDF publications into a flip-book with our unique Google optimized e-Paper software.
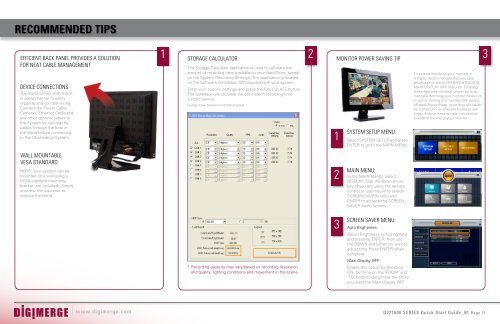
RECOMM<strong>EN</strong>DED TIPSEfficient back panel provides a solutionfor neat cable managementDevice ConnectionsThe stand comes with a builtin cable channel to easilyorganize and conceal wiring.Connect the Power Cable,Cameras, Ethernet Cable andany other optional cables tothe System by running thecables through the hole inthe stand before connectingto the Observation System.1Storage Calculator2The Storage Calculator application is used to calculate theamount of recording time available on your Hard Drive, basedon the System Recording Settings. This application is locatedon the Software Installation CD provided with your system.Enter your specific settings and press the CALCULATE button.The Software will calculate the estimated* recording time(circled below)Example shown below is for a 8 channel system.Monitor Power Saving Tip31System Setup Menu:Select SYSTEM SETUP and press<strong>EN</strong>TER to go to the MAIN M<strong>EN</strong>U.To extend the life of your monitor, itis highly recommended that you takeadvantage of the AUTO BRIGHTNESS &MAIN DISPLAY OFF features. Enablingthese features will save power by automaticallydimming your monitor when notin use or turning the monitor OFF duringoff-peak hours (Note: recording will neverbe turned OFF or affected by these settings).Follow these simple instructionsto extend the life of your monitor.WALL MOUNTABLEVESA STANDARDNOTE: Your system can bemounted on a wall using aVESA standard mountingbracket (not included). Simplyunscrew the 4 screws toremove the stand.2MAIN M<strong>EN</strong>U:In the MAIN M<strong>EN</strong>U, selectDISPLAY. Use the down arrowkey (if you are using the remotecontrol or use mouse to select)SCRE<strong>EN</strong> SAVER menu and<strong>EN</strong>TER to activate the SCRE<strong>EN</strong>SAVER menu options.* Recording capacity may vary based on recording resolutionand quality, lighting conditions and movement in the scene.3Screen Saver Menu:Auto Brightness:Adjust Brightness by highlightingand pressing <strong>EN</strong>TER, then usethe DOWN and UP arrow keys toadjust time.Press <strong>EN</strong>TER whencomplete.Main Display OFF:Enable this option by selectingON. Set time on the ‘FROM’ and‘TO’ fields to determine the timesyou want the Main Display OFF.www.digimerge.com <strong>D221600</strong> SERIES Quick Start Guide_<strong>R1</strong> Page 11