22TOP TIPS FORJETMOUNTER USERSTOP TIPS FOR JETMOUNTER USERS• Always make sure that you prepare your materials and artworkon a flat area. Never try to prepare your work on the laminator,as this will lead to poorly aligned jobs.• Always prepare your work on a clean surface, as dust or dirtcould become trapped in your job, leading to lumps and bumps.The best work surface is a professional cutting mat (page 38),which is blade proof, easy to keep clean and readily shows dirt.• Other great accessories for keeping your boards and printsclean are: Tac Cloths (page 12) for cleaning dust from boards,and the Dust Removal System roller for removing specs of dustfrom your artwork (see page 38).• When you are laminating, remember to include a waste edge oflaminate film along the leading edge of your work. Laminatesshould never be pressed directly onto your image, as fingermarks and air will be trapped in this leading edge.• Remember, when you mount and laminate images that areto be framed, you only need to purchase the frame itself. Thecost saving in terms of glass and frame backs “not-purchased”will enhance your profit margins.• When processing long prints on your JetMounter laminator,make sure you position yourself to the side of the machine soyou can easily remove silicone release liners. The silicone releaseliner should always be removed by pulling it back over theroller, while maintaining a tension in the film. If the print is reallybig, ask a helper to assist you until you are more experienced.• When working with linen finishes, take extra care to line up yourfilm’s “weave” with the edge of your images.• When using gloss finishes, such as Standard Gloss orUltra Gloss, it is pointless to mount to anything other than thesmoothest of boards.Foam Centred Board, Rigid PlasticBoard, Plexiglas, Aluminium and even smooth MDF are all recommendedsubstrates - mount board is not! Any board thatis even slightly textured will cause imperfections in your glosssurface. This is known as ‘orange peel’ and is most unflatteringto your work.• If you are using soft substrates with laminated images, rememberto always laminate the image first using a carrier board.If you attempt to laminate an image that has already beenmounted to foam centred board or mouse mat material, thesoft substrate will absorb all the pressure and result in a poorlylaminated image.• When you are opening a new roll of material, rememberto pull the special label off your box and insert it into the coreof your roll. It contains the batch number and product code foryour roll and saves time when you reorder.• Always keep your materials at room temperature (20°C).If pressure-sensitive materials are used below this temperature,their adhesive will be quite hard and may not flow properly.This may result in a weak bond. On laminates this can cause“silvering”, which is minute speckles of air that have not beenfilled with adhesive. Should you experience silvering, the conditioncan sometimes be “fixed” by allowing the piece to “cureitself out” in a warm place for a few hours. Try passing a hairdryerover the work, then process it through your JetMounteragain while it is hot. <strong>Press</strong>ure-sensitive materials only becomestronger when exposed to heat - so give it a go. Also, if youare working with lustred or stippled papers - warm the film upbefore applying it to the artwork.• When you are using roll materials, store the waste fromcut material inside the roll core. It will come in handy for smallerjobs and is often used by photographers for laminating prints infamily albums and Portfolio prints. You can even use off cuts toimprove the look of your business cards and hand-outs.• After using roll materials, make sure you tighten up the roll andtape it. Failure to do so may result in the materials picking upmoisture. <strong>Press</strong>ure-sensitive materials are made up of a combinationof plastics and papers. When moisture gets in, the paperswells, but the plastic doesn’t. This results in the paper liner(s)lifting from the film and causes “pipes”, making the materialsdifficult to work with. Why not make a Velcro ® reusable strap bysticking 650mm lengths of hook and loop Velcro back to back.As an extra protection, store your materials back in the originalplastic sleeve.• Remember to always leave your JetMounter rollersapart when the machine is not in use. Rollers left under pressuremay develop a “flat spot”, which can show on future work.• When not in use, the JetMounter is compact enough tobe removed from your work bench and stored on the floor or ina cupboard.• If you are working in a dusty environment it is advisable to coveryour JetMounter with a dust sheet.• To clean the rollers of your JetMounter we recommendlighter fluid, isopropyl alcohol or adhesive removers. Use a softcloth for cleaning.• Finally, remember that <strong>Hot</strong> <strong>Press</strong> provide the best technicalback-up of any adhesive supplier in the UK. With dealersnationwide, a team of on the road technical specialists and freetraining schools, we are here to make your JetMounter experiencea pleasurable and profitable one.
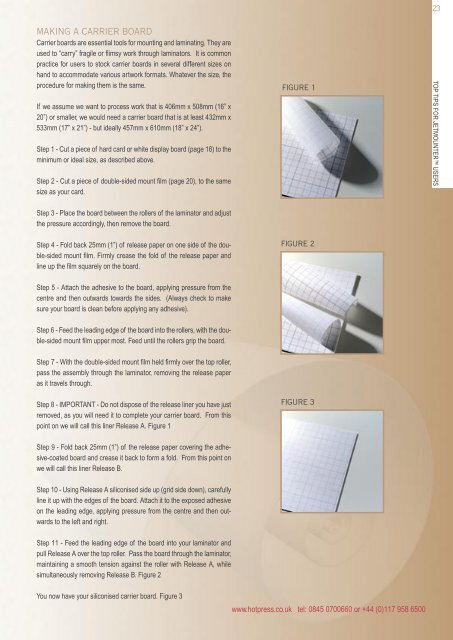
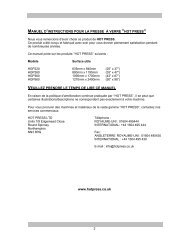
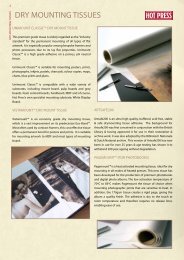
23MAKING A CARRIER BOARDCarrier boards are essential tools for mounting and laminating. They areused to “carry” fragile or flimsy work through laminators. It is commonpractice for users to stock carrier boards in several different sizes onhand to accommodate various artwork formats. Whatever the size, theprocedure for making them is the same.If we assume we want to process work that is 406mm x 508mm (16” x20”) or smaller, we would need a carrier board that is at least 432mm x533mm (17” x 21”) - but ideally 457mm x 610mm (18” x 24”).Step 1 - Cut a piece of hard card or white display board (page 18) to theminimum or ideal size, as described above.Step 2 - Cut a piece of double-sided mount film (page 20), to the samesize as your card.FIGURE 1TOP TIPS FOR JETMOUNTER USERSStep 3 - Place the board between the rollers of the laminator and adjustthe pressure accordingly, then remove the board.Step 4 - Fold back 25mm (1”) of release paper on one side of the double-sidedmount film. Firmly crease the fold of the release paper andline up the film squarely on the board.FIGURE 2Step 5 - Attach the adhesive to the board, applying pressure from thecentre and then outwards towards the sides. (Always check to makesure your board is clean before applying any adhesive).Step 6 - Feed the leading edge of the board into the rollers, with the double-sidedmount film upper most. Feed until the rollers grip the board.Step 7 - With the double-sided mount film held firmly over the top roller,pass the assembly through the laminator, removing the release paperas it travels through.Step 8 - IMPORTANT - Do not dispose of the release liner you have justremoved, as you will need it to complete your carrier board. From thispoint on we will call this liner Release A. Figure 1FIGURE 3Step 9 - Fold back 25mm (1”) of the release paper covering the adhesive-coatedboard and crease it back to form a fold. From this point onwe will call this liner Release B.Step 10 - Using Release A siliconised side up (grid side down), carefullyline it up with the edges of the board. Attach it to the exposed adhesiveon the leading edge, applying pressure from the centre and then outwardsto the left and right.Step 11 - Feed the leading edge of the board into your laminator andpull Release A over the top roller. Pass the board through the laminator,maintaining a smooth tension against the roller with Release A, whilesimultaneously removing Release B. Figure 2You now have your siliconised carrier board. Figure 3www.hotpress.co.uk tel: 0845 0700660 or +44 (0)117 958 6500