Product Catalogue - Hot Press
Product Catalogue - Hot Press
Product Catalogue - Hot Press
- No tags were found...

You also want an ePaper? Increase the reach of your titles
YUMPU automatically turns print PDFs into web optimized ePapers that Google loves.
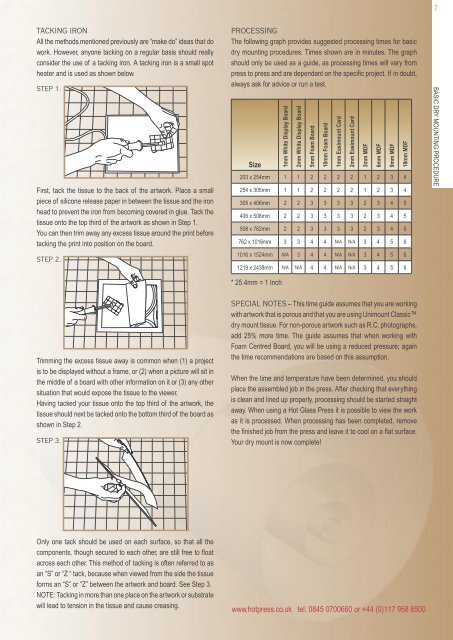
7TACKING IRONAll the methods mentioned previously are “make do” ideas that dowork. However, anyone tacking on a regular basis should reallyconsider the use of a tacking iron. A tacking iron is a small spotheater and is used as shown below.STEP 1.First, tack the tissue to the back of the artwork. Place a smallpiece of silicone release paper in between the tissue and the ironhead to prevent the iron from becoming covered in glue. Tack thetissue onto the top third of the artwork as shown in Step 1.You can then trim away any excess tissue around the print beforetacking the print into position on the board.STEP 2.PROCESSINGThe following graph provides suggested processing times for basicdry mounting procedures. Times shown are in minutes. The graphshould only be used as a guide, as processing times will vary frompress to press and are dependant on the specific project. If in doubt,always ask for advice or run a test.Size1mm White Display Board2mm White Display Board5mm Foam Board10mm Foam Board1mm Easimount Card2mm Easimount Card3mm MDF6mm MDF9mm MDF203 x 254mm 1 1 2 2 2 2 1 2 3 4254 x 305mm 1 1 2 2 2 2 1 2 3 4305 x 406mm 2 2 3 3 3 3 2 3 4 5406 x 508mm 2 2 3 3 3 3 2 3 4 5508 x 762mm 2 2 3 3 3 3 2 3 4 5762 x 1016mm 3 3 4 4 N/A N/A 3 4 5 61016 x 1524mm N/A 3 4 4 N/A N/A 3 4 5 61219 x 2438mm N/A N/A 4 4 N/A N/A 3 4 5 618mm MDFBASIC DRY MOUNTING PROCEDURE* 25.4mm = 1 InchTrimming the excess tissue away is common when (1) a projectis to be displayed without a frame, or (2) when a picture will sit inthe middle of a board with other information on it or (3) any othersituation that would expose the tissue to the viewer.Having tacked your tissue onto the top third of the artwork, thetissue should next be tacked onto the bottom third of the board asshown in Step 2.STEP 3.SPECIAL NOTES – This time guide assumes that you are workingwith artwork that is porous and that you are using Unimount Classicdry mount tissue. For non-porous artwork such as R.C. photographs,add 25% more time. The guide assumes that when working withFoam Centred Board, you will be using a reduced pressure; againthe time recommendations are based on this assumption.When the time and temperature have been determined, you shouldplace the assembled job in the press. After checking that everythingis clean and lined up properly, processing should be started straightaway. When using a <strong>Hot</strong> Glass <strong>Press</strong> it is possible to view the workas it is processed. When processing has been completed, removethe finished job from the press and leave it to cool on a flat surface.Your dry mount is now complete!Only one tack should be used on each surface, so that all thecomponents, though secured to each other, are still free to floatacross each other. This method of tacking is often referred to asan “S” or “Z “ tack, because when viewed from the side the tissueforms an “S” or “Z” between the artwork and board. See Step 3.NOTE: Tacking in more than one place on the artwork or substratewill lead to tension in the tissue and cause creasing.www.hotpress.co.uk tel: 0845 0700660 or +44 (0)117 958 6500