ANAMORPHIC LENS ATTACHMENT PLATE - Planar
ANAMORPHIC LENS ATTACHMENT PLATE - Planar
ANAMORPHIC LENS ATTACHMENT PLATE - Planar

Create successful ePaper yourself
Turn your PDF publications into a flip-book with our unique Google optimized e-Paper software.
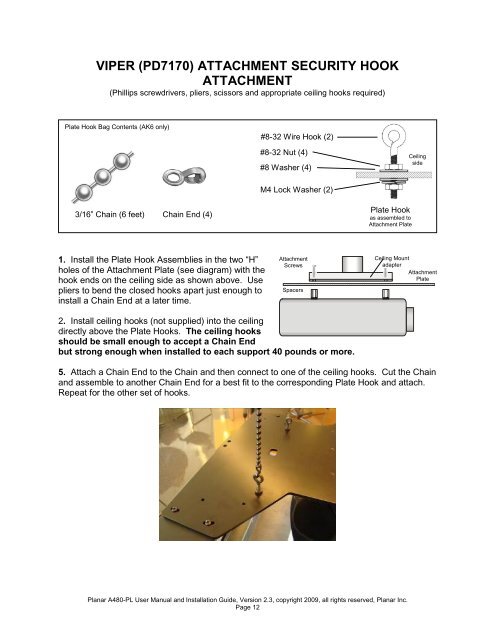
VIPER (PD7170) <strong>ATTACHMENT</strong> SECURITY HOOK<br />
<strong>ATTACHMENT</strong><br />
(Phillips screwdrivers, pliers, scissors and appropriate ceiling hooks required)<br />
Plate Hook Bag Contents (AK6 only)<br />
3/16” Chain (6 feet) Chain End (4)<br />
1. Install the Plate Hook Assemblies in the two “H”<br />
holes of the Attachment Plate (see diagram) with the<br />
hook ends on the ceiling side as shown above. Use<br />
pliers to bend the closed hooks apart just enough to<br />
install a Chain End at a later time.<br />
#8-32 Wire Hook (2)<br />
#8-32 Nut (4)<br />
#8 Washer (4)<br />
M4 Lock Washer (2)<br />
Attachment<br />
Screws<br />
Spacers<br />
2. Install ceiling hooks (not supplied) into the ceiling<br />
directly above the Plate Hooks. The ceiling hooks<br />
should be small enough to accept a Chain End<br />
but strong enough when installed to each support 40 pounds or more.<br />
Plate Hook<br />
as assembled to<br />
Attachment Plate<br />
5. Attach a Chain End to the Chain and then connect to one of the ceiling hooks. Cut the Chain<br />
and assemble to another Chain End for a best fit to the corresponding Plate Hook and attach.<br />
Repeat for the other set of hooks.<br />
<strong>Planar</strong> A480-PL User Manual and Installation Guide, Version 2.3, copyright 2009, all rights reserved, <strong>Planar</strong> Inc.<br />
Page 12<br />
Ceiling<br />
side<br />
Ceiling Mount<br />
adapter<br />
Attachment<br />
Plate