Configure RIPv2 Routing
Configure RIPv2 Routing
Configure RIPv2 Routing

You also want an ePaper? Increase the reach of your titles
YUMPU automatically turns print PDFs into web optimized ePapers that Google loves.
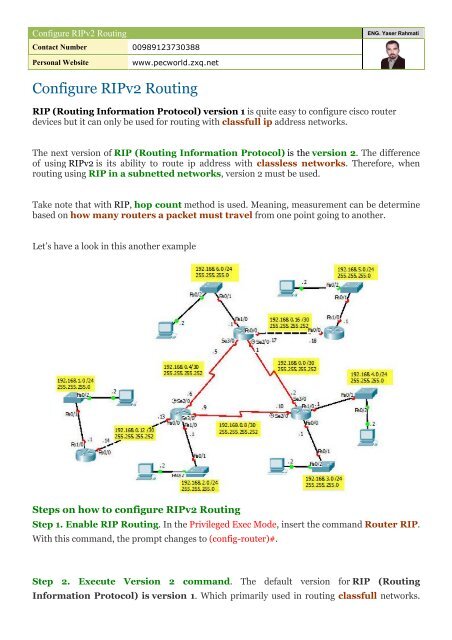
<strong>Configure</strong> <strong>RIPv2</strong> <strong>Routing</strong>Contact Number 00989123730388ENG. Yaser RahmatiPersonal Websitewww.pecworld.zxq.net<strong>Configure</strong> <strong>RIPv2</strong> <strong>Routing</strong>RIP (<strong>Routing</strong> Information Protocol) version 1 is quite easy to configure cisco routerdevices but it can only be used for routing with classfull ip address networks.The next version of RIP (<strong>Routing</strong> Information Protocol) is the version 2. The differenceof using <strong>RIPv2</strong> is its ability to route ip address with classless networks. Therefore, whenrouting using RIP in a subnetted networks, version 2 must be used.Take note that with RIP, hop count method is used. Meaning, measurement can be determinebased on how many routers a packet must travel from one point going to another.Let’s have a look in this another exampleSteps on how to configure <strong>RIPv2</strong> <strong>Routing</strong>Step 1. Enable RIP <strong>Routing</strong>. In the Privileged Exec Mode, insert the command Router RIP.With this command, the prompt changes to (config-router)#.Step 2. Execute Version 2 command. The default version for RIP (<strong>Routing</strong>Information Protocol) is version 1. Which primarily used in routing classfull networks.
<strong>Configure</strong> <strong>RIPv2</strong> <strong>Routing</strong>Contact Number 00989123730388ENG. Yaser RahmatiPersonal Websitewww.pecworld.zxq.netVersion 2 command switches from version 1 to 2. This enables Cisco routers to route ipnetworks with classless addresses.Step 3. Advertise your Networks. This is very important since only those that are listedbelow (entered into the router for routing) will be advertised (published to another routers).Format for listing subnetted network should be network . For example, if wewill try to add the network 192.168.0.8 with subnet mask of 255.255.255.252, the commandshould be network 192.168.0.8.Command SummaryR1R1(config)#router ripR1(config-router)#version 2R1(config-router)#network 192.168.6.0R1(config-router)#network 192.168.0.16R1(config-router)#network 192.168.0.0R1(config-router)#network 192.168.0.4R1(config-router)#endR2R2(config)#router ripR2(config-router)#version 2R2(config-router)#network 192.168.0.4R2(config-router)#network 192.168.0.8R2(config-router)#network 192.168.2.0R2(config-router)#network 192.168.0.12R2(config-router)#end
<strong>Configure</strong> <strong>RIPv2</strong> <strong>Routing</strong>Contact Number 00989123730388ENG. Yaser RahmatiPersonal Websitewww.pecworld.zxq.netR3R3(config)#router ripR3(config-router)#version 2R3(config-router)#network 192.168.0.0R3(config-router)#network 192.168.4.0R3(config-router)#network 192.168.3.0R3(config-router)#network 192.168.0.8R3(config-router)#endR4R4(config)#router ripR4(config-router)#version 2R4(config-router)#network 192.168.1.0R4(config-router)#network 192.168.0.12R4(config-router)#endR5R5(config)#router ripR5(config-router)#version 2R5(config-router)#network 192.168.0.16R5(config-router)#network 192.168.5.0R5(config-router)#end